Redux
Redux 诞生于前端社区,它的目的是用来解决复杂前端应用的状态问题。但是它的设计理念并不局限于前端,它甚至可以用在 Android ,以及 iOS 开发上。redux.dart 是基于 dart 语言的 redux 实现,配合 dart 生态,你可以在 Web ,或者 flutter 上使用它。
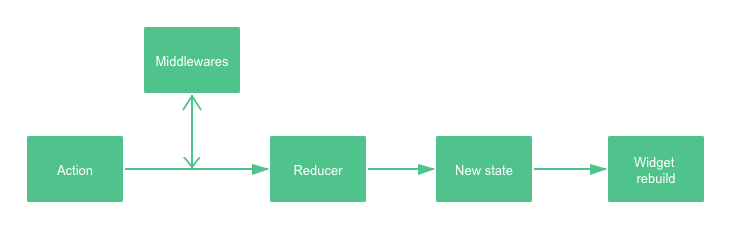
上图则是 redux 的数据流流程。
基本用法
import 'package:redux/redux.dart';

// Create typed actions. You will dispatch these in order to
// update the state of your application.
enum Actions {
  increment,
  decrement,
}

// Create a Reducer. A reducer is a pure function that takes the
// current State (int) and the Action that was dispatched. It should
// combine the two into a new state without mutating the state passed
// in! After the state is updated, the store will emit the update to
// the `onChange` stream.
//
// Because reducers are pure functions, they should not perform any
// side-effects, such as making an HTTP request or logging messages
// to a console. For that, use Middleware.
int counterReducer(int state, action) {
  if (action == Actions.increment) {
    return state + 1;
  } else if (action == Actions.decrement) {
    return state - 1;
  }

  return state;
}

// A piece of middleware that will log all actions with a timestamp
// to your console!
//
// Note, this is just an example of how to write your own Middleware.
// See the redux_logging package on pub for a pre-built logging
// middleware.
loggingMiddleware(Store<int> store, action, NextDispatcher next) {
  print('${new DateTime.now()}: $action');

  next(action);
}

main() {
  // Create the store with our Reducer and Middleware
  final store = new Store<int>(
    counterReducer,
    initialState: 0,
    middleware: [loggingMiddleware],
  );

  // Render our State right away
  render(store.state);

  // Listen to store changes, and re-render when the state is updated
  store.onChange.listen(render);

  // Attach a click handler to a button. When clicked, the `INCREMENT` action
  // will be dispatched. It will then run through the reducer, updating the
  // state.
  //
  // After the state changes, the html will be re-rendered by our `onChange`
  // listener above.
  querySelector('#increment').onClick.listen((_) {
    store.dispatch(Actions.increment);
  });
}

render(int state) {
  querySelector('#value').innerHtml = '${state}';
}
Actions
- 唯一改变 store 数据的手段
- 通过
store.dispatch执行
JS 版 Action:
{
  type: TOGGLE_TODO,
  index: 5
}
Dart 版 Action:
class AddTodoAction {
  final Todo todo;

  AddTodoAction(this.todo);
}
Reducers
- 处理改变 store 数据的逻辑
- Pure function, 无副作用
主要作用是根据传进来的 Action 生成新的 state:
(previousState, action) => nextStateStore
- 存储应用的状态
- 通常是一个大的对象
- store 里的 state 是不可变的,每次 action 都会生成新的 state
- 应用通过调用 store 的 dispatch 触发状态变更
- 应用通过调用
onChange监听 store 的数据变更
Middlewares
- 提供扩展,在 action 发起之后,以及在 reducer 执行之前触发
- 多用于日志记录,崩溃报告,调用异步接口等
异步 action
很多时候你需要执行一些异步操作,比如 API 接口请求,虽然这个步骤可以在 middleware 里面处理,但是实际上已有现成的 middleware 来帮我们处理异步 action,例如 redux_thunk :
import 'dart:async';

import 'package:redux/redux.dart';
import 'package:redux_thunk/redux_thunk.dart';

void main() {
  // First, create a quick reducer
  String reducer(String state, dynamic action) =>
      action is String ? action : state;

  // Next, apply the `thunkMiddleware` to the Store
  final store = Store<String>(
    reducer,
    middleware: [thunkMiddleware],
  );

  // Create a `ThunkAction`, which is any function that accepts the
  // Store as it's only argument. Our function (aka ThunkAction) will
  // simply send an action after 1 second.  This is just an example,
  // but  in real life, you could make a call to an HTTP service or
  // database instead!
  void action(Store<String> store) async {
    final String searchResults = await Future.delayed(
      Duration(seconds: 1),
      () => "Search Results",
    );

    store.dispatch(searchResults);
  }

  // Dispatch the action! The `thunkMiddleware` will intercept and invoke
  // the action function.
  store.dispatch(action);
}
与其 dispatch 一个普通的 class action,通过使用 thunk 中间件,你也可以 dispatch 一个异步函数,这个函数会接收 store 作为参数,然后你就可以在函数内部进行异步调用,然后再按需触发其他的 action 。
redux thunk 的实现原理非常简单,它本质上就是判断传进来的 action 是否是一个 ThunkAction ,是的话就调用它,否则调用
next 方法进入下一个中间件。dynamic thunkMiddleware<State>(
Store<State> store,
dynamic action,
NextDispatcher next,
) {
if (action is ThunkAction<State>) {
return action(store);
} else if (action is CallableThunkAction<State>) {
return action.call(store);
} else {
return next(action);
}
}使用 redux thunk 的好处是它可以让 action 更加灵活,开发者可以在 action 里面处理异步操作,无需单独创建 middleware 来实现同样的事情,代码更加集中和简洁。
Flutter redux
Redux 本质上是一个数据管理库,它跟 View 层是无关的。如果要在 flutter 使用 redux 的话,你需要一个桥梁来桥接 flutter 跟 redux ,这个桥梁就是 flutter_redux 。
Flutter redux 提供了三个组件:
StoreProvider
StoreProvider 是 flutter redux 的基础组件,在这里你传递 store 给它,然后在它的子组件里面就可以获取到 store 数据了。StoreProvider 本质上是一个 InheritedWidget 组件,它提供了 StoreProvider.of 方法用来快速获取 store 数据,前提是你必须在 StoreProvider 的子组件里面:import 'package:flutter/material.dart';
import 'package:flutter_redux/flutter_redux.dart';
import 'package:redux/redux.dart';
enum Actions { Increment }
int counterReducer(int state, dynamic action) {
if (action == Actions.Increment) {
return state + 1;
}
return state;
}
void main() {
final store = Store<int>(counterReducer, initialState: 0);
runApp(FlutterReduxApp(
title: 'Flutter Redux Demo',
store: store,
));
}
class FlutterReduxApp extends StatelessWidget {
final Store<int> store;
final String title;
FlutterReduxApp({Key key, this.store, this.title}) : super(key: key);
@override
Widget build(BuildContext context) {
return StoreProvider<int>(
store: store,
child: MaterialApp(
theme: ThemeData.dark(),
title: title,
home: Scaffold(
appBar: AppBar(
title: Text(title),
),
body: Center(
child: Column(
mainAxisAlignment: MainAxisAlignment.center,
children: [
Text(
'You have pushed the button this many times:',
),
StoreConnector<int, String>(
converter: (store) => store.state.toString(),
builder: (context, count) {
return Text(
count,
style: Theme.of(context).textTheme.display1,
);
},
)
],
),
),
floatingActionButton: Child(),
),
),
);
}
}
class Child extends StatefulWidget {
@override
State<StatefulWidget> createState() {
return ChildState();
}
}
class ChildState extends State {
void onPressed() {
var store = StoreProvider.of<int>(context);
store.dispatch(Actions.Increment);
}
@override
Widget build(BuildContext context) {
return FloatingActionButton(
onPressed: onPressed,
child: Icon(Icons.add),
);
}
}StoreConnector
StoreConnector 提供一种获取 store 数据的快捷方法,你可以根据 converter 方法来对 store 的状态进行转换,以此来得到适合组件使用的 state 。
StoreConnector<AppState, List<Todo>>(
  converter: (store) => store.state.todos,
  builder: (_, todos) {
    return new Text(
      'Todo count: ${todos.length}',
      textAlign: TextAlign.center,
      style: const TextStyle(fontSize: 20.0),
    );
  },
),
需要注意的是,默认情况下,StoreConnector 会在每次 store 的 state 发生变化时重新 rebuild 。即使你通过 converter 获取到的 state 并没有变化。如果你想尽可能减少 rebuild ,那么可以在 StoreConnector 传入
distinct: true 的参数:StoreConnector<AppState, List<Todo>>(
converter: (store) => store.state.todos,
distinct: true,
builder: (_, todos) {
return new Text(
'Todo count: ${todos.length}',
textAlign: TextAlign.center,
style: const TextStyle(fontSize: 20.0),
);
},
),这样 builder 方法只会在 converter 返回的数据发生变化之后才会重新执行。同时,如果你的 converter 返回的是一个 class ,那么你需要编写 class 的
== 和 hashCode ,这样才能让这个特性生效。StoreBuilder
StoreBuilder 本质上是基于 StoreConnector 的封装,两者区别在于,StoreConnector 可以通过传入 ViewModel 来获取所需要数据结构,而 StoreBuilder 则简单粗暴地把整个 store 传给 builder 。通常情况下推荐使用 StoreConnector 。
Mobx
与 redux 一样,Mobx 也是诞生于前端社区的又一个数据管理库,但是跟 redux 不同的是,它是基于响应式的。
基本用法
import 'package:flutter/material.dart';
import 'package:mobx/mobx.dart';
part 'counter.g.dart';
class Counter = CounterBase with _$Counter;
abstract class CounterBase with Store {
@observable
int value = 0;
@action
void increment() {
value++;
}
}
final counter = Counter();
final dispose = autorun((_) {
print(counter.value);
});
counter.value = 2;
counter.increment();
dispose();
// Prints:
// 0
// 2
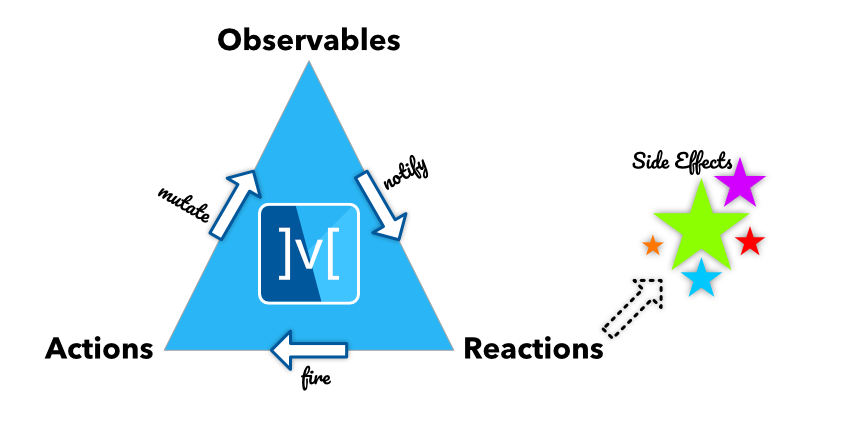
// 3Observables
Observables 是响应式的 state,它可以是简单的数字或字符串,也可以是一个复杂的对象。可以通过
Observable 来创建一个最基本的响应式 state:import 'package:mobx/mobx.dart';
final counter = Observable(0);也可以通过 mobx_codegen 来使用 annotation 来给 class 的属性声明 observable:
import 'package:mobx/mobx.dart';

part 'counter.g.dart';

class Counter = CounterBase with _$Counter;

abstract class CounterBase with Store {
  @observable
  int value = 0;

  @computed
  int get doubleValue => value * 2;
}
Actions
与 redux 的 action 不同,mobx 的 action 是用来改变 observable state 的。
final counter = Observable(0);

final increment = Action((){
  counter.value++;
});
import 'package:mobx/mobx.dart';
part 'counter.g.dart';
class Counter = CounterBase with _$Counter;
abstract class CounterBase with Store {
@observable
int value = 0;
@action
void increment() {
value++;
}
@action
Future<void> asyncAction() async {
value = 5;
await sleep();
value = 10; //This also notifies observers
}
}Reactions
Reactions 则是用来监听 observable 的变化。Mobx 提供了几个方法来实现 observable 的监听:
- autorun
- reaction
- when
- asyncWhen
Flutter mobx
与 flutter redux 类似,flutter mobx 为 flutter 和 mobx 提供了桥梁,它提供了 Observer 组件来实现 observable 对象的监听:
import 'package:flutter/material.dart';
import 'package:flutter_mobx/flutter_mobx.dart';
import 'package:mobx/mobx.dart';

part 'counter.g.dart';

class Counter = CounterBase with _$Counter;

abstract class CounterBase with Store {
  @observable
  int value = 0;

  @action
  void increment() {
    value++;
  }
}

class CounterExample extends StatefulWidget {
  const CounterExample({Key key}) : super(key: key);

  @override
  _CounterExampleState createState() => _CounterExampleState();
}

class _CounterExampleState extends State<CounterExample> {
  final _counter = Counter();

  @override
  Widget build(BuildContext context) => Scaffold(
        appBar: AppBar(
          title: const Text('Counter'),
        ),
        body: Center(
          child: Column(
            mainAxisAlignment: MainAxisAlignment.center,
            children: <Widget>[
              const Text(
                'You have pushed the button this many times:',
              ),
              Observer(
                  builder: (_) => Text(
                        '${_counter.value}',
                        style: const TextStyle(fontSize: 20),
                      )),
            ],
          ),
        ),
        floatingActionButton: FloatingActionButton(
          onPressed: _counter.increment,
          tooltip: 'Increment',
          child: const Icon(Icons.add),
        ),
      );
}
只要 observable 对象发生变化,那么 Observer 就会触发 rebuild 。
与 Redux 差异点
- store 的数据类型Redux 的 state 数据类型是普通的对象,而 mobx 的数据是 observable 类型
- state 的状态Redux 的 state 是不可变的,每次都会生成新的 state 。而 mobx 的 state 是可变的,action 可以直接修改 state 的数据。
- 学习曲线Mobx 更容易上手,学习曲线较为平缓。而 Redux 由于是基于函数式编程思想,因此入门门槛较高。另外 mobx 代码更为简洁一些,而 redux 需要创建很多模板代码。
- 可维护性相对而言,redux 可维护性更强。