

Using PVE to Run a Clash Bypass Router Virtual Machine for Transparent Proxying
Before I started tinkering with a bypass router, all the circumvention at home was done by installing an SS service on the router and implementing proxying at the router level, so that every networked device could enjoy the benefits of transparent proxying. But the router's performance was too poor and became a bottleneck. Later I ran a bypass router on a mini PC, and the circumvention performance directly saturated the bandwidth. The only thing is that the installation process was quite a hassle, so I'm recording it here to make it easier for others to learn from, and also for my own future reference.
Before I started tinkering with a bypass router, circumventing the Great Firewall at home meant installing an SS service on the router and implementing the proxy at the router level, so that every networked device could enjoy the benefits of a transparent proxy—that is, being able to happily access overseas websites without installing any software. But this approach had a fatal flaw: the router's performance was too poor, far from being able to saturate the bandwidth.
As for the devices I have on hand, the router is an ASUS AC86U. To be fair, this router's performance isn't bad—I bought it two years ago for over 800 RMB—but when running SS, the speed can't even reach 100 Mbps, while the home broadband is currently 500 Mbps down and 50 Mbps up, so the router's performance has become the bottleneck.
It was only after I bought Yunxuan's mini PC that I learned you could run a bypass router on it to achieve a transparent proxy. After trying it out, I was astonished—the bypass router's circumvention performance was far better than the AC86U's, running straight up to the bandwidth's maximum speed.
It's just that the bypass router installation process is still quite a hassle, and I took quite a few detours, so I'm recording it here to make it easier for others to learn from, and for my own future reference.
Before We Begin
Before I start explaining the process, let me first lay out the device requirements. In essence, a bypass router just means treating some device as a gateway, installing circumvention software on it, and then manually setting the gateway and DNS on the devices that need to circumvent the Great Firewall, thereby achieving a transparent proxy.
This bypass router device can be either physical hardware or a virtual machine; there isn't much difference between the two. You can use ESXi, Proxmox VE, or Synology's VMM to create this virtual machine, because the principle is the same.
Since I myself use PVE, I'll take PVE as the example here.
In addition, let me also talk about the choice of bypass router system and software. Currently the more mainstream options are:
- Use the LEDE system to run the koolss software
- Use the LEDE system to run the koolclash software
- Run the Clash software directly on a Linux system
As for the software, after trying out koolss and koolclash, I decisively chose the latter, because the latter offers more flexible node configuration and rule configuration, a more user-friendly UI, as well as real-time traffic records and real-time logs that can be queried. However, when using koolclash, I ran into a very strange problem: the software was all set up, but the device could only access some overseas websites. And certain overseas websites, such as Google, Twitter, Facebook, etc., could not be accessed. After searching online to no avail, I looked for other solutions. Finally, I found an article whose solution was to run Clash directly on a Linux system. After some tinkering, I found that this solution was viable, so I ultimately decided to use it.
Therefore, this article takes installing Clash under a Debian system as an example.
Software preparation
Since the steps for creating a virtual machine differ somewhat across the various platforms, and the method for creating a virtual machine is also very simple, the process of creating a Debian virtual machine is skipped.
After installing the Debian system, you need to set the system's IP address to a static address. Taking my own as an example, I set the IP address of the Debian bypass router to
192.168.1.80 , and the main router address to 192.168.1.1 . The specific setup method is to directly edit /etc/network/interfaces:# The loopback network interface
auto lo
iface lo inet loopback
# The primary network interface
allow-hotplug ens18
iface ens18 inet static
address 192.168.1.80/24
gateway 192.168.1.1
# dns-* options are implemented by the resolvconf package, if installed
dns-nameservers 192.168.1.1Here
ens18 is the name of my Debian virtual machine's network interface; everyone's network interface name may be different. If you want to check your own network interface name, you can do so by running ip link show to check.After editing, you need to restart the network:
sudo /etc/init.d/networking restartAt this point, barring any surprises, Debian's IP will have become the one we specified
192.168.1.80 .Once the network is ready, you need to first download the Clash software and set it as executable:
# 下载最新版 clash,注意根据自己的系统下载对应的版本,我的是 64 位的,所以下载的是 linux-amd64 这个版本
wget https://github.com/Dreamacro/clash/releases/download/v0.17.1/clash-linux-amd64-v0.17.1.gz
# 解压并且把二进制文件放到 /usr/bin ,并且加上可执行权限
gzip -d clash-linux-amd64-v0.17.1.gz
sudo mv clash-linux-amd64-v0.17.1 /usr/bin/clash
sudo chmod +x /usr/bin/clash
# 为 clash 添加绑定低位端口的权限,这样运行 clash 的时候无需 root 权限
sudo setcap cap_net_bind_service=+ep /usr/bin/clash
Create the Clash configuration file
Before running Clash, you need to first create a configuration file, otherwise Clash cannot start:
# 创建文件夹
mkdir -p ~/.config/clash
cd ~/.config/clash
# 创建配置文件
touch config.yaml
vim config.yaml
In
config.yaml file, fill in the following configuration:# 以下部分不要修改!
port: 7890
socks-port: 7891
redir-port: 7892
allow-lan: true
mode: Rule
log-level: info
# external-controller 主要是用于 web 端管理页面,必须监听在 0.0.0.0
external-controller: 0.0.0.0:9090
# secret 是进入管理面板所需要的密码,可填可不填,建议填上
secret: "secret-password"
# external-ui 表示管理面板的路径
external-ui: dashboard
dns:
enable: true
ipv6: false
listen: 0.0.0.0:53
enhanced-mode: fake-ip
fake-ip-range: 198.18.0.1/16
nameserver:
- '8.8.8.8'
# 下面部分则是代理的设置跟规则的设置,这里忽略不写。
Proxy:
...dnsnameserver192.168.1.1After creating the configuration file, you also need to download the front-end code of the management panel locally, so that after running clash, you can access it through
http://192.168.1.80:9090/ui/#/ the path.Currently, there are two management panels that are used more often. One isthe official management panel, and the other isa panel developed by a third-party developer. Based on the principle of good looks, I finally chose
haishanh/yacd 's panel. The specific installation method is:# 先进入到配置文件的目录
cd ~/.config/clash
# 下载前端代码压缩包,如果要使用官方的管理面板则把链接替换成 https://github.com/Dreamacro/clash-dashboard/archive/gh-pages.zip
wget https://github.com/haishanh/yacd/archive/gh-pages.zip
# 解压缩并且把目录名改成 dashboard
unzip gh-pages.zip
mv yacd-gh-pages/ dashboard/At this point, the configuration file and the management panel are both configured. Next, you need to set up the corresponding forwarding and routing.
Set up forwarding and routing
Edit
/etc/sysctl.conf the file to enable forwarding:sudo vim /etc/sysctl.conf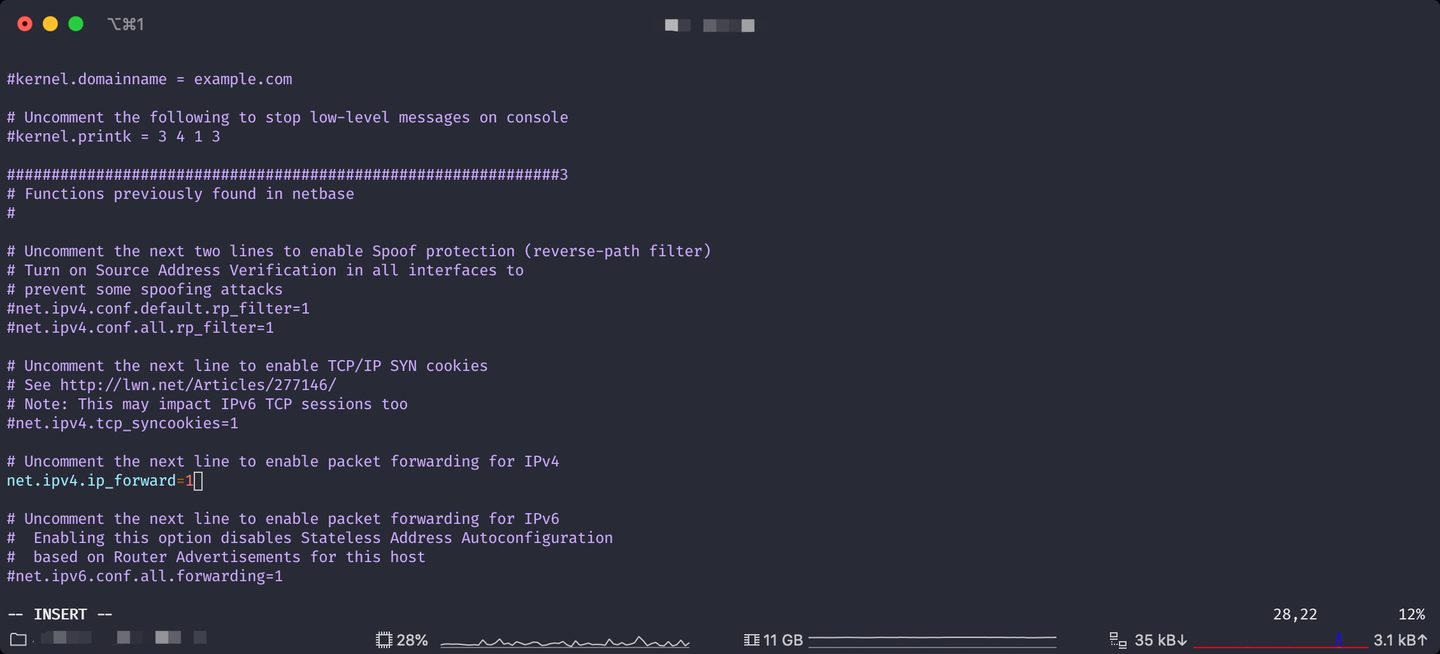
Find
net.ipv4.ip_forward=1 this line and uncomment it. Or the simplest way is to directly add this line of configuration at the top or bottom of the file, then save it.To make the previous modification take effect, you need to execute:
sudo sysctl -pThis enables forwarding. Next, you also need to enable iptables routing. Execute the following in order:
iptables -t nat -N clash
iptables -t nat -N clash_dns

iptables -t nat -A PREROUTING -p tcp --dport 53 -d 198.19.0.0/24 -j clash_dns
iptables -t nat -A PREROUTING -p udp --dport 53 -d 198.19.0.0/24 -j clash_dns
iptables -t nat -A PREROUTING -p tcp -j clash

# 这里需要注意的是,下面两行最后的 192.168.1.80 是当前旁路由的 IP 地址,请根据你自己的实际情况修改
# 如果你自己的旁路由 IP 跟下面的 IP 地址不对的话会造成无法翻墙
iptables -t nat -A clash_dns -p udp --dport 53 -d 198.19.0.0/24 -j DNAT --to-destination 192.168.1.80:53
iptables -t nat -A clash_dns -p tcp --dport 53 -d 198.19.0.0/24 -j DNAT --to-destination 192.168.1.80:53

iptables -t nat -A clash -d 0.0.0.0/8 -j RETURN
iptables -t nat -A clash -d 10.0.0.0/8 -j RETURN
iptables -t nat -A clash -d 127.0.0.0/8 -j RETURN
iptables -t nat -A clash -d 169.254.0.0/16 -j RETURN
iptables -t nat -A clash -d 172.16.0.0/12 -j RETURN
iptables -t nat -A clash -d 192.168.0.0/16 -j RETURN
iptables -t nat -A clash -d 224.0.0.0/4 -j RETURN
iptables -t nat -A clash -d 240.0.0.0/4 -j RETURN

iptables -t nat -A clash -p tcp -j REDIRECT --to-ports 7892
After executing the above iptables commands, the routing function of the bypass router is complete. However, at this point iptables has not been permanently saved, and the above configuration will be lost the next time the machine is turned on. To make the iptables commands still exist after a restart, we need to install software to achieve this:
sudo apt install iptables-persistentDuring installation, you will be prompted whether you need to save the iptables configuration. Just choose yes. At this point, even if the computer restarts, these routing rules will still be applied.
If you need to modify the iptables configuration again later, then you only need to execute the following after running iptables:
sudo iptables-save > /etc/iptables/rules.v4to save the latest iptables rules.
Start clash and set it to start on boot
Since my bypass router system is debian, here I use
systemctl to manage the clash service. First, create the clash service file:sudo touch /etc/systemd/system/clash.service
sudo vim /etc/systemd/system/clash.serviceFill in the following content:
[Unit]
Description=clash daemon

[Service]
Type=simple
User=YOUR USER NAME
ExecStart=/usr/bin/clash -d /home/YOUR USER NAME/.config/clash/
Restart=on-failure

[Install]
WantedBy=multi-user.target
Note that the above
User and ExecStart need to be filled in according to your own actual situation.User indicates which user is required to start clash, usually a non-root user. Then ExecStart inside -d the path after the parameter is the path to the clash configuration file.After editing, save it, then start clash and enable auto-start on boot:
# 启动 clash
sudo systemctl start clash.service
# 启动开机自启
sudo systemctl enable clash.service
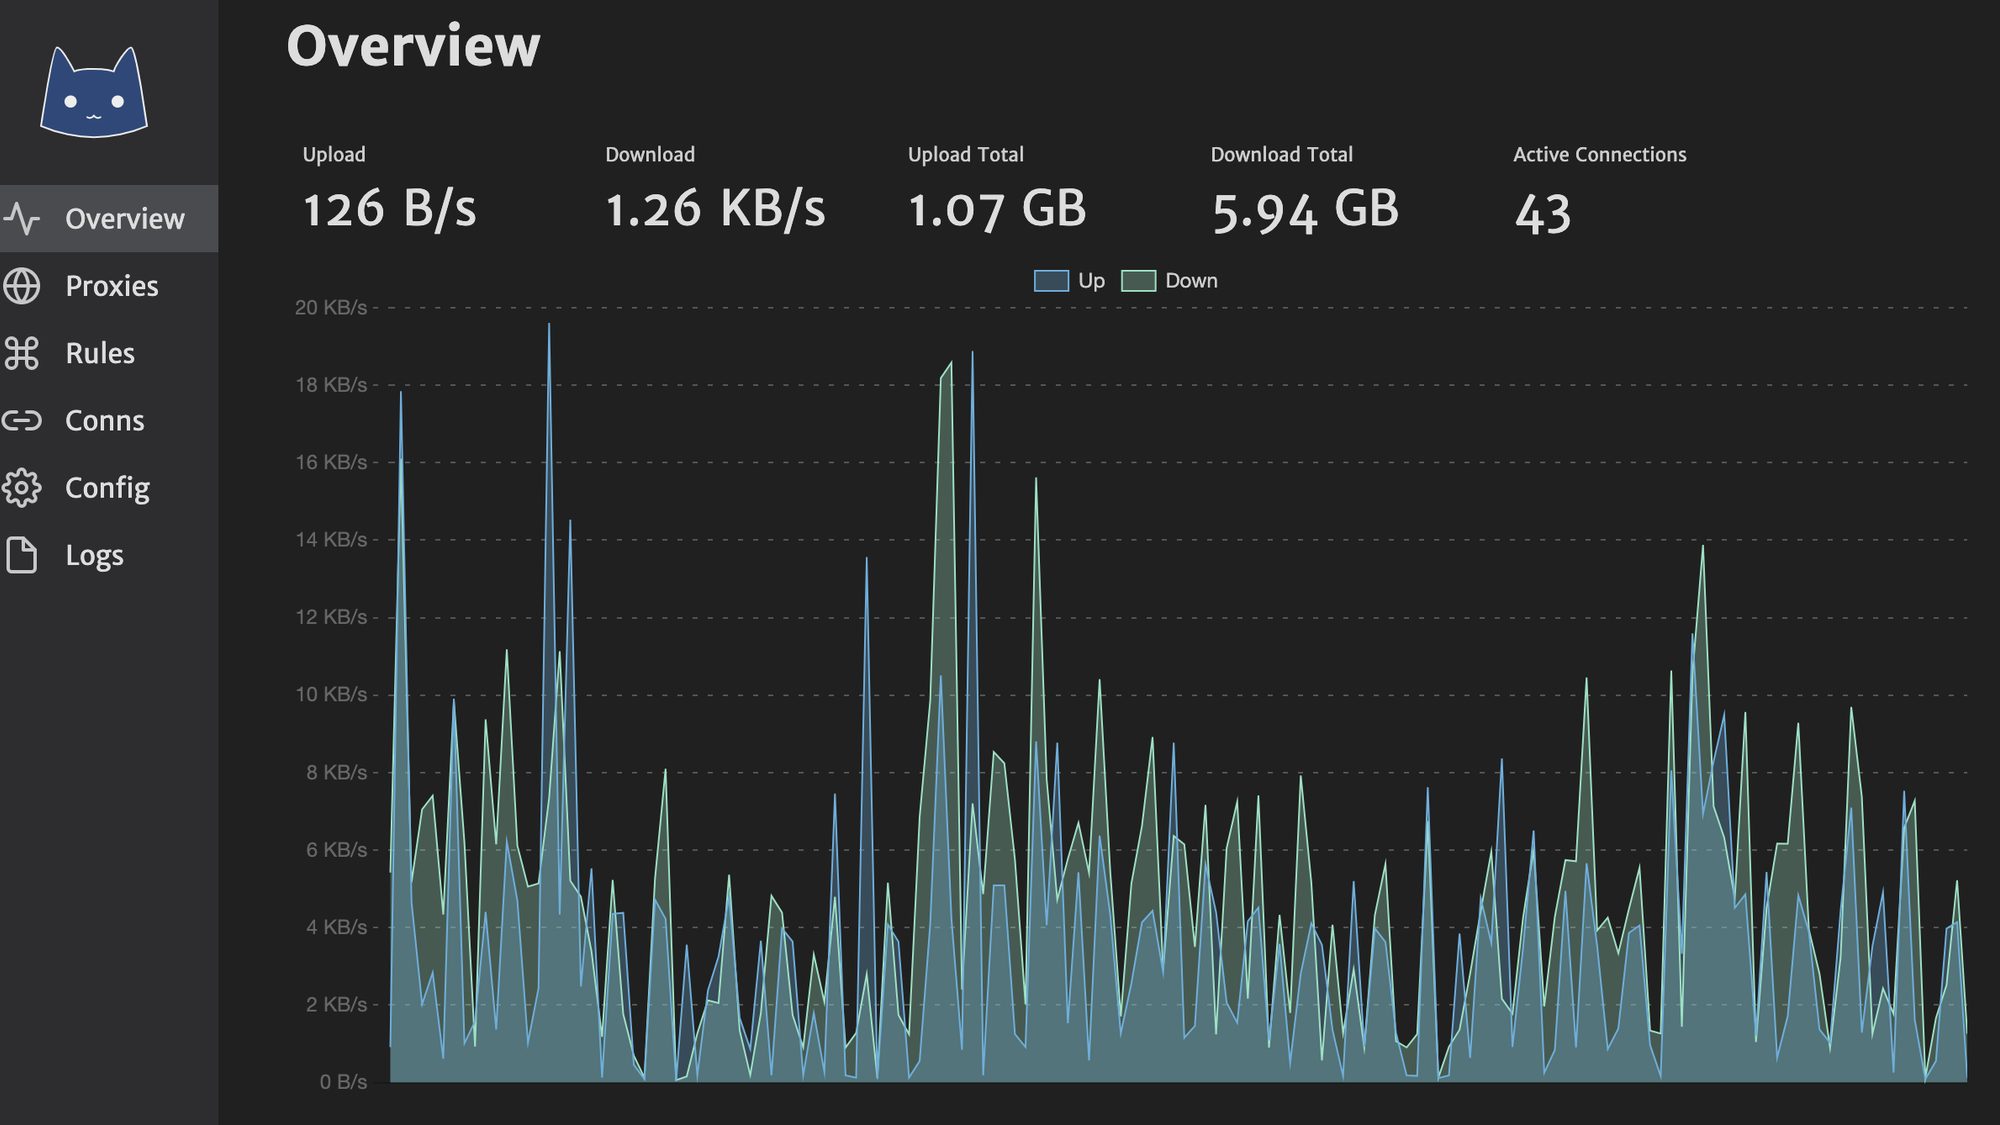
If nothing unexpected happens, clash should already be running by now. Access it through a browser
http://192.168.1.80:9090/ui and you will be able to see the clash management panel.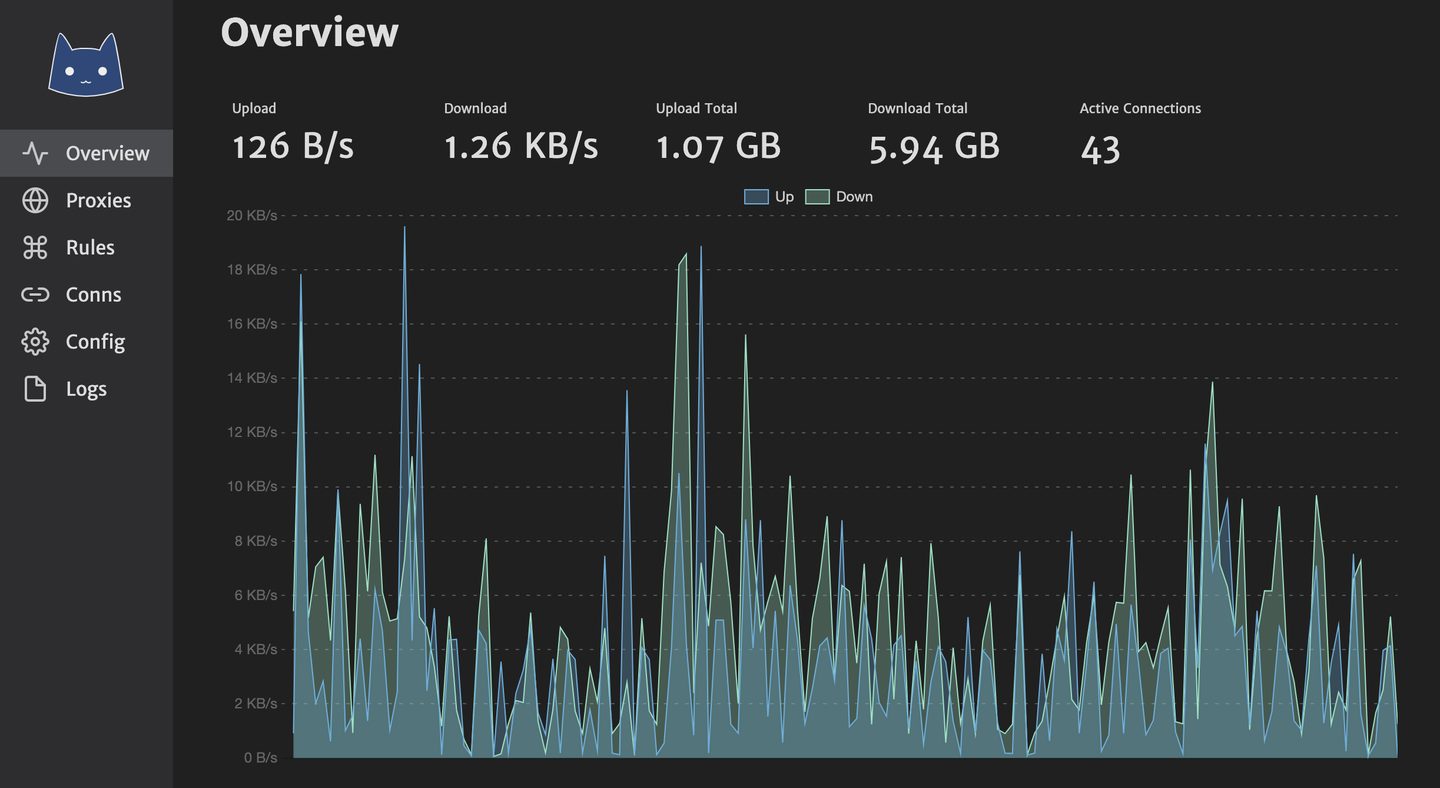
Setting the gateway and DNS for phones and other devices
Once the bypass router is configured, all that's left is to modify the gateway and DNS of each networked device one by one. In the device's network settings, manually specify the IP, gateway, and DNS. The gateway must be set to the bypass router's IP, which in my case is 192.168.1.80, and the DNS should be set to 198.19.0.1 and 198.19.0.2 respectively, as shown in the figure below:
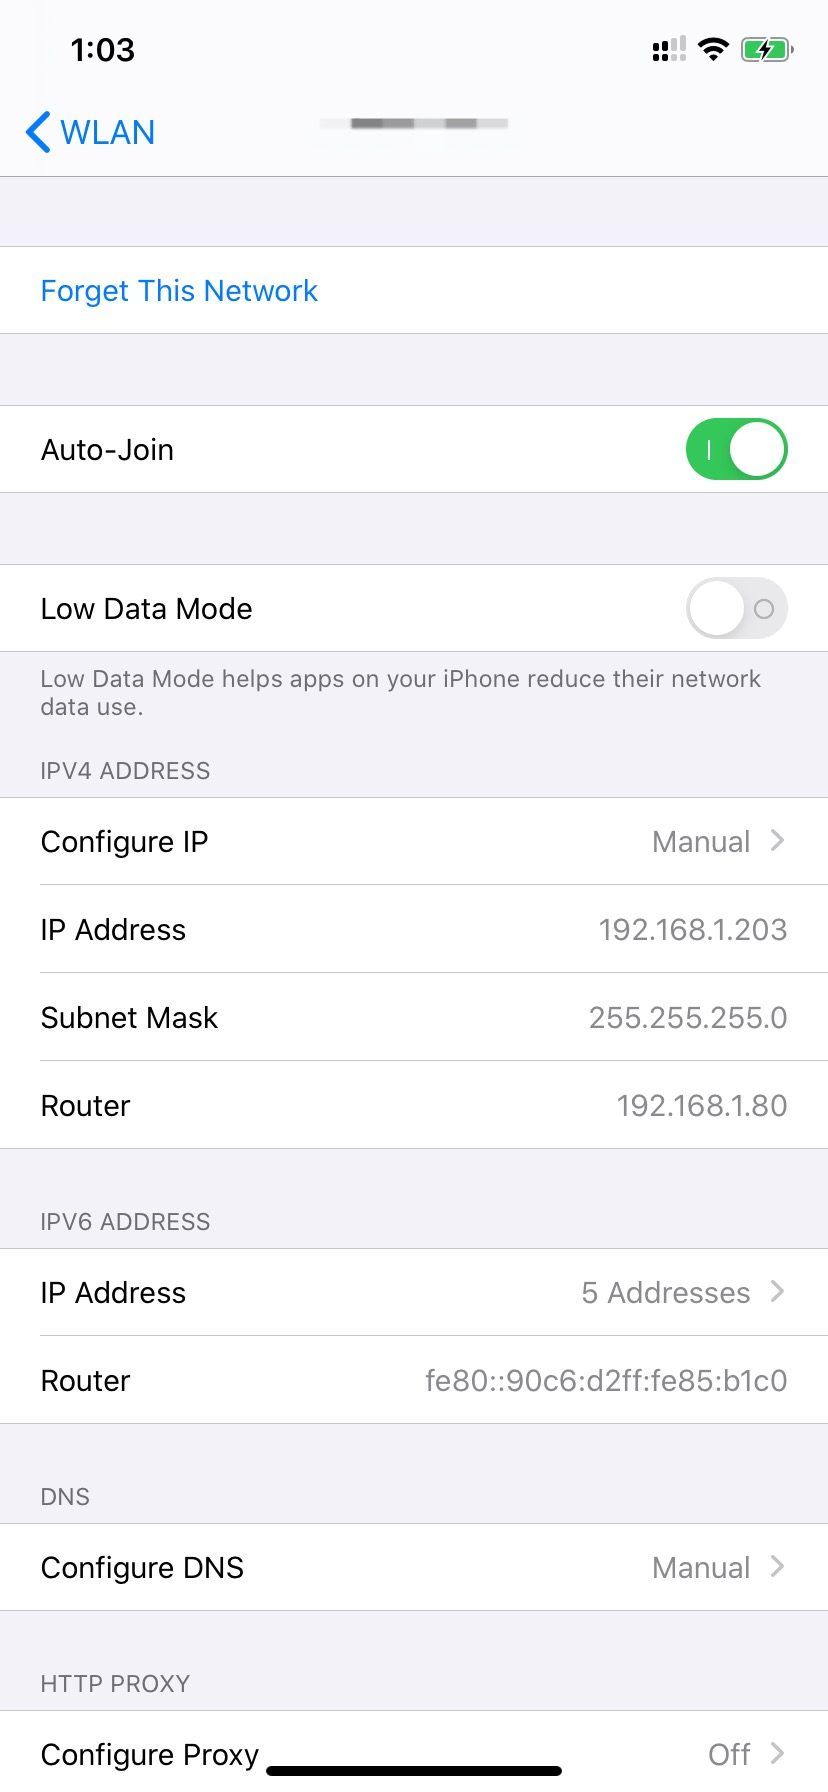
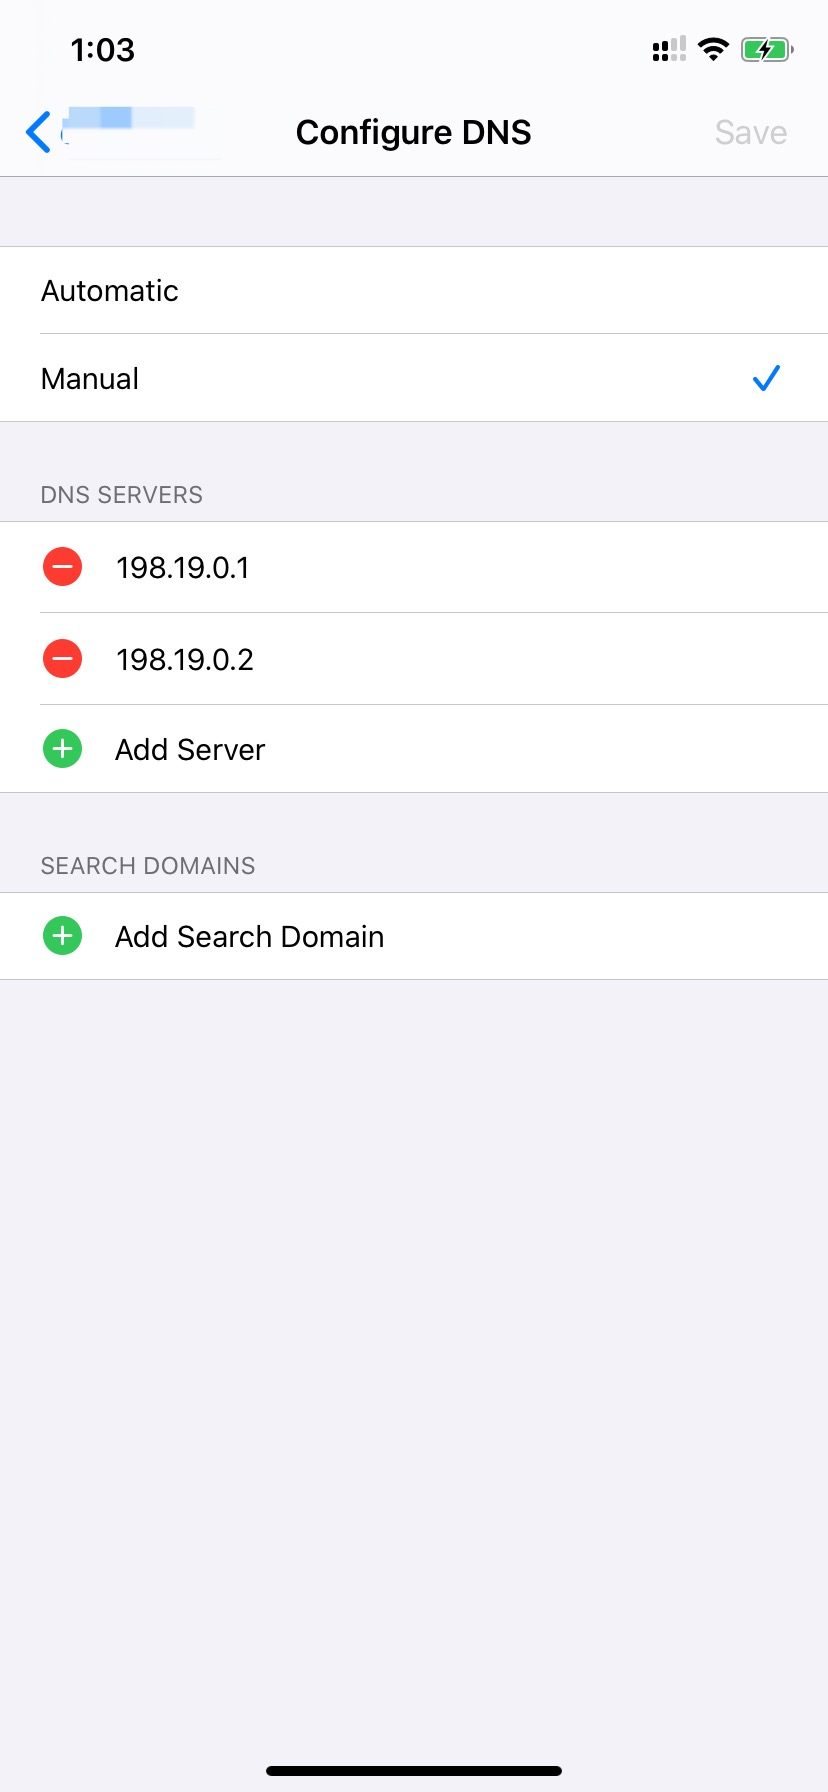
The image above shows the setup method for an iPhone; other devices follow the same principle. After configuring the network, you can visit Google or YouTube to see whether you can bypass the firewall. If nothing unexpected happens, the device will be able to access overseas websites normally, and you will be able to see real-time traffic, as well as logs and connections, in the clash management panel.
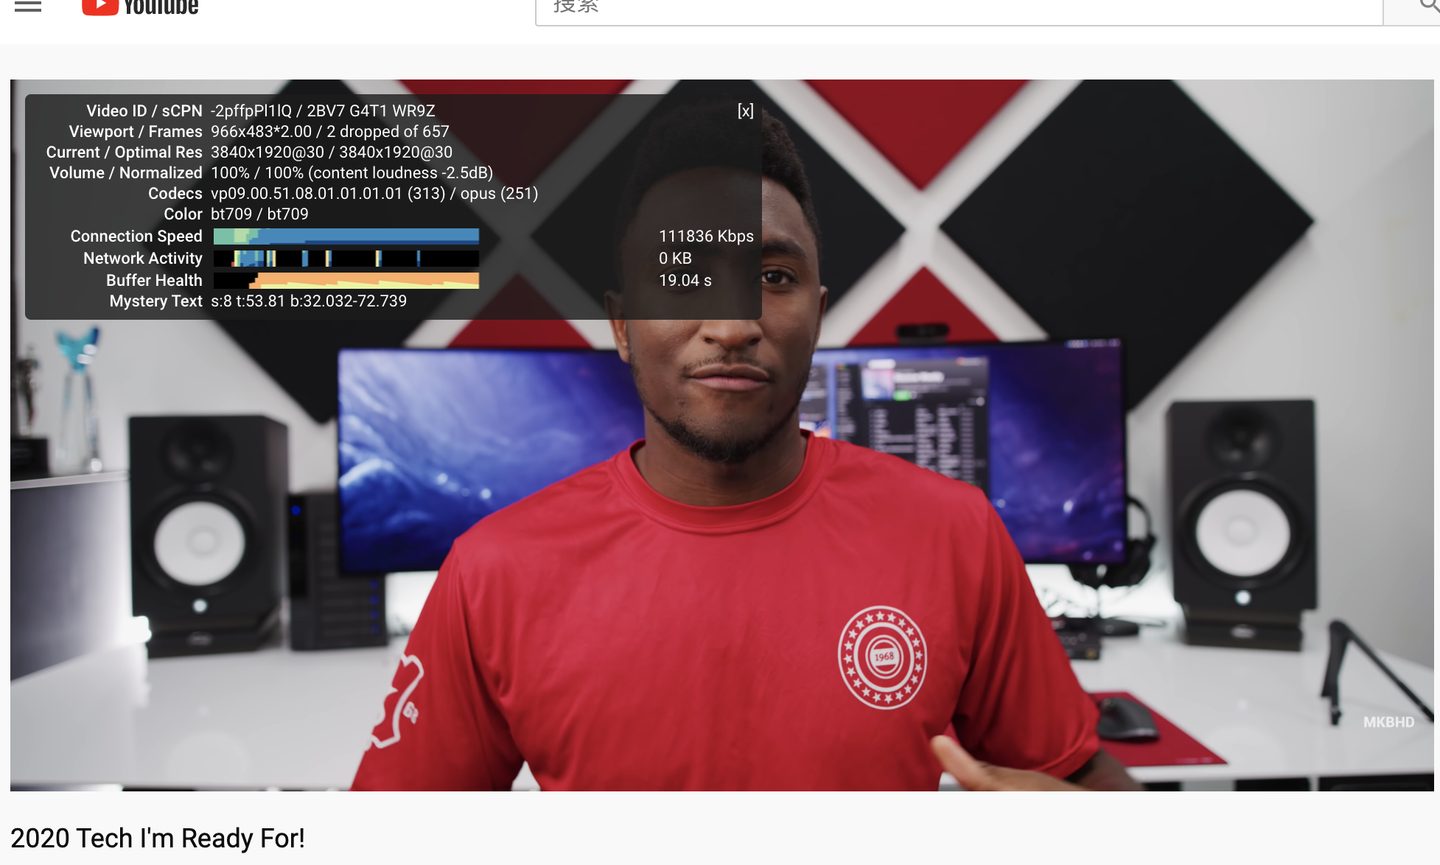
After setting up the gateway on my own MacBook Pro, the speed of watching videos on YouTube is as follows:
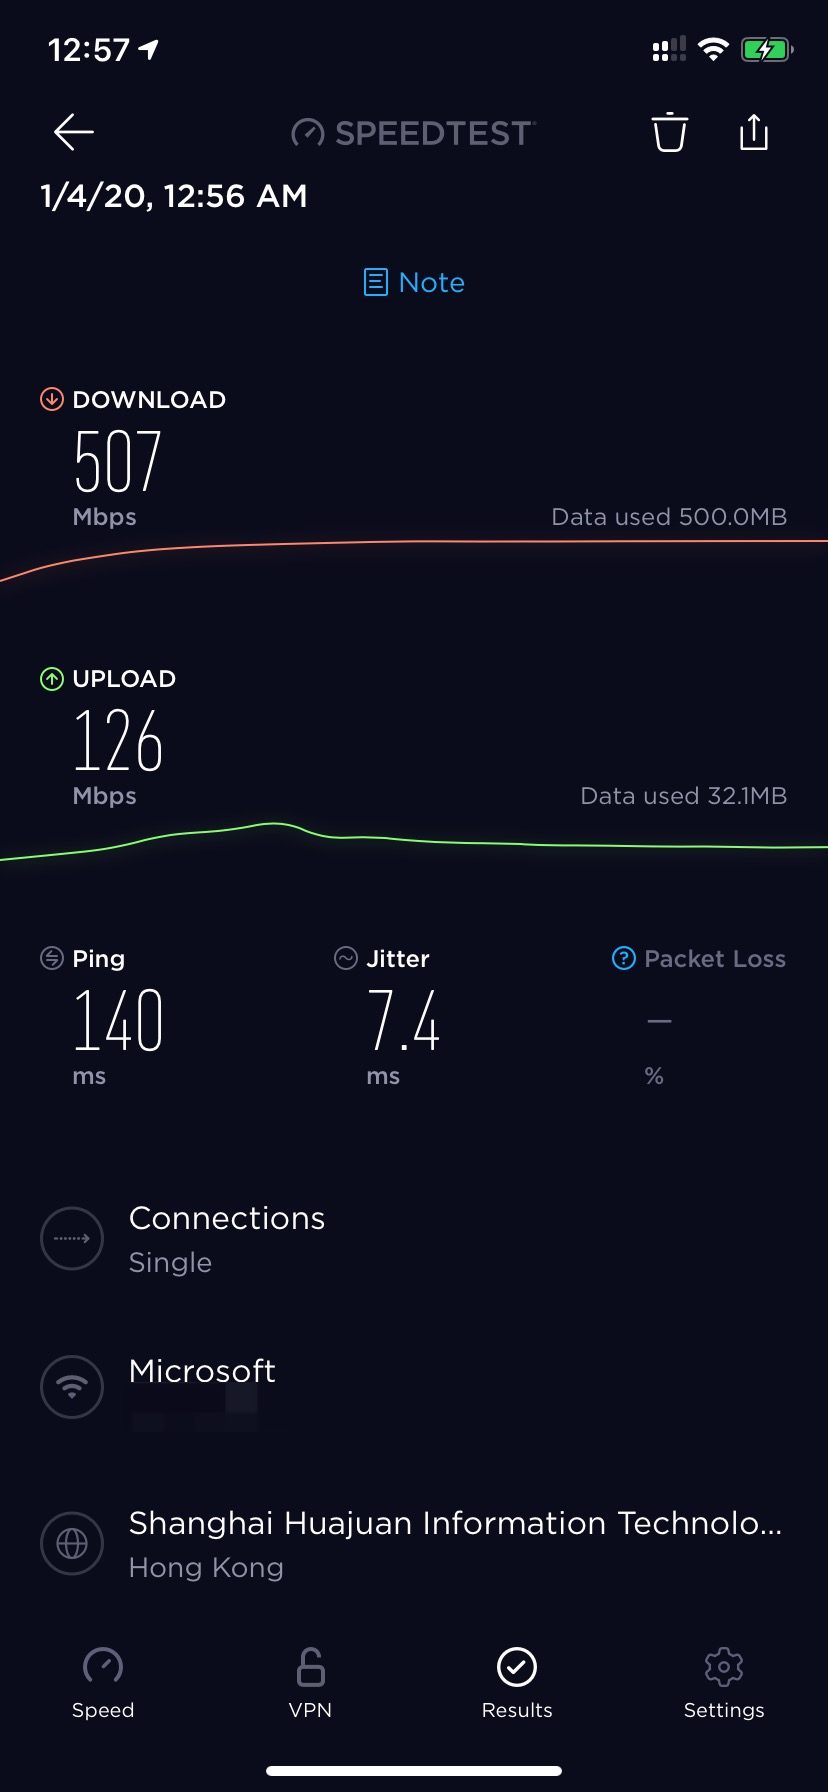
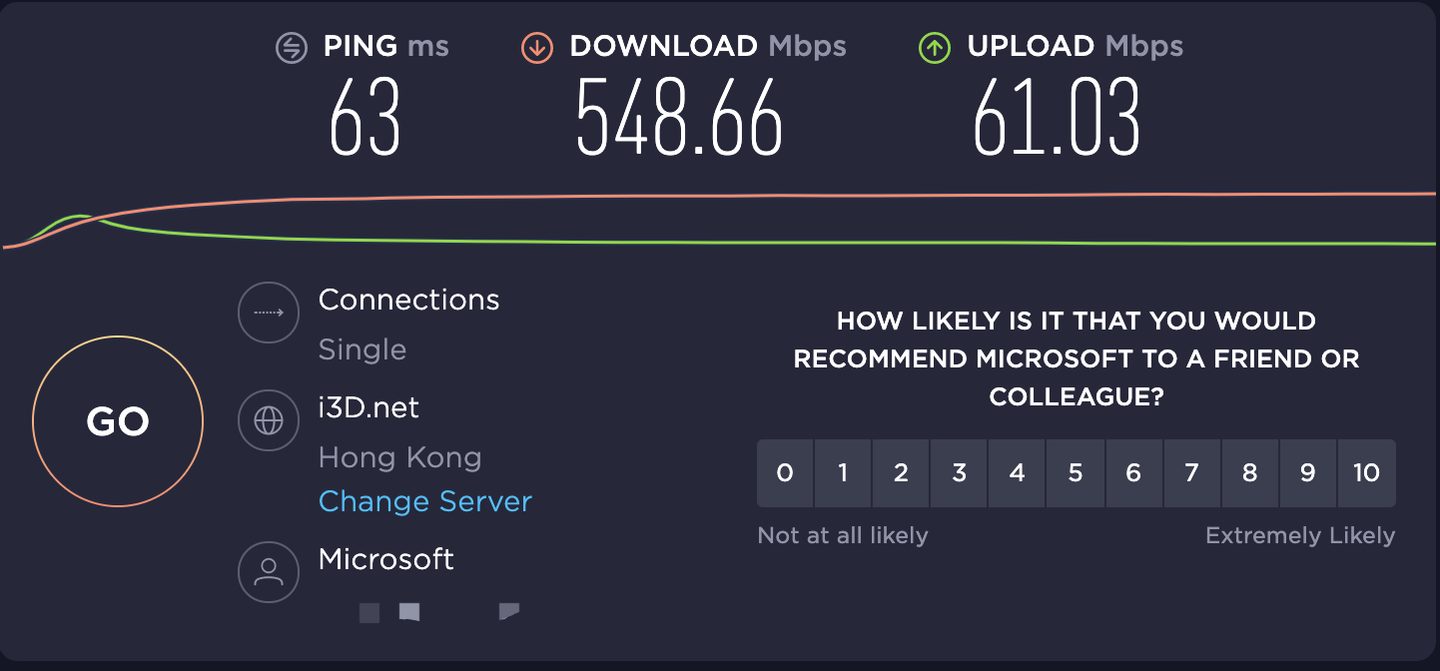
Finally, run a Speedtest, and the speed comfortably reaches the limit of the bandwidth.
Bonus: Set the main router to distribute the bypass router's IP as the default gateway
If you have quite a few devices at home, you'll need to modify the gateway and DNS on each device one by one. Fortunately, most routers nowadays can set a default gateway IP. Taking Merlin as an example, you can set the default gateway directly in the DHCP server:
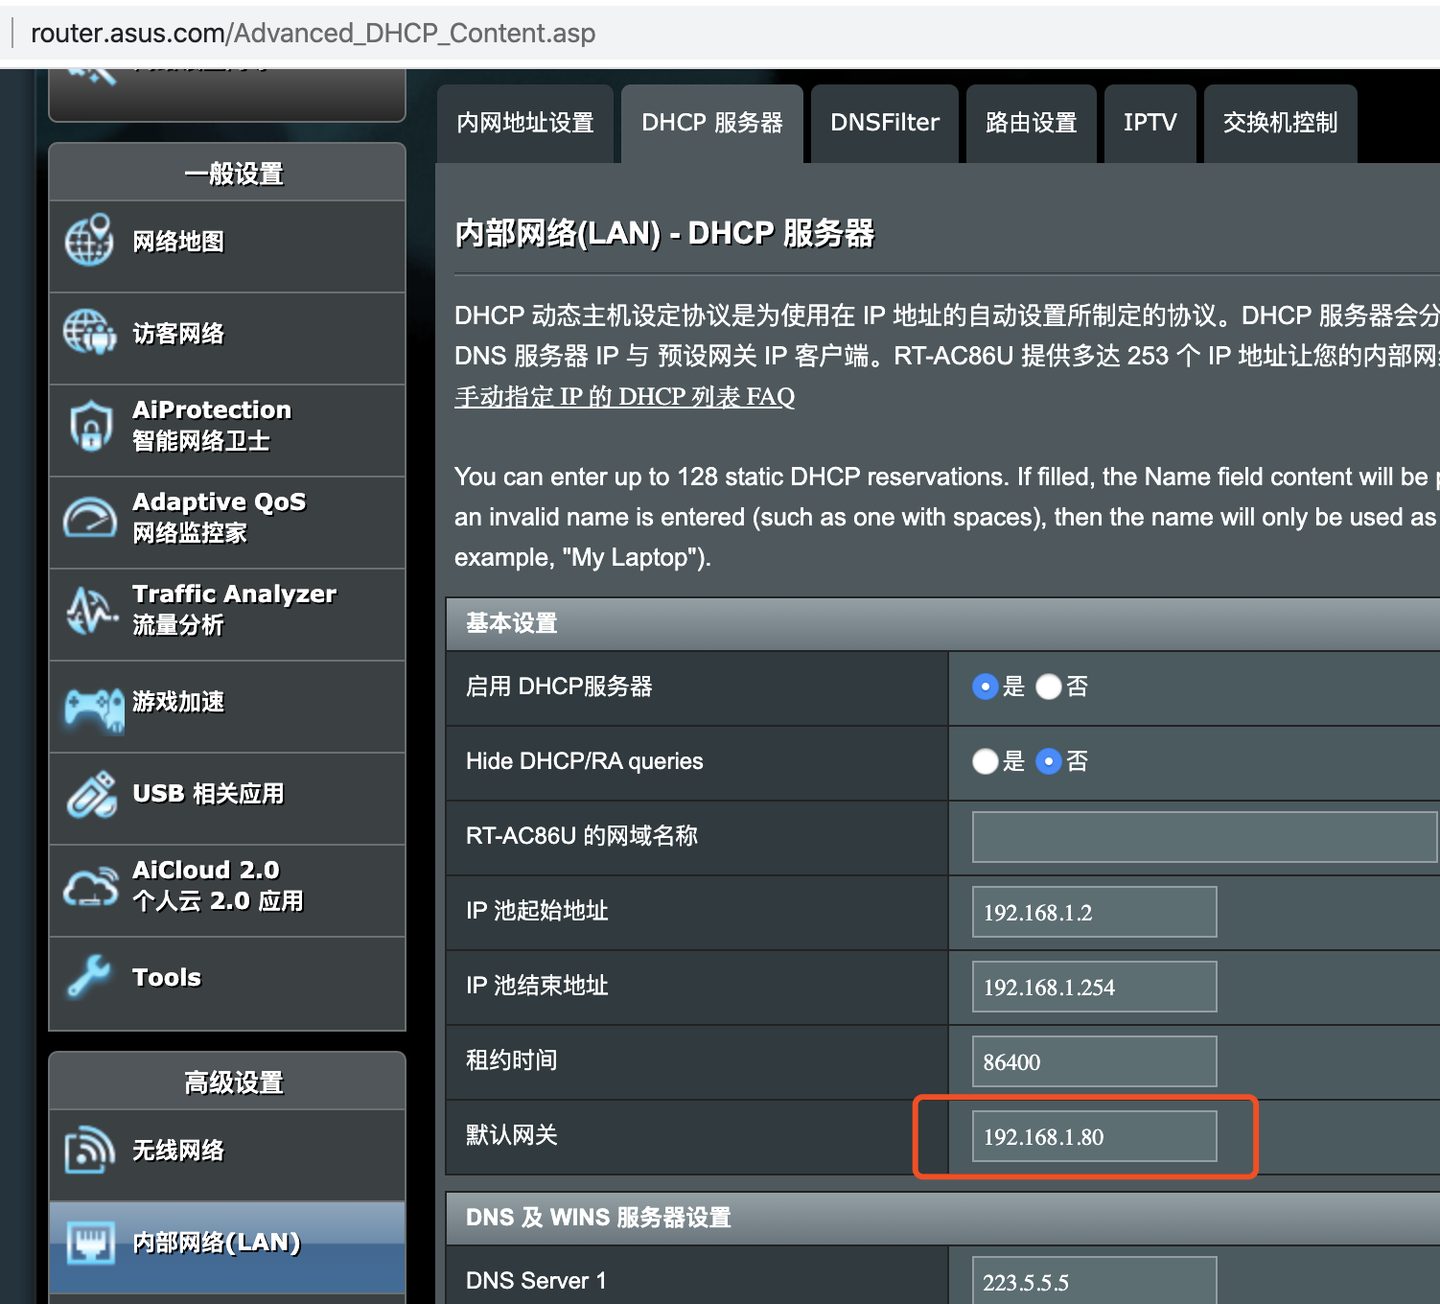
After saving, all devices connected via DHCP will be directly assigned the side router's IP as the gateway, enabling circumvention as soon as they connect to the network.
However, this method cannot be used for DNS configuration; you still have to solve it by manually specifying DNS. Actually, even without configuring DNS, devices can still access the internet and circumvent normally—it's just that they won't be able to enjoy Clash's ability to dynamically route traffic based on domain names. Without DNS configuration, Clash only receives IP addresses, so it can only match proxies through IP-based rules, as shown in the figure below:
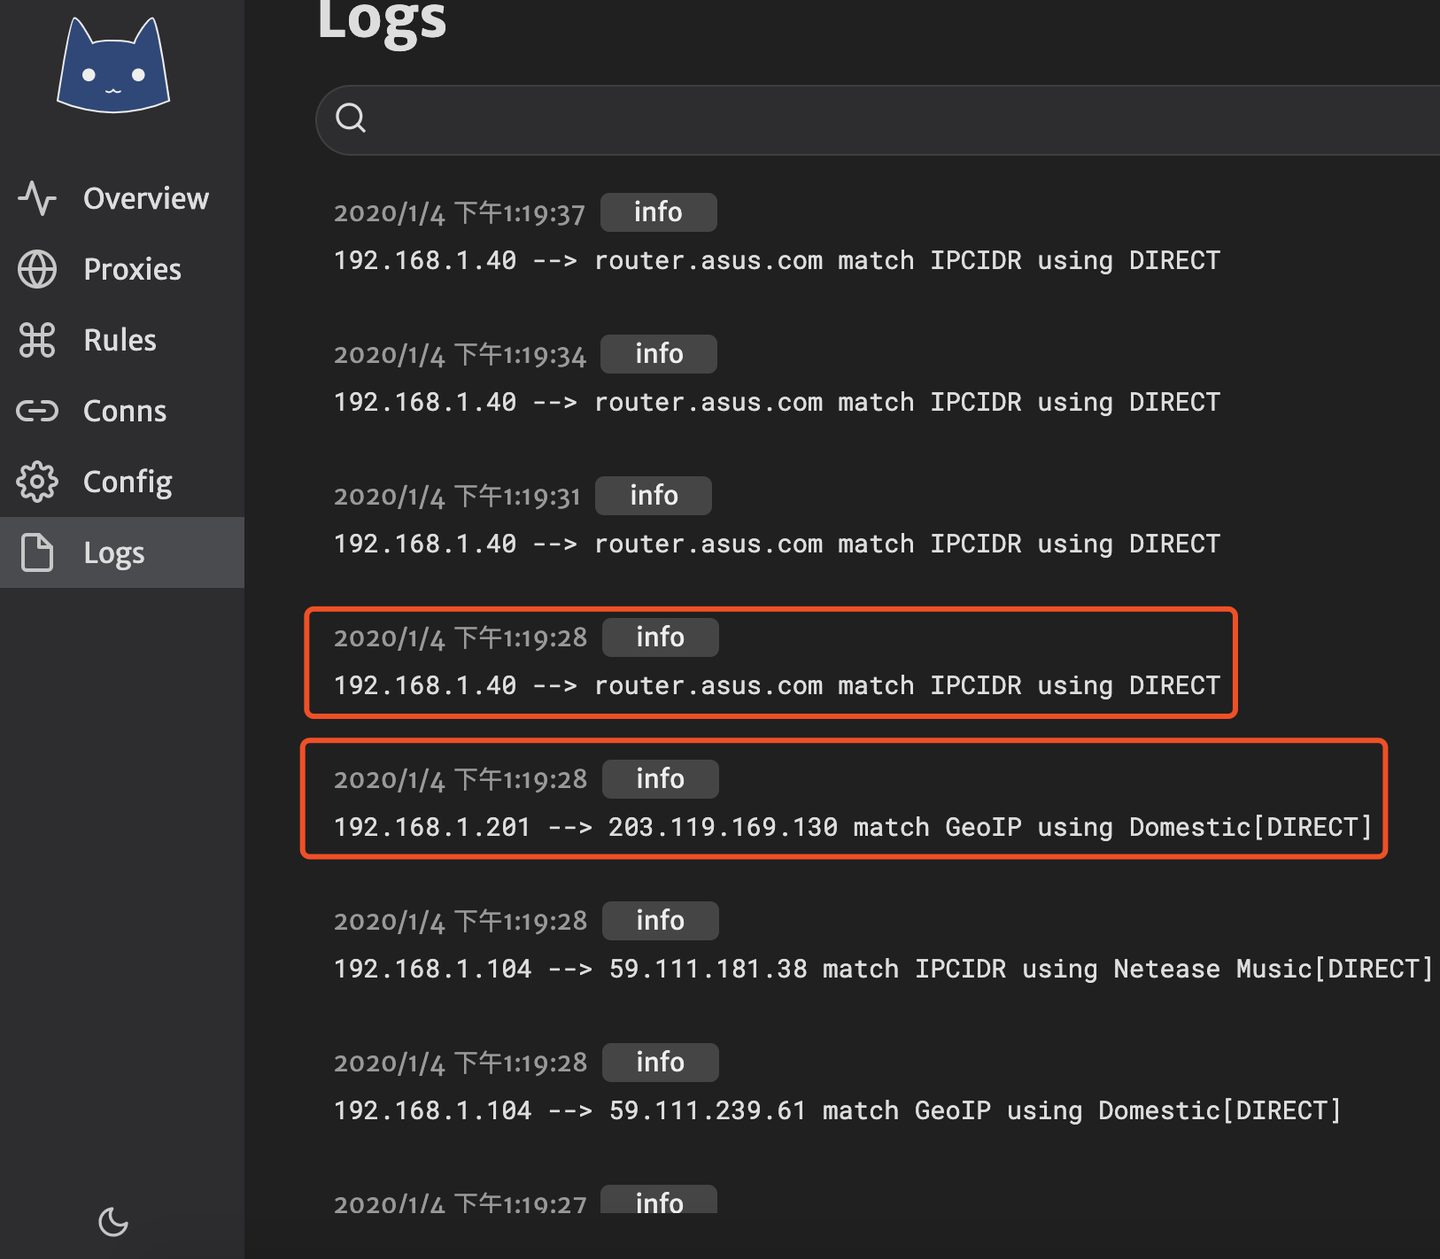
Bonus: Adding custom DNS resolution capability
Even though Clash is very useful, it currently lacks a very important feature: the ability to customize DNS resolution. In koolss, there is a very handy feature called custom dnsmasq, which lets you resolve certain domains to specific IPs. For example, I set up a GitLab service on my own Homelab and enabled external access, so I can access my GitLab via the domain from the external network. But when on the internal network, I want the GitLab domain to resolve to the corresponding internal IP, so it doesn't have to go through the external network—this makes it much faster.
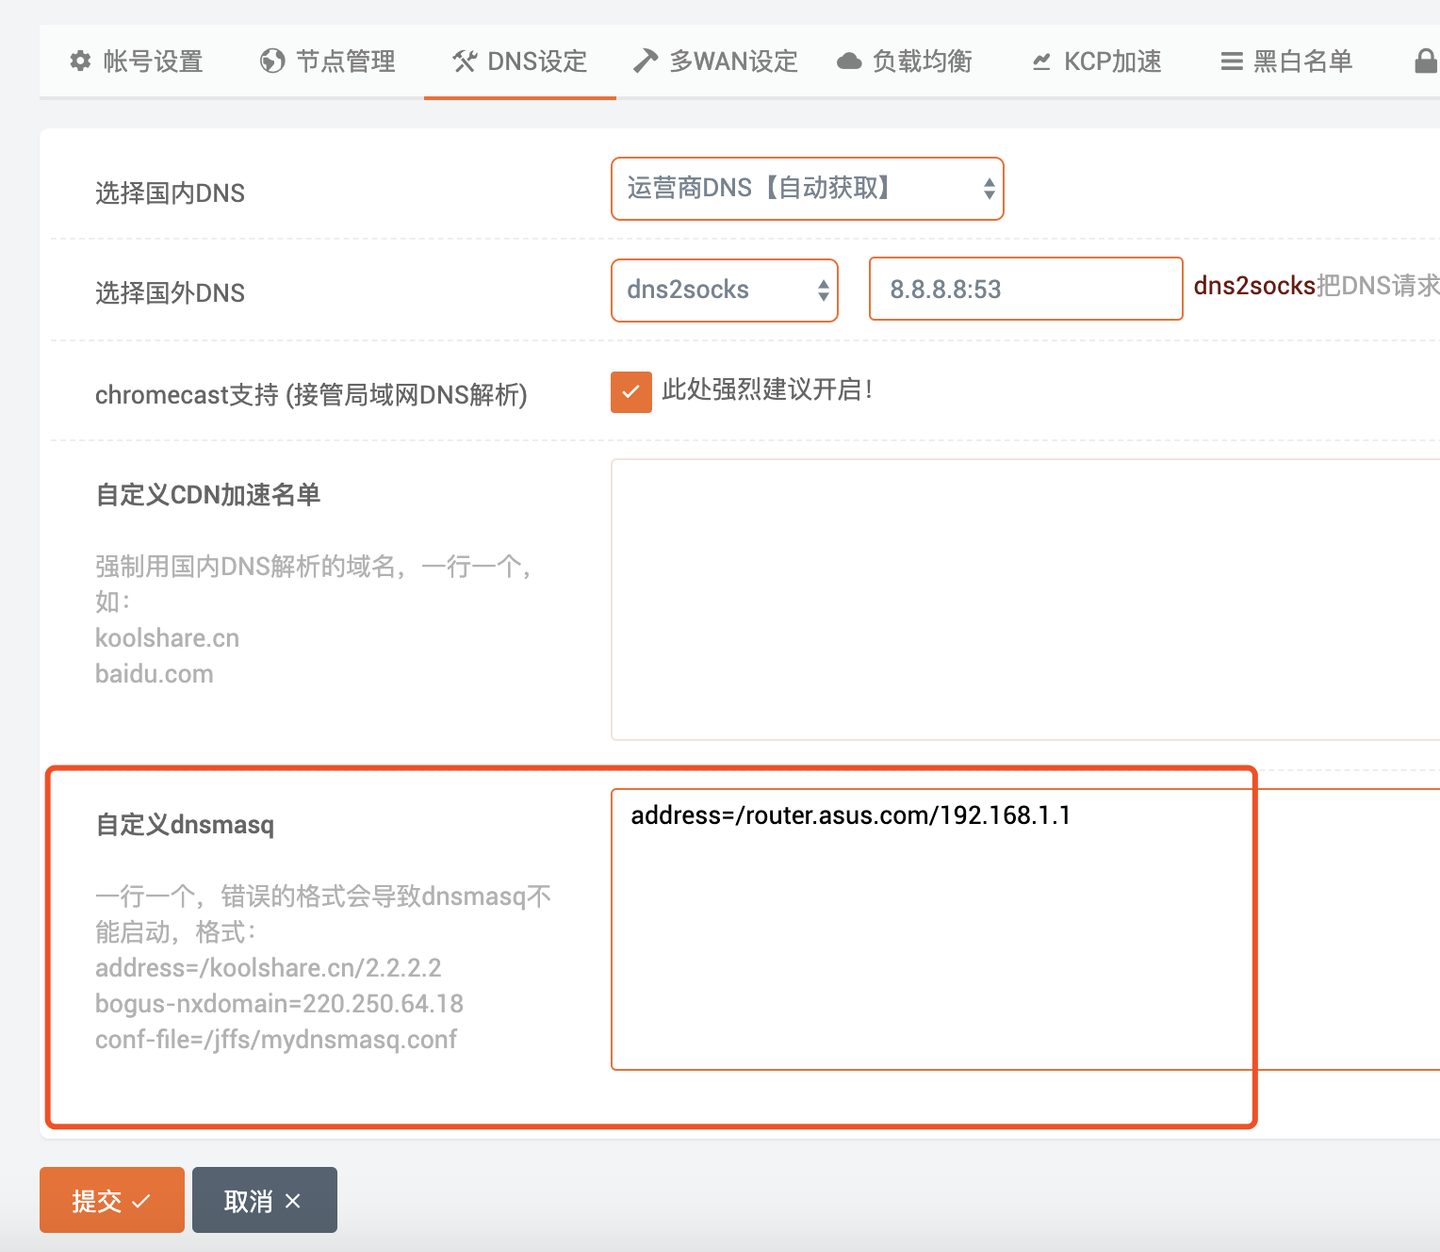
2020-02-28 Update: Later I accidentally discovered that Clash already supports custom hosts functionality; I hadn't carefully confirmed it before. So here I'm updating the method for implementing custom hosts functionality with Clash.
In the example configuration file on Clash's GitHub, there is a piece of code like this:
# # experimental hosts, support wildcard (e.g. *.clash.dev Even *.foo.*.example.com)
# # static domain has a higher priority than wildcard domain (foo.example.com > *.example.com)
# hosts:
#   '*.clash.dev': 127.0.0.1
#   'alpha.clash.dev': '::1'
This configuration is the custom hosts feature. It may still be an experimental feature, and the documentation doesn't mention it much, but I tried it myself and it does work. Therefore, you can add your own custom hosts configuration to Clash's configuration.
dns:
  enable: true
  ...
  nameserver:
- '192.168.1.1'/jffs/configsdnsmasq.conf.adduser@RT-AC86U:/jffs/configs# cat dnsmasq.conf.add
address=/example.com/192.168.1.101
user@RT-AC86U:/jffs/configs#At this point, even when using Clash's transparent proxy, you can enjoy custom DNS resolution. This way, for internal network services, it resolves to the internal IP when on the internal network, and to the external IP when on the external network, achieving intelligent switching.