

Hand-sized Mini PC Yunxuan H170 Usage Experience and Homelab Setup
At the end of 2019, while browsing SMZDM, I stumbled upon an article about the Yunxuan H170 and was instantly hooked. This is a mini-STX barebone PC—tiny in size and cheap in price; the motherboard + case + power supply bundle cost only 369. After agonizing for a day or two, I placed an order, planning to use it to run CPU-intensive services like GitLab and CI, and to migrate the miscellaneous services off my Synology DS 918+.
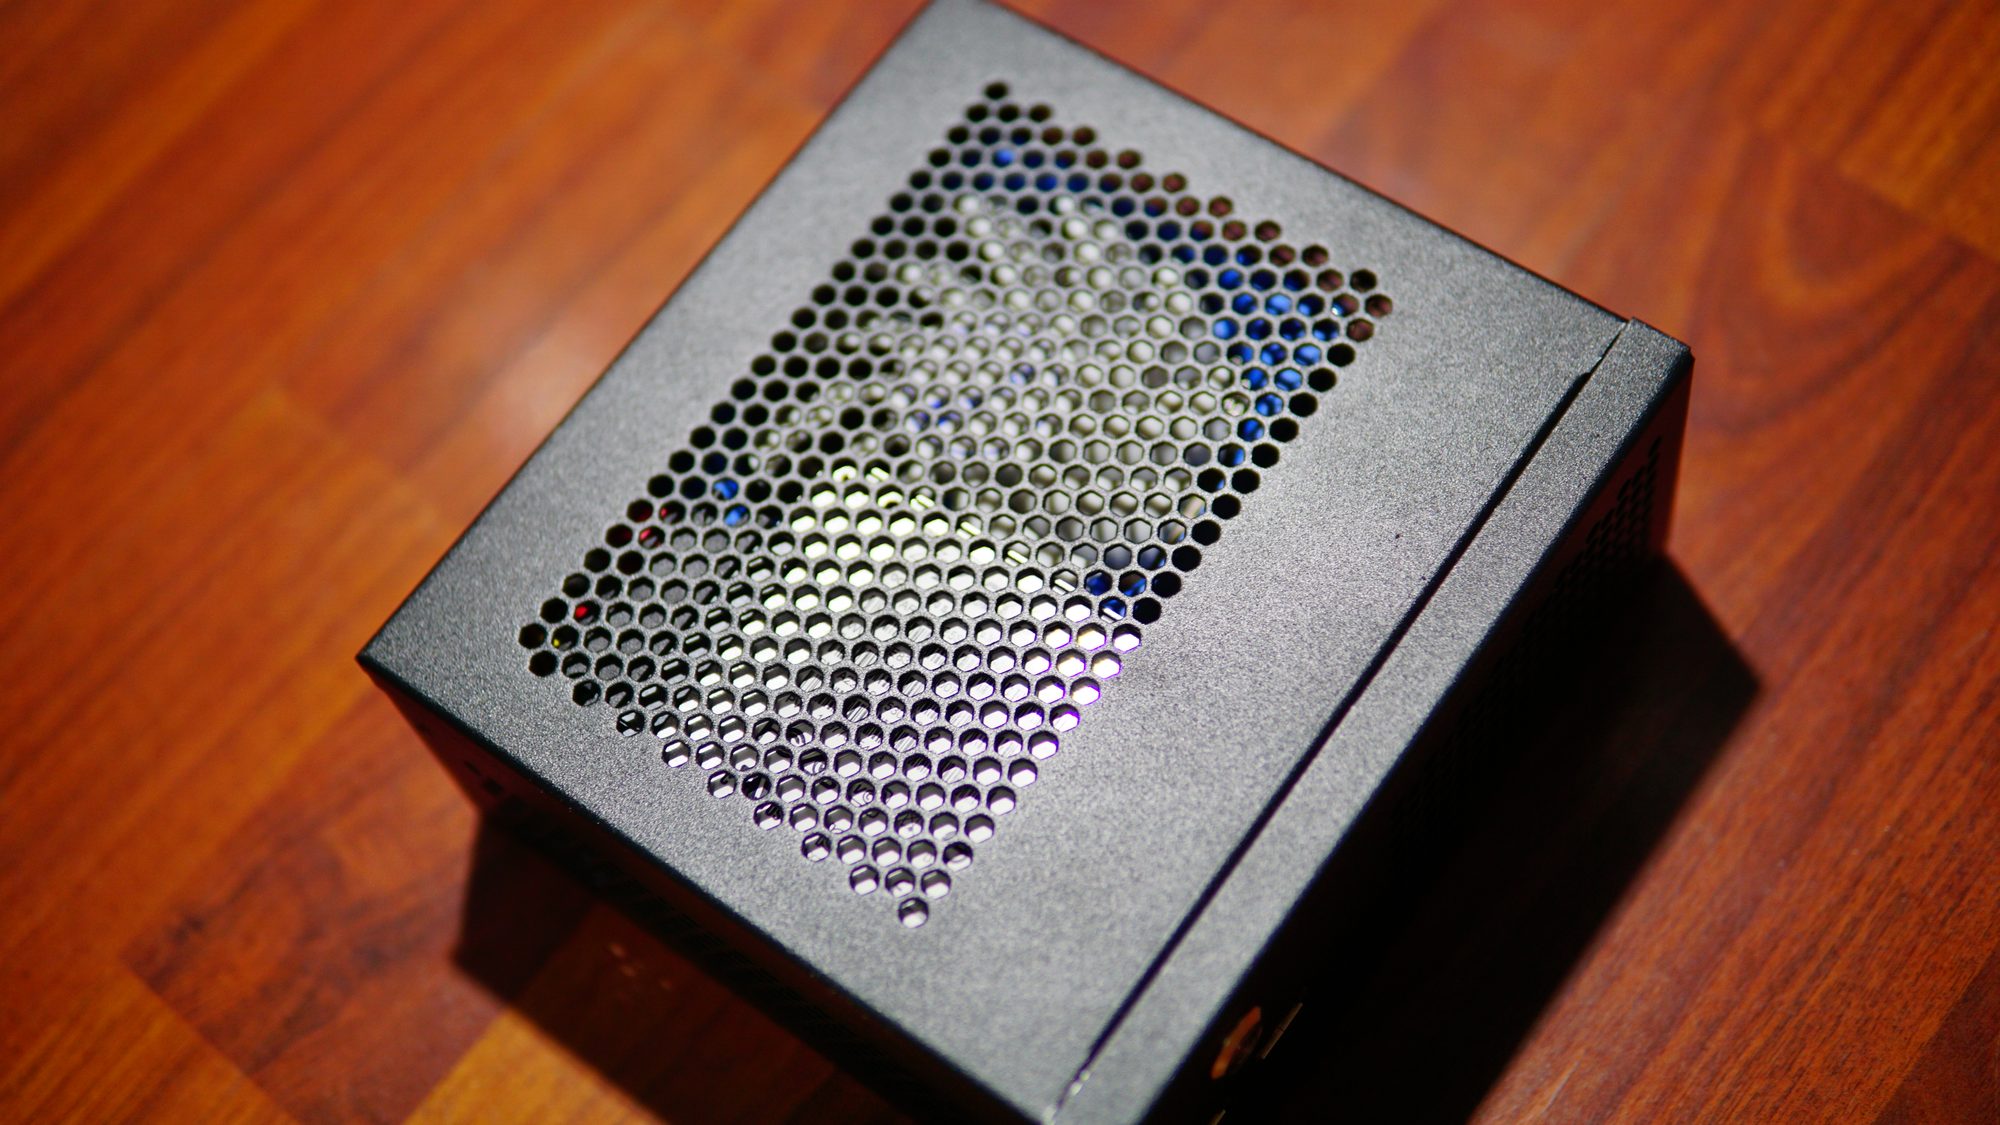
At the end of 2019, while browsing SMZDM, I happened to come acrossarticles about the Yunxuan H170, and I was instantly hooked.The Yunxuan H170 is a mini-STX barebone host. Its standout features are its extremely compact size and very low price. The barebone bundle of motherboard + case + power supply costs only 369 (I got a discount when I bought it; the original price was 499, and the current discounted price is around 379).
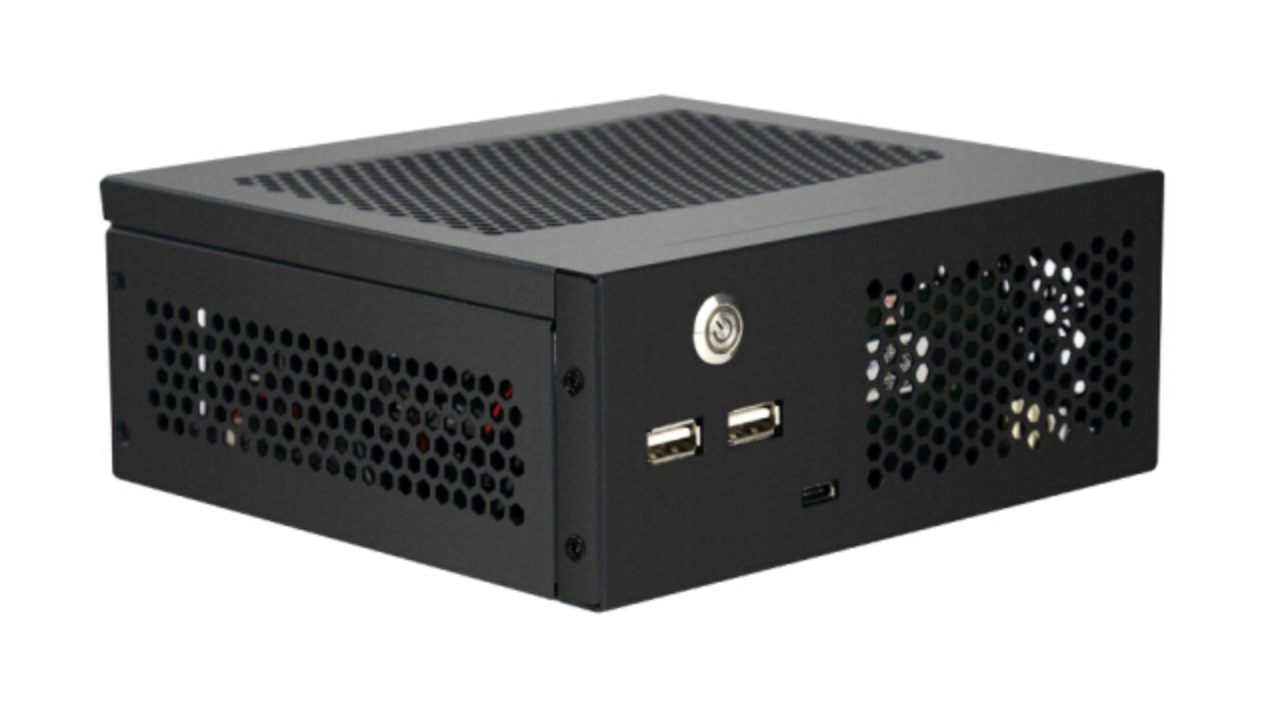
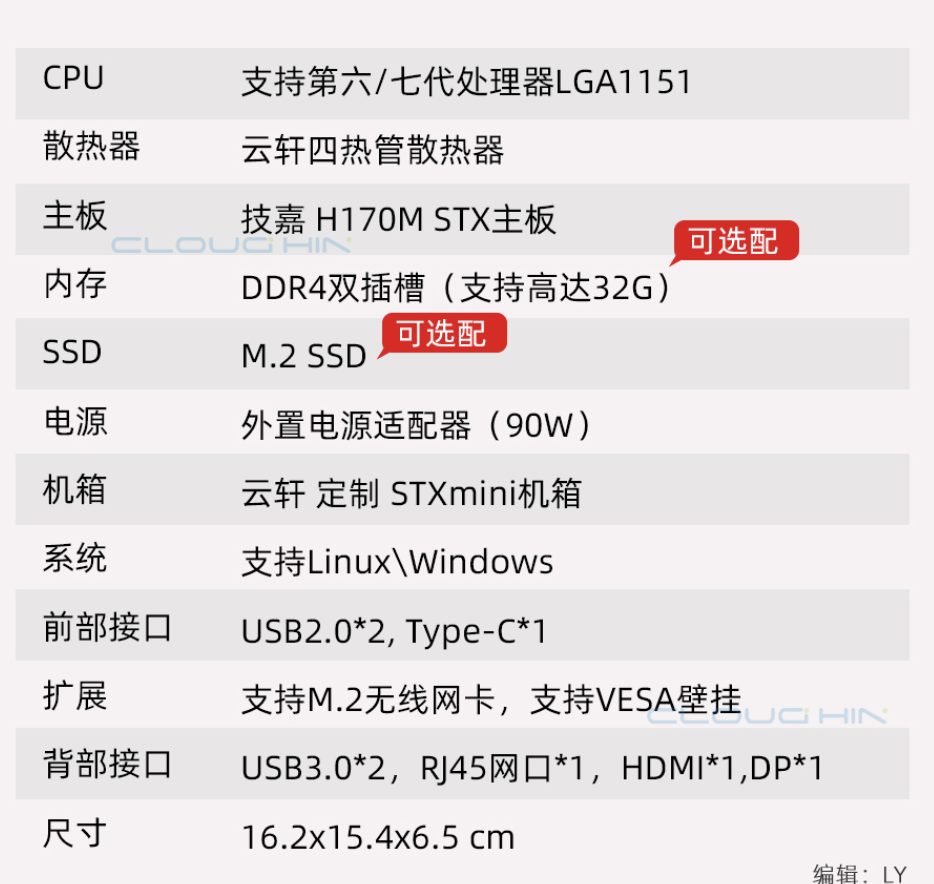
After mulling it over for a day or two, I placed the order.
Reasons for buying and use cases
The main reason I bought this host was to run some services that have certain CPU requirements, such as GitLab and CI services. Before buying this host, I already had a Synology DS 918+ NAS, which is my data center and backup center, and some of my services run on it. But later I found that its performance was not suitable for running such CPU-intensive tasks over the long term, and for the sake of system stability, I needed to move as many miscellaneous services as possible to other machines. Based on this premise, I had always wanted to buy a small host to run these services.
In addition to having certain performance requirements, I also wanted this host to be small enough, since it would be placed in my room, and my room is not very spacious. It also had to be quiet enough, not consume too much power, and, crucially, not be too expensive.
So when you add it all up, this Yunxuan machine is a perfect fit for me: small, with DIY capability, quiet, and low power consumption. Of course, this host is not 100% perfect; it also has flaws, such as no audio output port, an m.2 slot that only supports SATA SSDs and not NVMe, the need for a custom power cable for 2.5-inch SATA drives, and a cut-down Type-C port. But these issues have almost no impact on me. So it is a perfect fit for me.
After I got it, I installed Proxmox on it and then created several VMs to run some services, such as the GitLab, CI, and bypass router mentioned above.
Host configuration and installation
Since I bought the barebone package, it came with the motherboard, case, and power supply included, and I needed to purchase the CPU, memory, hard drive, and cooler separately. The final configuration is:
- CPU: i3 8100 (¥685)
- Cooler: Jonsbo HP-400 (¥79)
- Memory: Xiede DDR4 2666 16G (¥297)
- Hard drive: Team Group M.2 SATA 256G (¥179)
- Hard drive: OCZ-ARC SATA 240G (owned)
- Hard drive cable: 4PIN+SATA all-in-one adapter hard drive cable (¥6.8)
- Case + motherboard + power supply: Yunxuan H170 (¥369)
The total cost was ¥1615, and the Master Lu benchmark score is around 140,000. This performance is already sufficient for me.
Since the motherboard uses the H170 chipset, it natively only supports 6th- and 7th-generation Intel Core CPUs, but you can have the seller flash the BIOS before shipping, so that you can directly use 8th- and 9th-generation b0 stepping CPUs.
As for the choice of CPU, I actually agonized over it for a long time. With the goal of building a host with the best possible performance at the lowest cost, and after reviewing articles on SMZDM, I listed a few options for myself:
- i3 8100 b0 stepping version, 680+
- i7 8700t ES version, 850+
- Modified version i7 7820HK, 530+
Among these, the i3 8100 B0 stepping version is the least hassle—once the seller has flashed the BIOS, you can just install it and it works. The i7 8700T, on the other hand, requires you to apply a mod sticker yourself. As for the i7 7820HK, you need to ship the host to the CPU seller so they can help flash the BIOS and install the CPU. From a cost perspective, the modded CPU is the best—it's cheap but the performance isn't bad. From a performance perspective, the 8700T is the best. I originally wanted to grit my teeth and buy the 8700T. I found a seller on Xianyu selling one for 800 with free shipping, and I decided to buy it right then. Who knew that when I tried to place the order, I found it had already been sold. Helpless, and also considering that I wanted to be able to play with this host as soon as possible, I just found a shop on Taobao and bought an i3 8100—simple and hassle-free.
This current configuration can be further upgraded later, for example upgrading the CPU to a more powerful i7 8700, or upgrading the memory to 32GB dual-channel. For now, since I don't need that much performance, I'll just leave it like this.
With all the components installed, it looks like this:
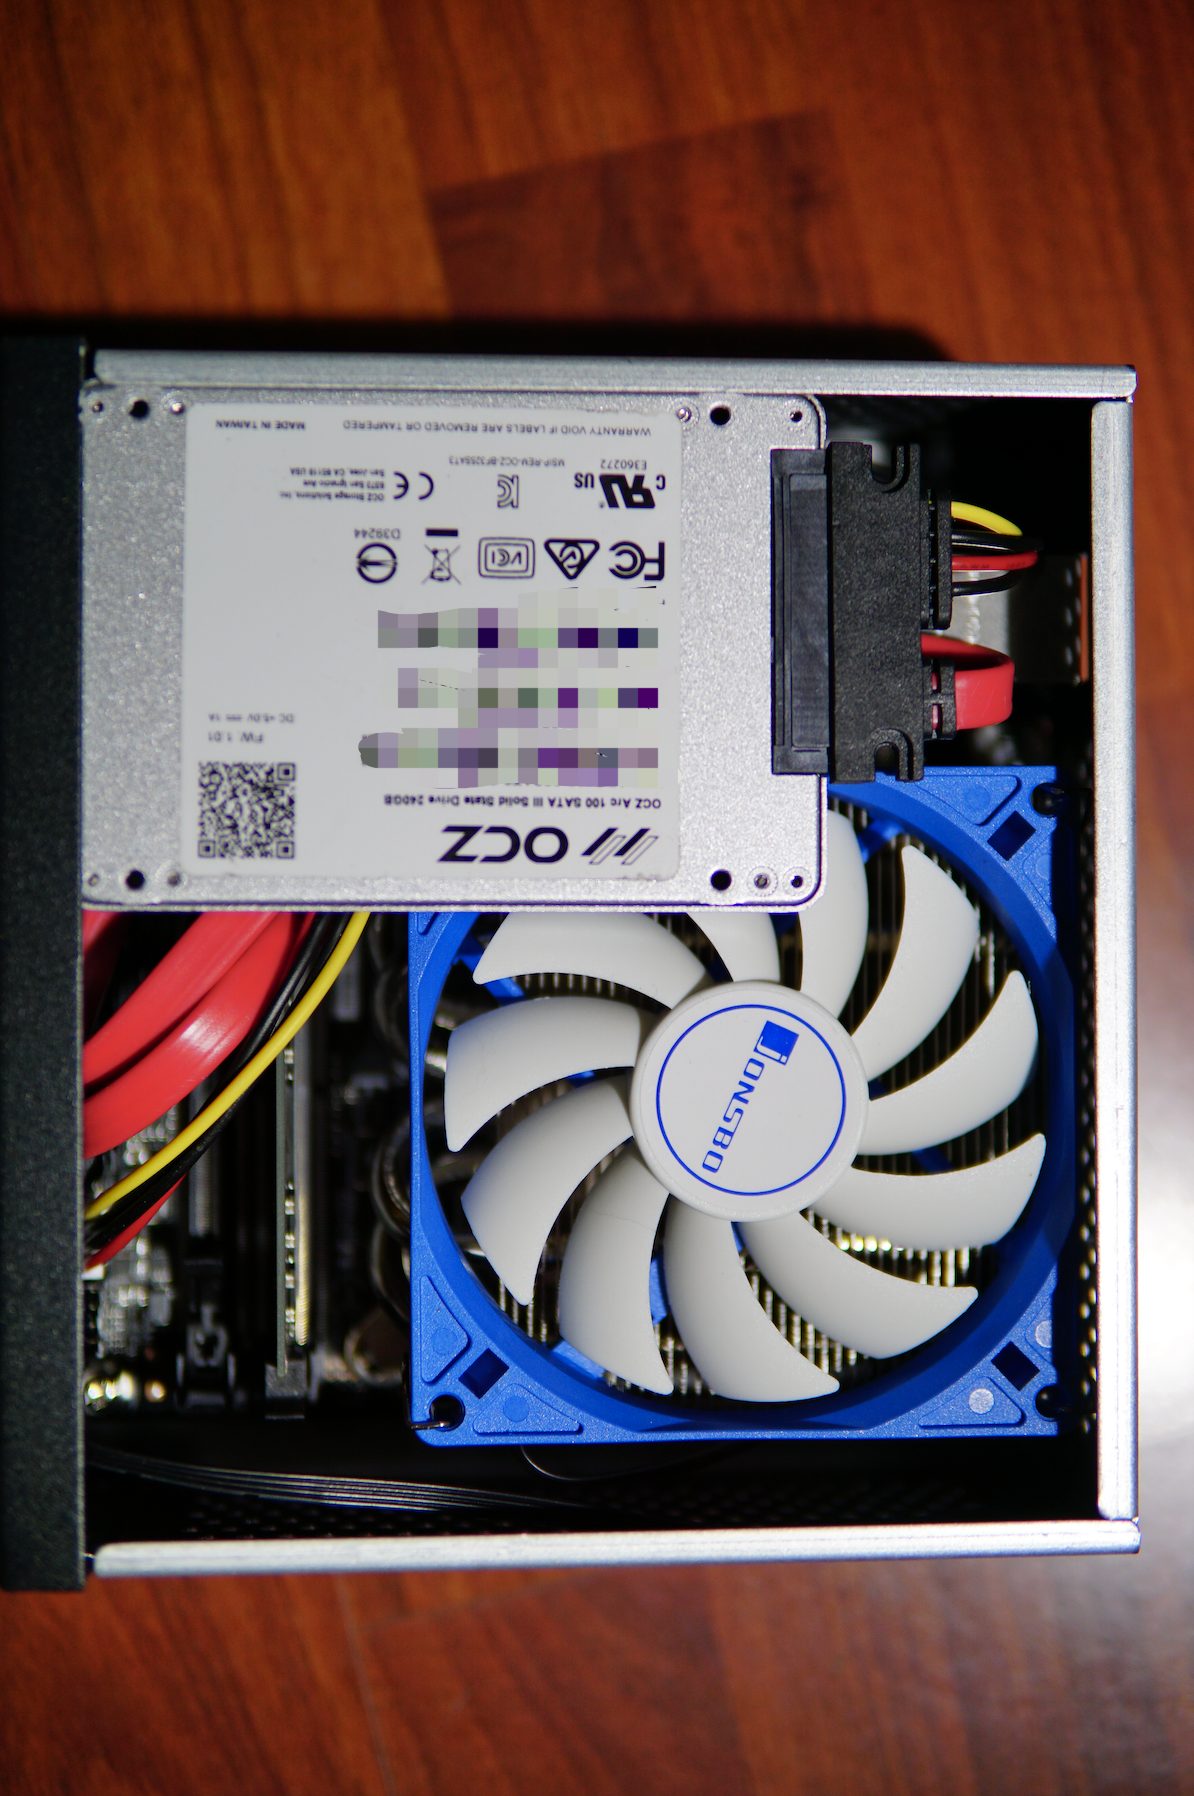
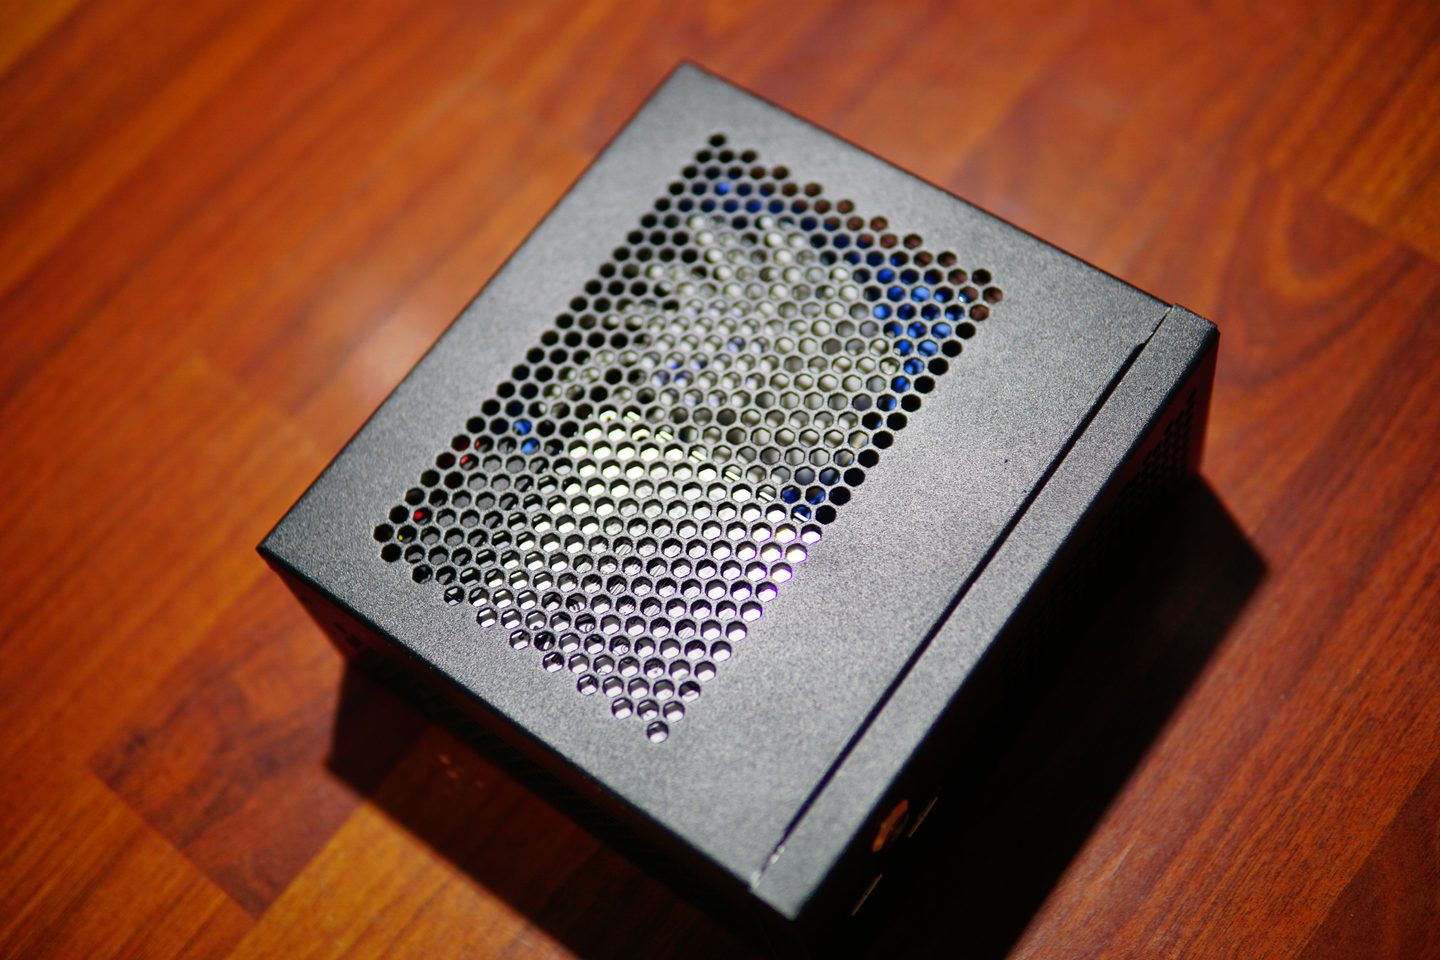
The 2.5-inch hard drive has no place to be secured, so for now it's just placed directly on top of the heatsink fan.
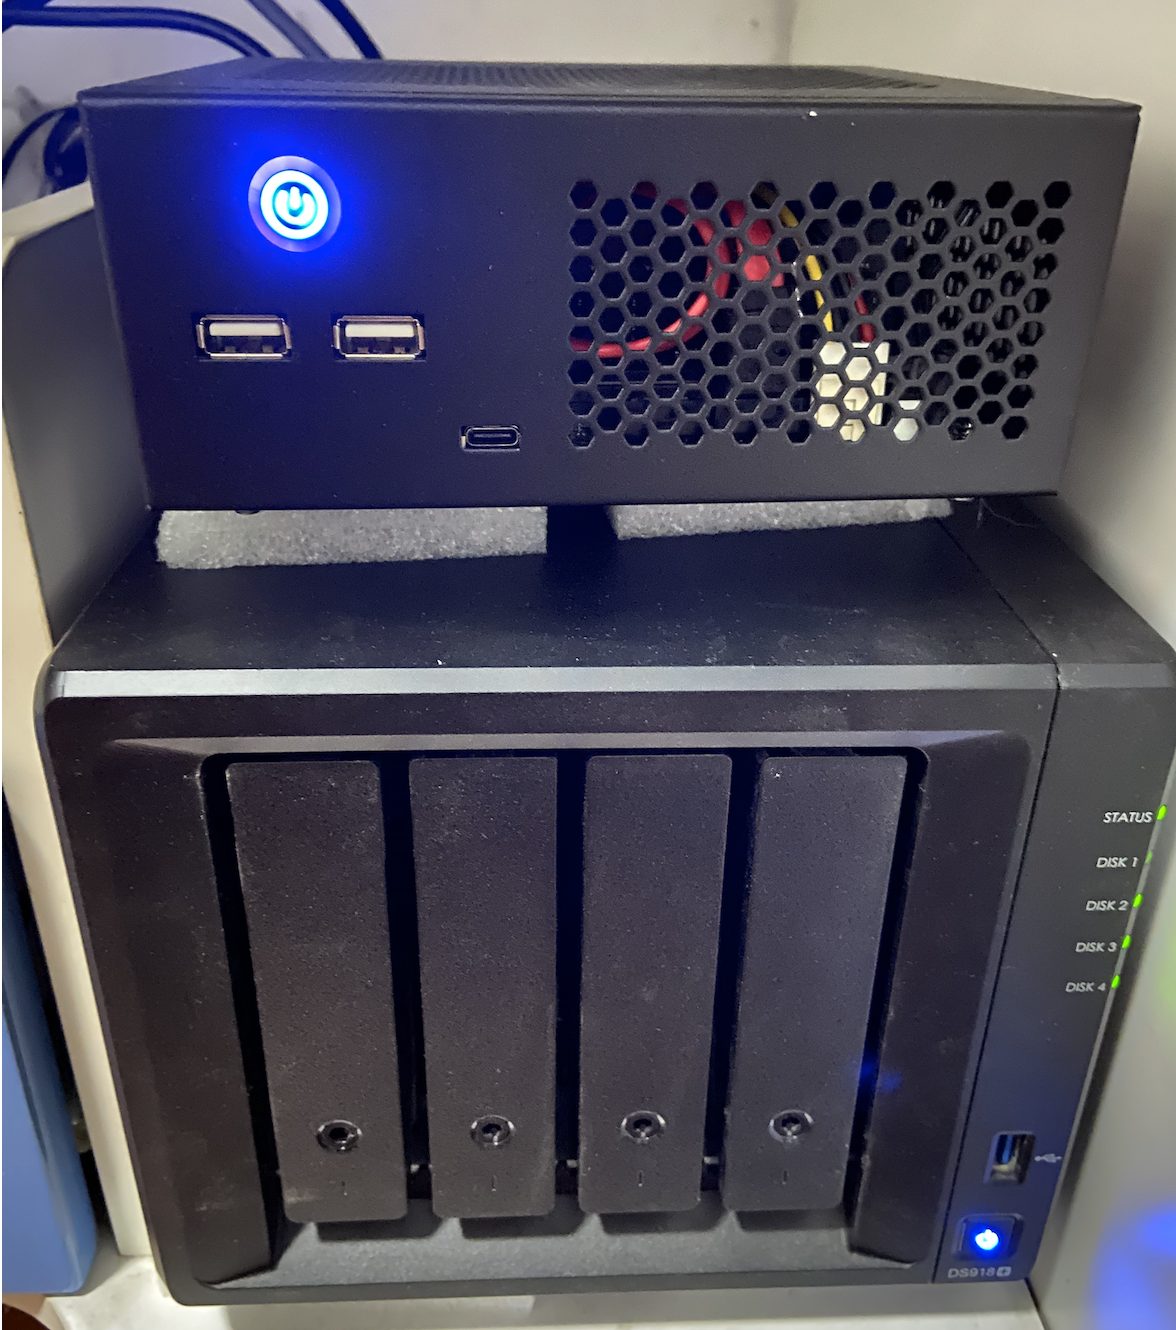
Placing the mini PC together with the DS 918+ looks like this:
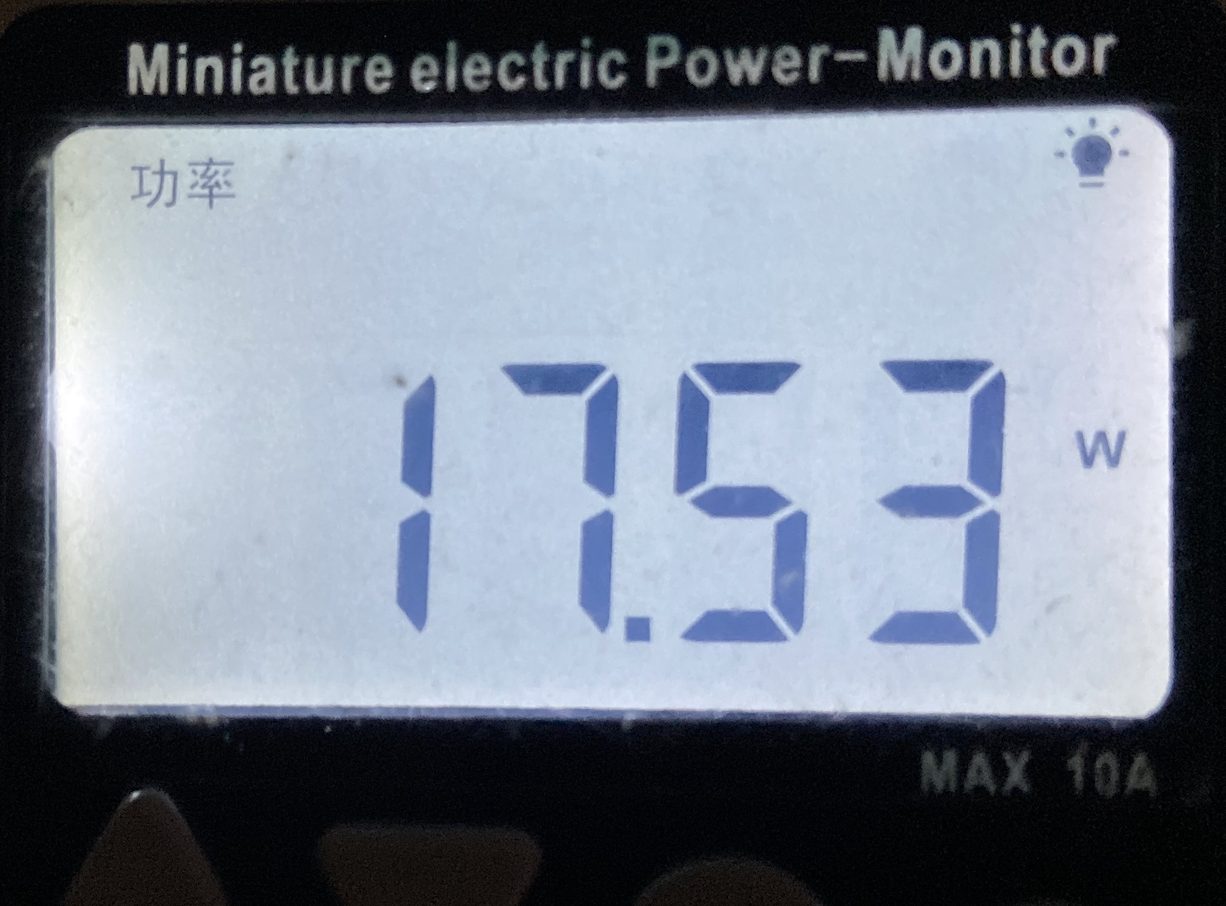
Power consumption at idle is only about 17 watts:
Subsequent adjustments
After the system was installed and running, I discovered two problems:
- The fan is very loud—even though the CPU temperature isn't high, the fan spins like crazy
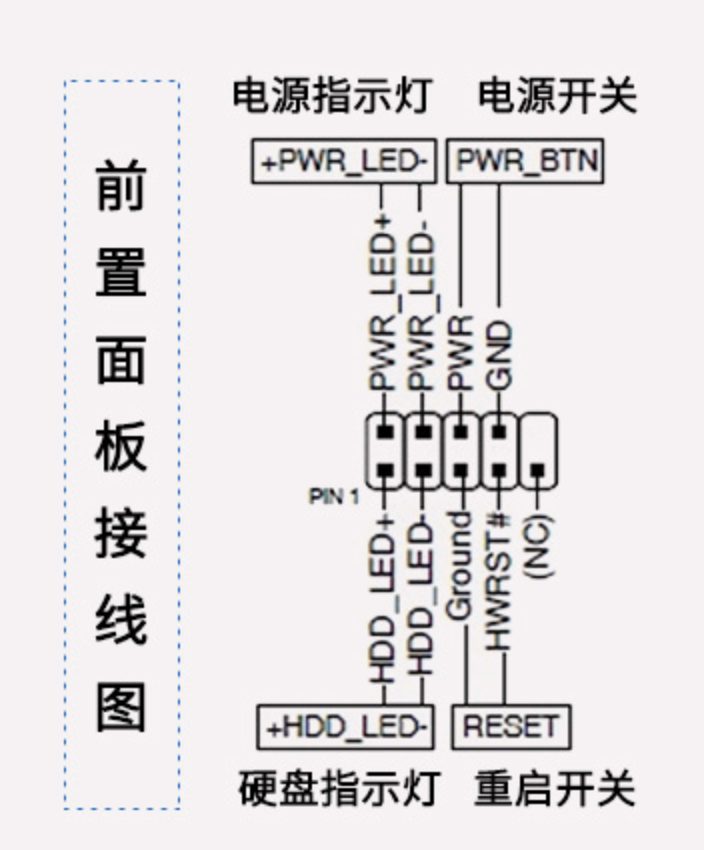
- The LED on the power button causes light pollution at night when sleeping, affecting sleep
So I made two adjustments:
- Adjusted the PWM fan control in the BIOS to let the fan run quietly
- Directly unplugged the LED on the power button
Adjusting the PWM is very simple—just enter the BIOS and click
Smart Fan 5 Settings and you can adjust the PWM.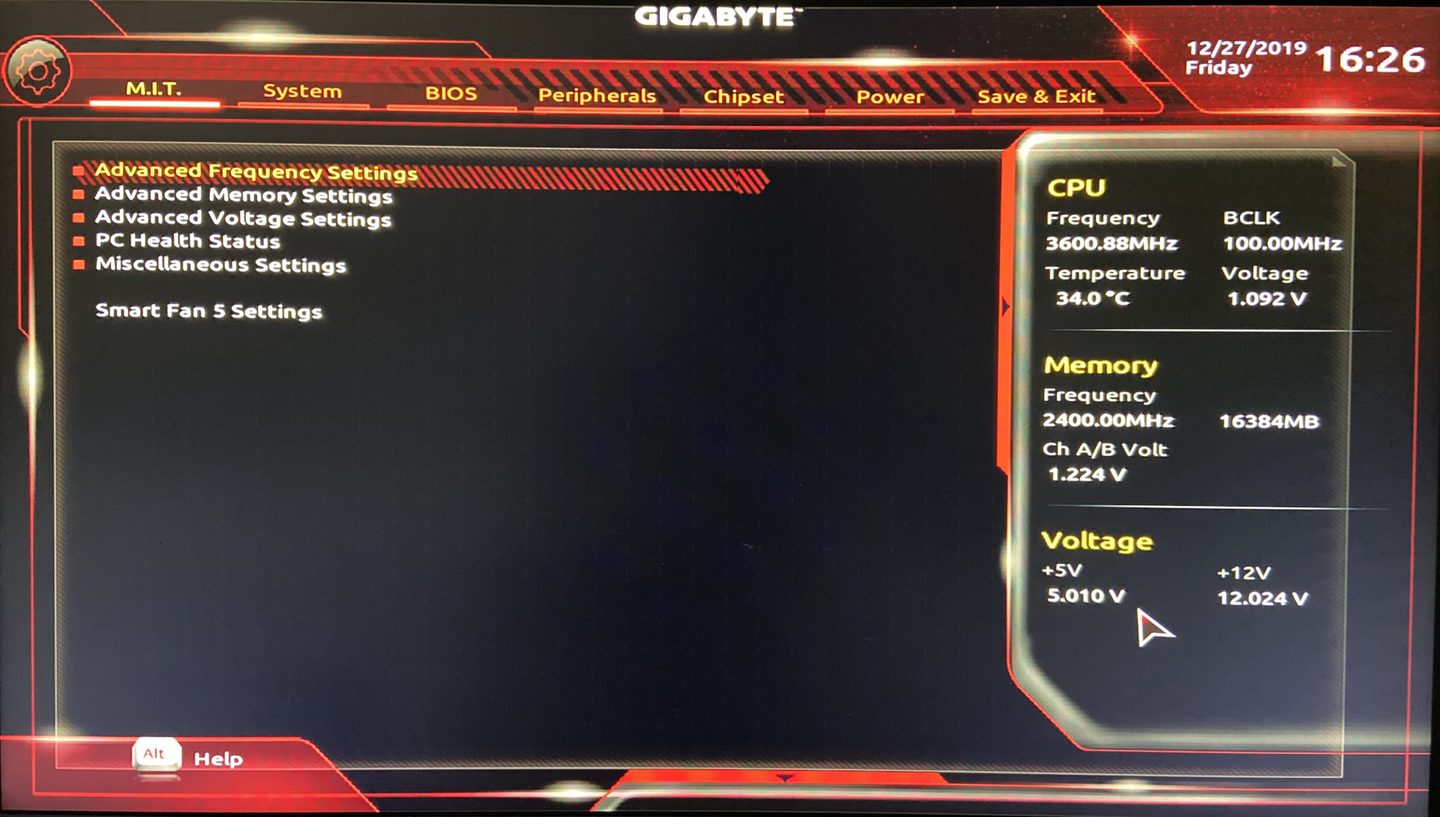
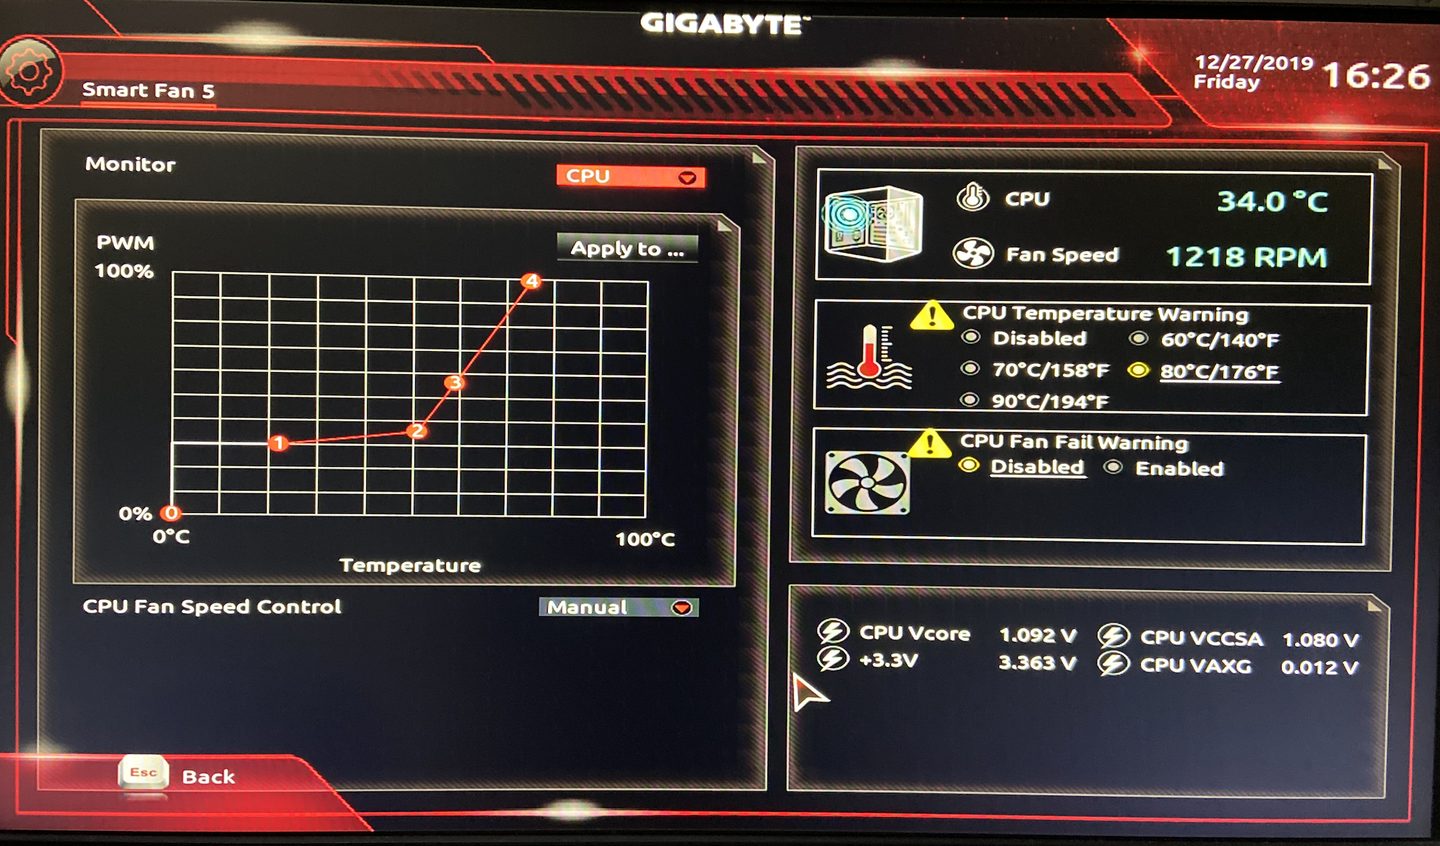
The above setting specifies that when the CPU temperature is below 50°C, the fan speed is between 30% and 35%; when the CPU temperature exceeds 50°C, the speed immediately increases; and when the temperature approaches 80°C, the fan runs at 100% speed. In fact, as can be seen from the temperature monitoring on the right, the idle temperature is only around 35°C, and when the fan runs at around 30% speed, there is almost no noise.
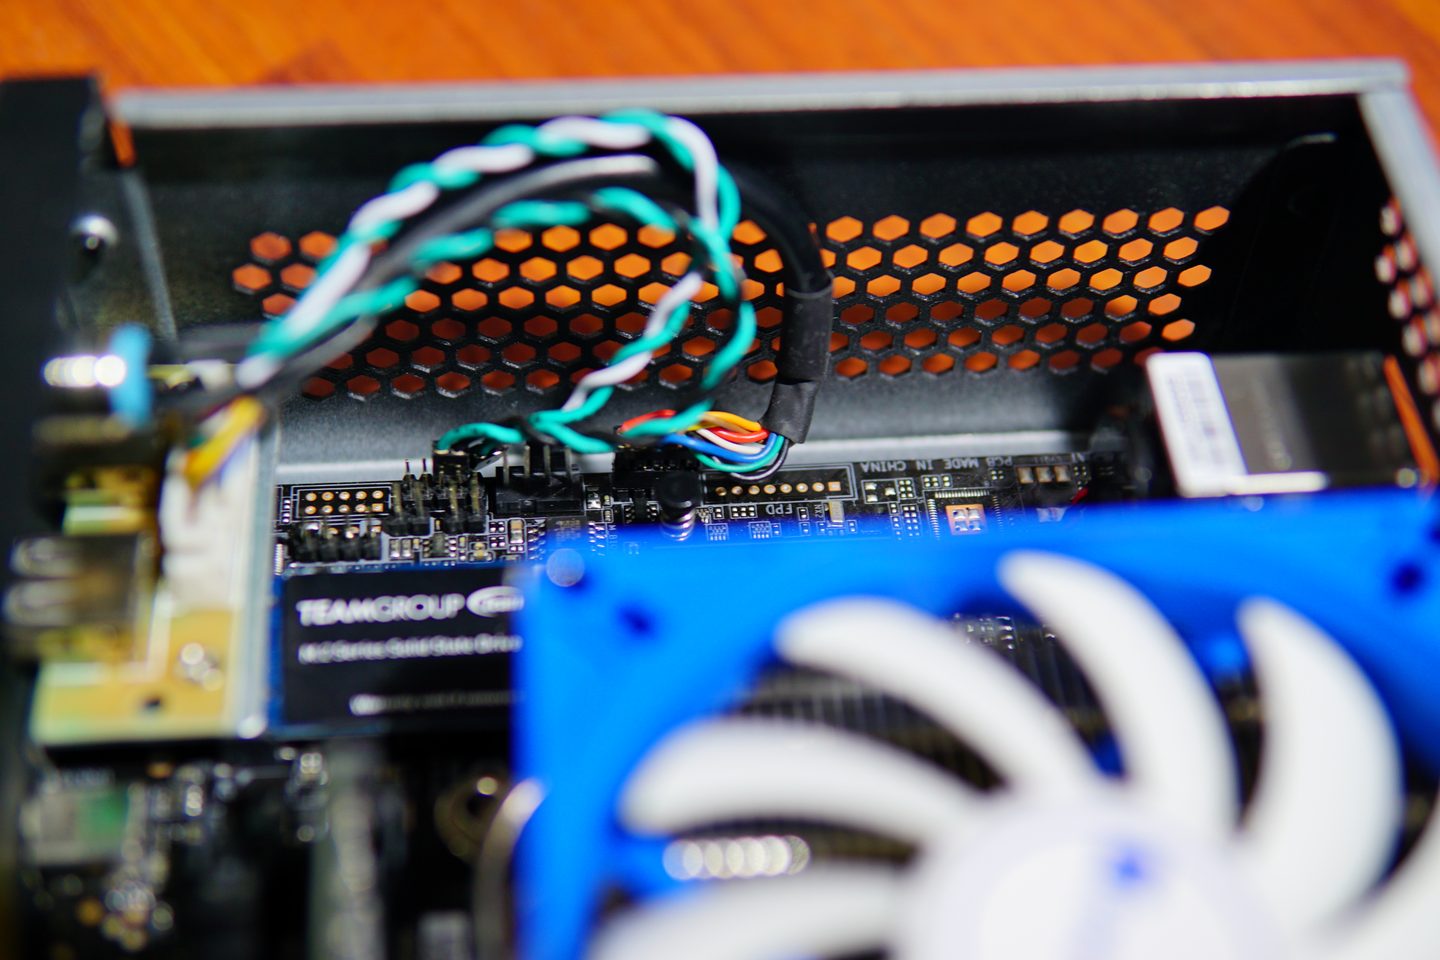
And removing the power light is also very simple—just unplug the relevant cable.
System Setup
After the hardware is assembled, it's time to start installing the system. I had originally planned to install Proxmox VE directly, but the ISO images downloaded from the official Proxmox website wouldn't boot directly, showing the message
grub_file_filters_enable not found , and there was simply no way to enter the installation interface. However, when I tried installing Windows 10 and ESXi directly, there were no problems at all—only Proxmox had issues. Later I looked it up online, and someone said it was probably because the BIOS was too old or too crappy. Since that was the case, I had no choice but to find another way.Later, on the official Proxmox website, I learned that you can actually install Proxmox in a roundabout way: first install Debian 10, and then install the Proxmox software.
So I directly referred to the Proxmox documentation for the installation steps:Install Proxmox VE on Debian Stretch, and it succeeded on the first try.
IP Settings
After Proxmox VE is installed, you need to create
vmbr0 network interface, as well as set a static IP. Directly edit /etc/network/interfaces file, and write:source /etc/network/interfaces.d/*
auto lo
iface lo inet loopback
allow-hotplug enp0s31f6
iface enp0s31f6 inet manual
auto vmbr0
iface vmbr0 inet static
address 192.168.1.102
netmask 24
gateway 192.168.1.1
bridge-ports enp0s31f6
bridge-stp off
bridge-fd 0Then execute
/etc/init.d/networking restart and it will take effect.Temperature Monitoring
After PVE is up and running, since the PVE control panel itself doesn't display the host CPU temperature, etc., in order to intuitively monitor the CPU temperature, I installed on PVE
lm-sensors software to detect the CPU temperature. Execute in the Shell of the PVE control panel:# 安装相关软件
apt install lm-sensors
# 让软件收集相关的传感器信息,在获取温度信息之前必须运行这个命令。过程会问你一堆问题,直接选 yes 就行
sensors-detect
# 传感器收集完成之后就可以获取当前的温度信息了
sensorsThe output is as follows (when I ran this command, one of my VMs was running a rather time-consuming task, so the CPU temperature shot up all at once):
root@proxmox:~# sensors
acpitz-acpi-0
Adapter: ACPI interface
temp1:        +27.8°C  (crit = +119.0°C)
temp2:        +29.8°C  (crit = +119.0°C)

coretemp-isa-0000
Adapter: ISA adapter
Package id 0:  +51.0°C  (high = +80.0°C, crit = +100.0°C)
Core 0:        +51.0°C  (high = +80.0°C, crit = +100.0°C)
Core 1:        +45.0°C  (high = +80.0°C, crit = +100.0°C)
Core 2:        +48.0°C  (high = +80.0°C, crit = +100.0°C)
Core 3:        +45.0°C  (high = +80.0°C, crit = +100.0°C)
Next, I need to modify the code of the PVE control panel so that we can directly see the temperature information in the panel. Execute in the Shell:
vi /usr/share/perl5/PVE/API2/Nodes.pmThen find
my $dinfo = df('/', 1); this line, and write above it $res→{thermalstate} = `sensors`; then save.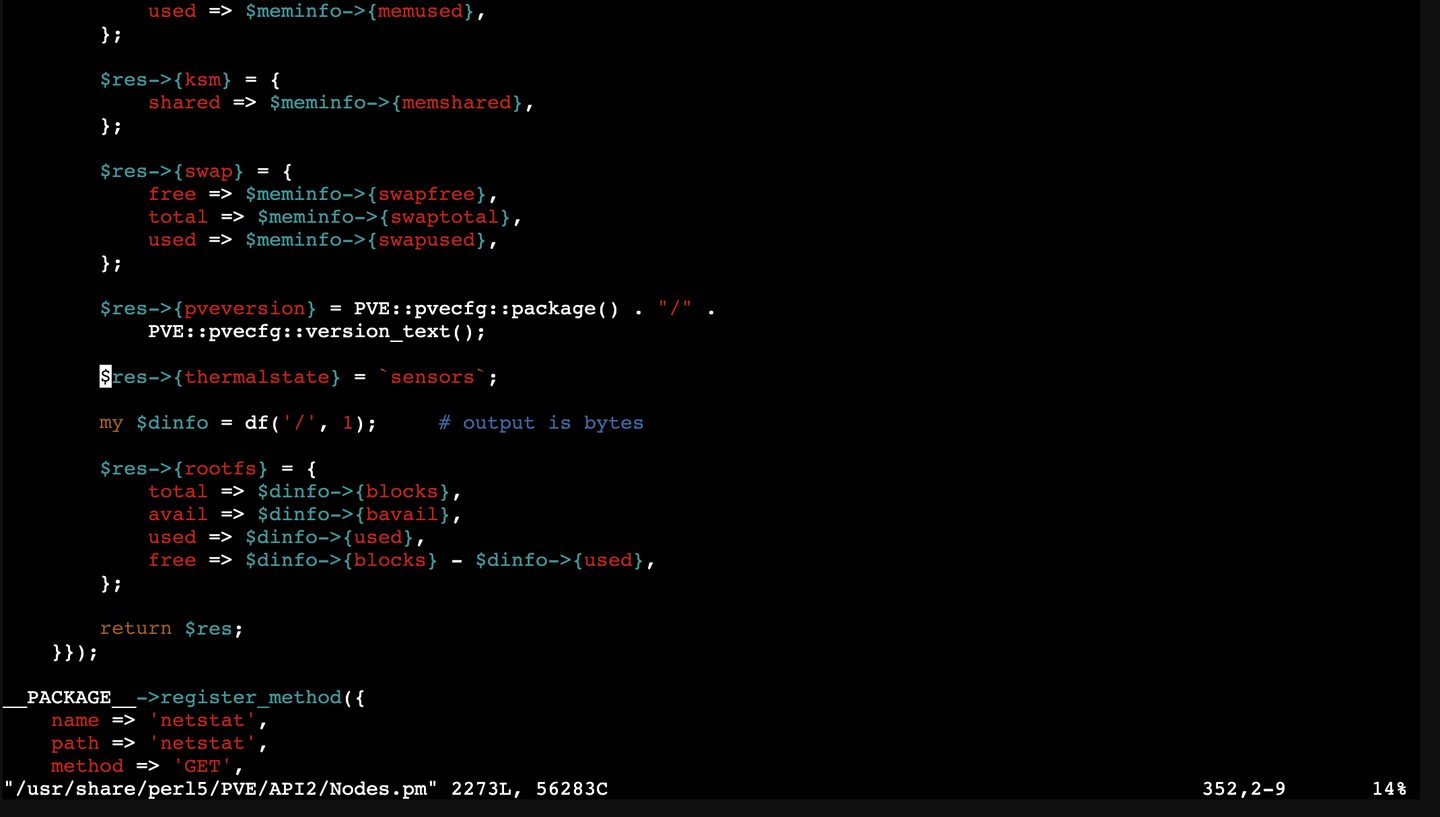
Next, edit
/usr/share/pve-manager/js/pvemanagerlib.js this file, and modify three places: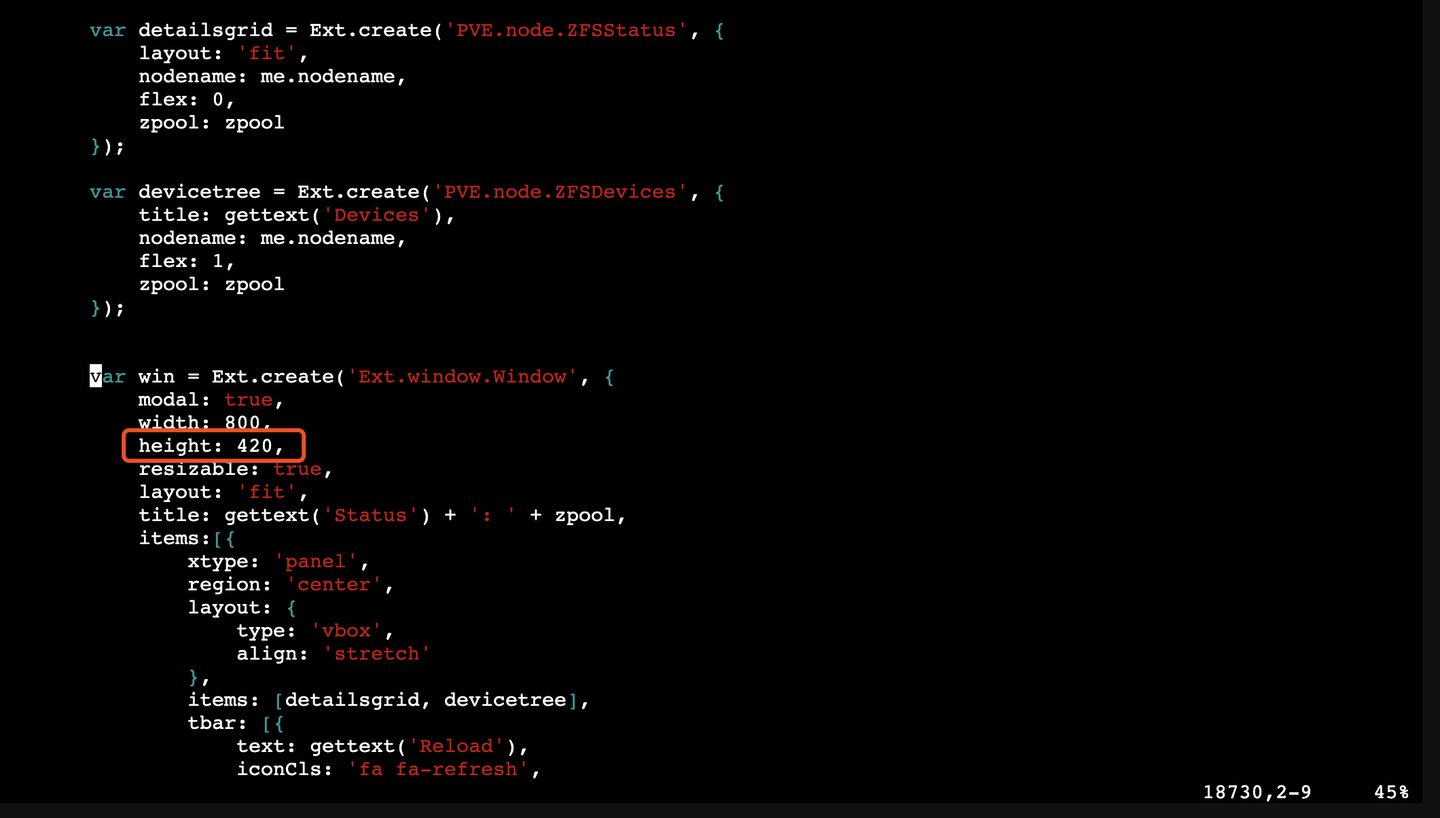
In line 18733,
height: 400 change to height: 420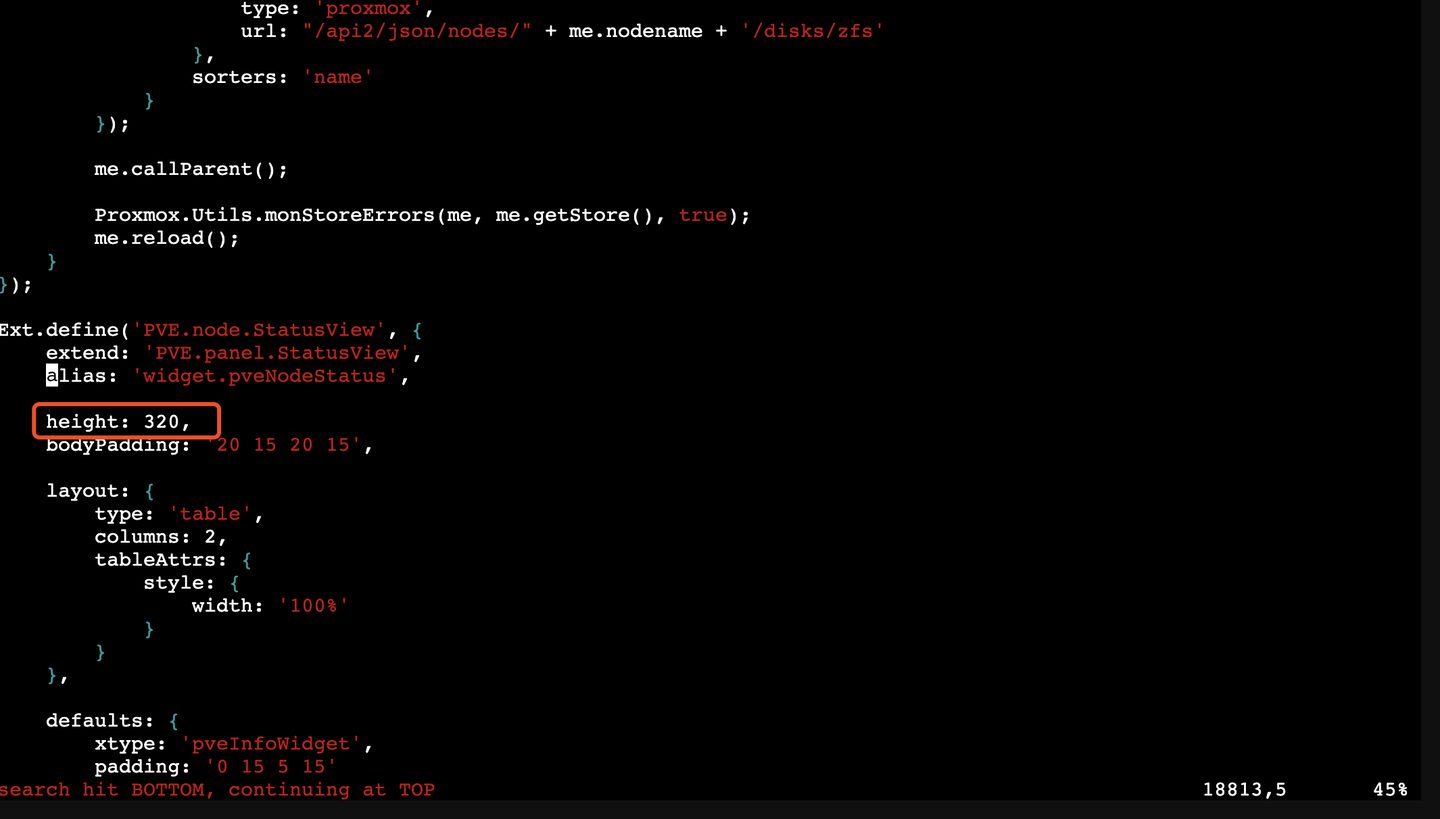
In line 18815,
height: 300 change to height: 320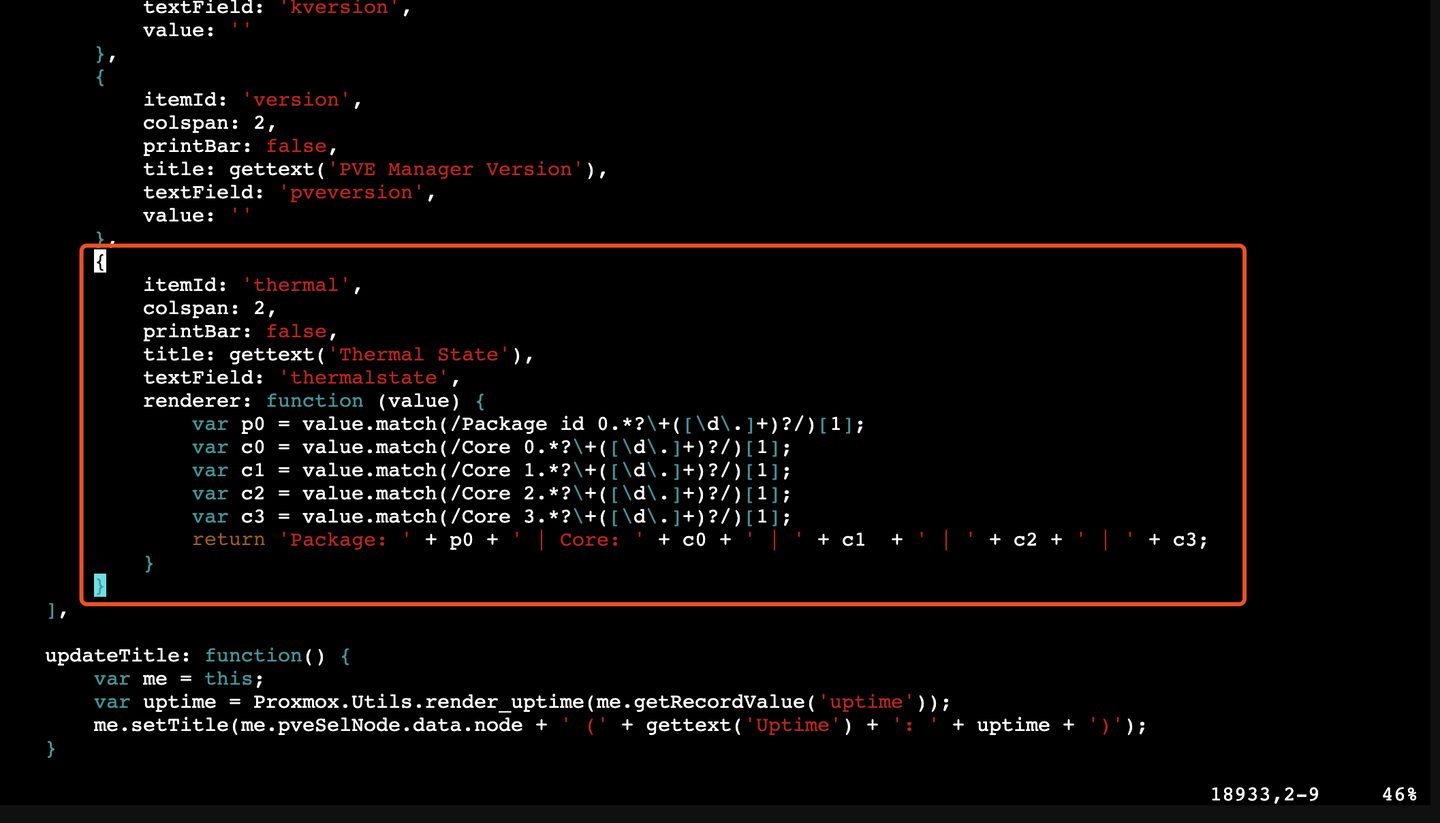
In line 18933, add the following content:
        {
            itemId: 'thermal',
            colspan: 2,
            printBar: false,
            title: gettext('Thermal State'),
            textField: 'thermalstate',
            renderer: function (value) {
                var p0 = value.match(/Package id 0.*?\+([\d\.]+)?/)[1];
                var c0 = value.match(/Core 0.*?\+([\d\.]+)?/)[1];
                var c1 = value.match(/Core 1.*?\+([\d\.]+)?/)[1];
                var c2 = value.match(/Core 2.*?\+([\d\.]+)?/)[1];
                var c3 = value.match(/Core 3.*?\+([\d\.]+)?/)[1];
                return 'Package: ' + p0 + ' | Core: ' + c0 + ' | ' + c1  + ' | ' + c2 + ' | ' + c3;
            }
        }
After saving, run
systemctl restart pveproxy restart the PVE panel, and then you will be able to see the temperature information from the panel: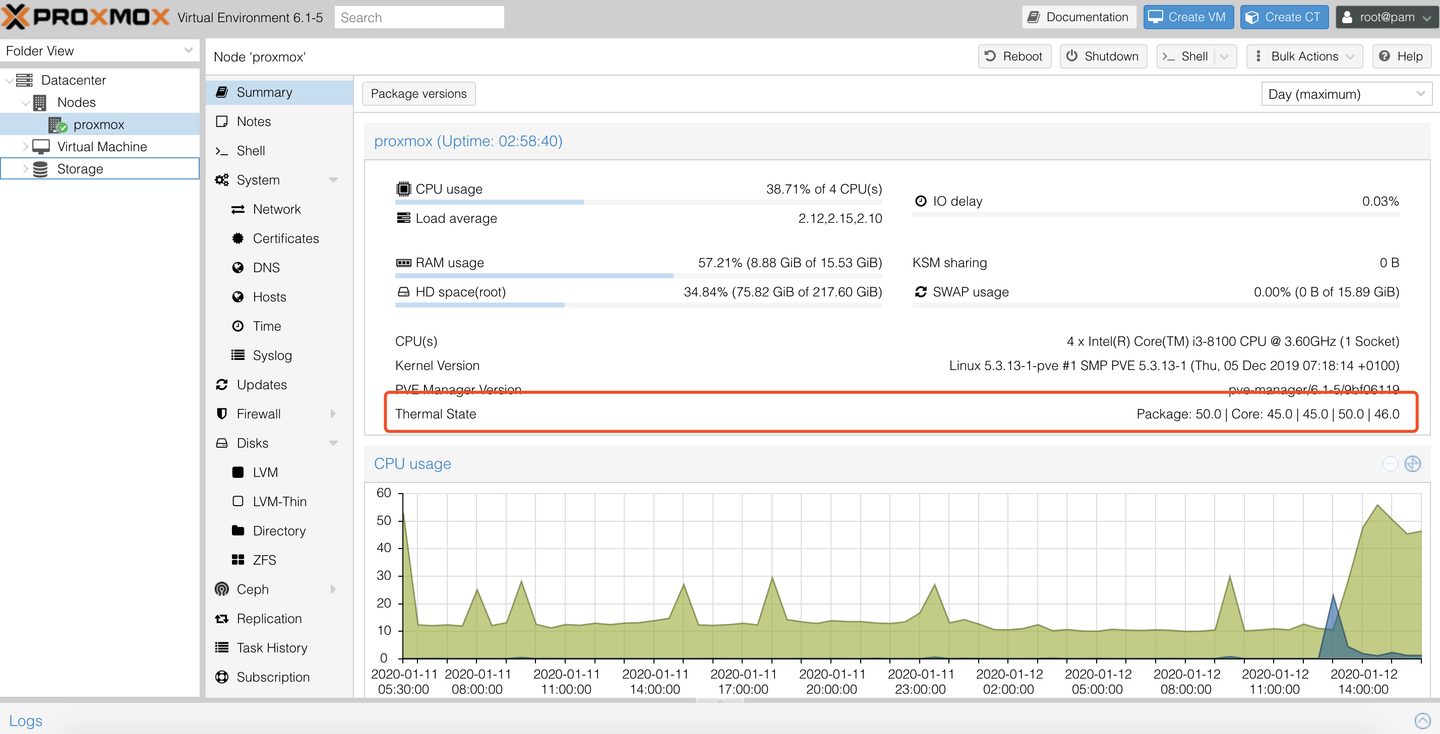
Configure PVE Storage
Since I already have a NAS, and the system image files are all stored on the NAS, I mounted the ISO system image folder from the NAS on PVE, so that I can select system images from the NAS.
Before mounting the folder on the NAS, you need to first enable the NFS service and set NFS rules for the shared folder:
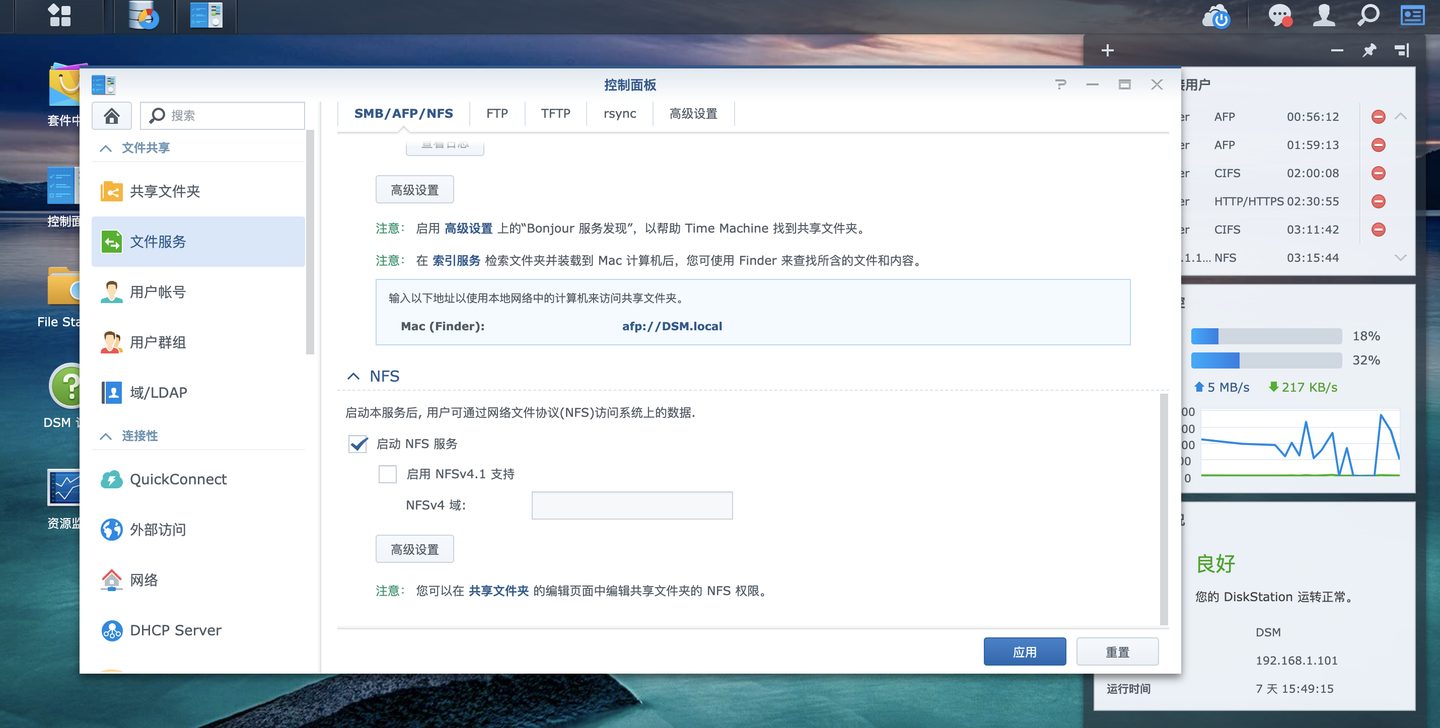
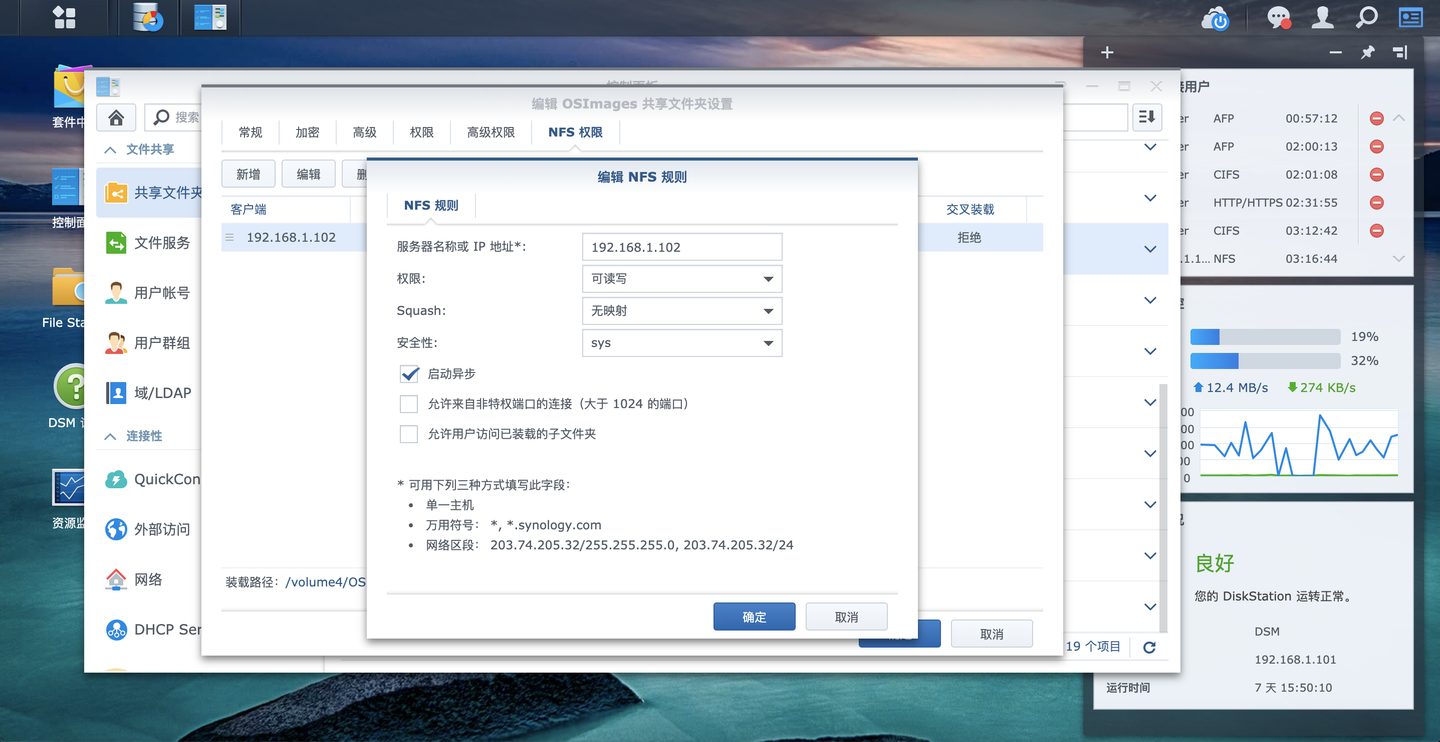
Finally, add NFS Storage on PVE:
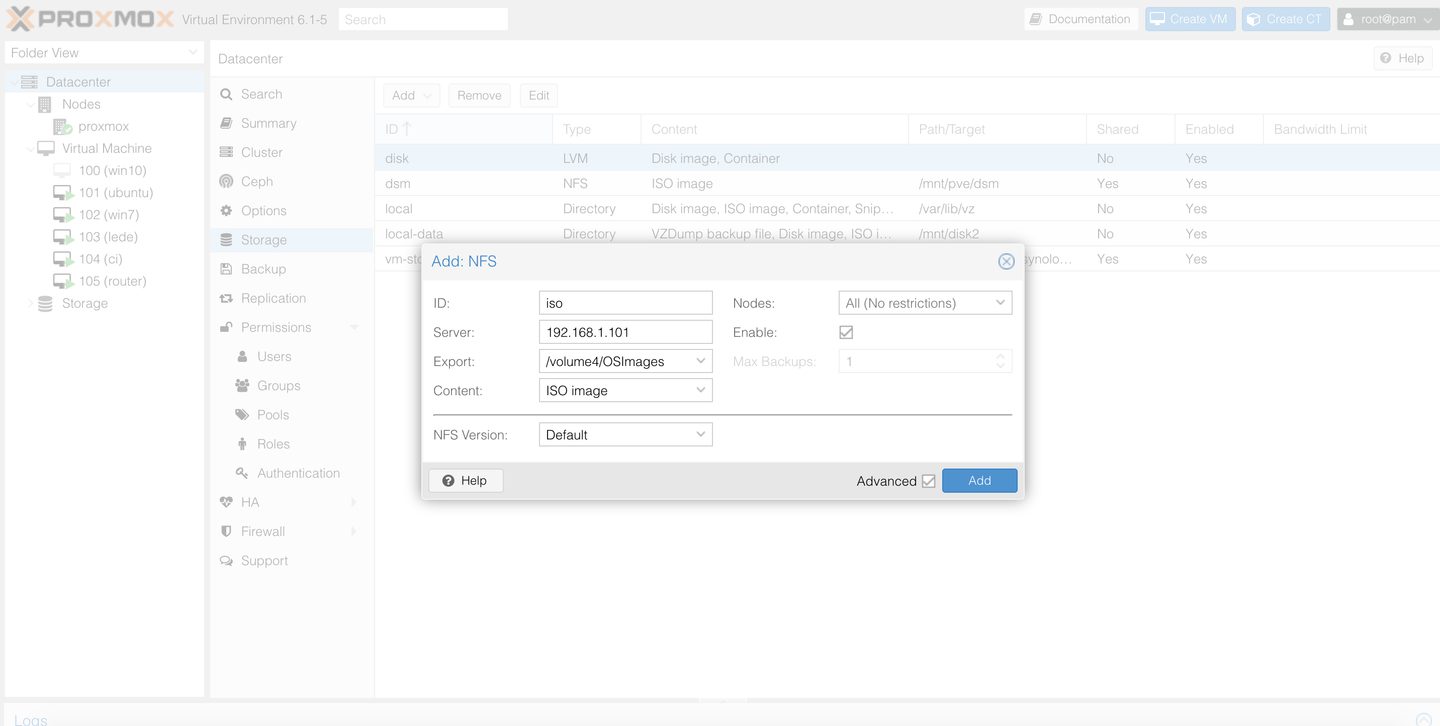
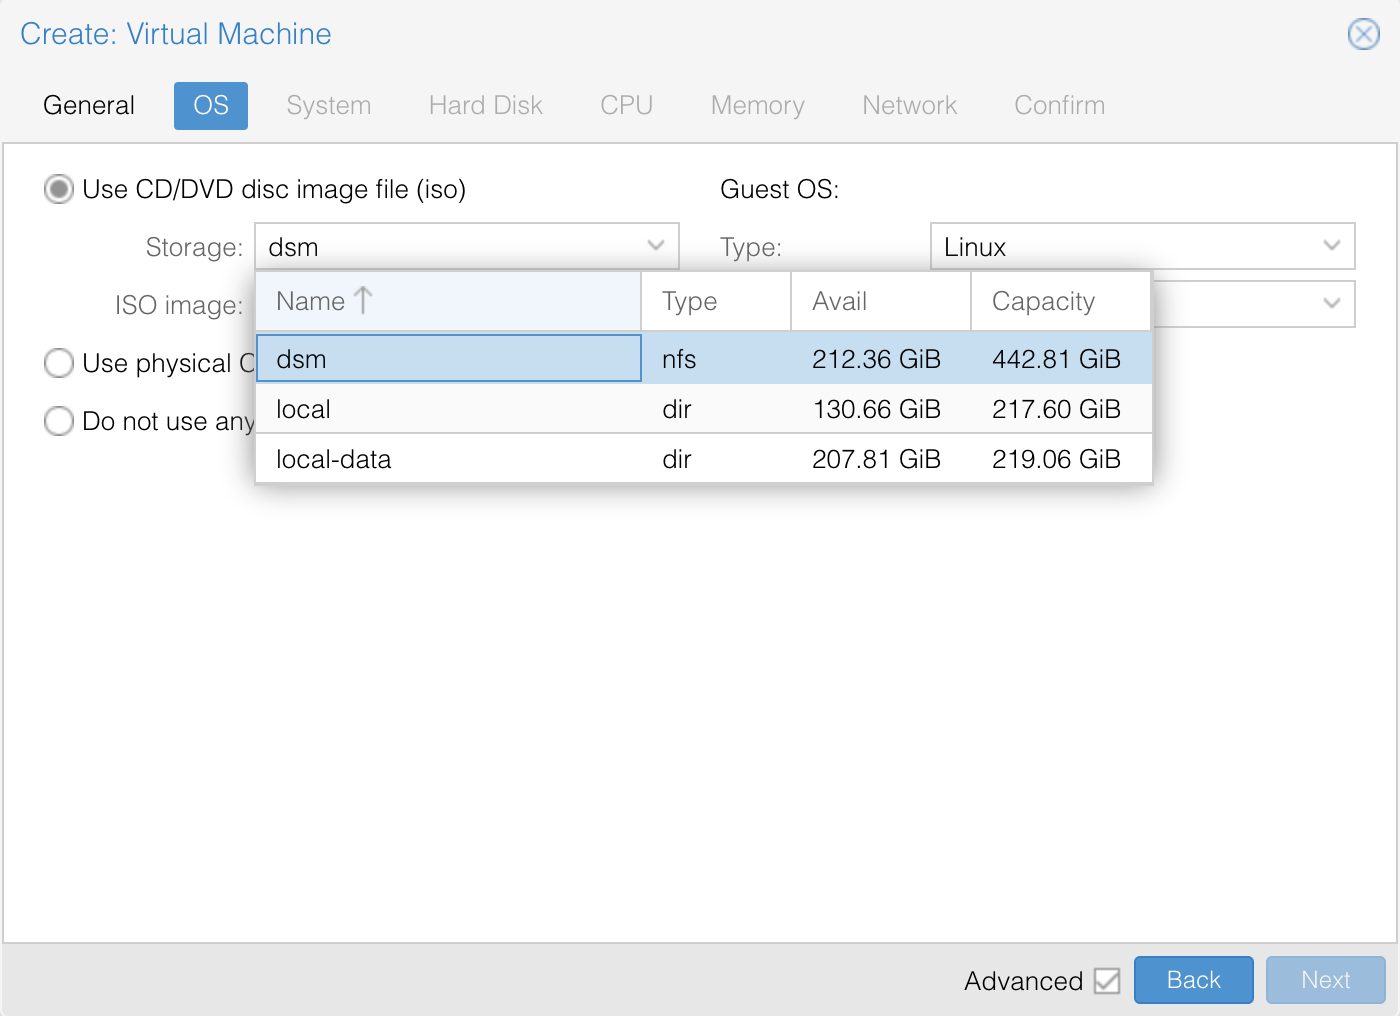
This way, when creating a virtual machine, you can select the ISO file you need from the NAS.
Of course, in addition to being able to select ISOs from the NAS, you can even store virtual machines on the NAS. This can be done by mounting the shared folder on the NAS via NFS or iSCSI.
Homelab Setup
This part is a bit of a clickbait title, because although it says Homelab Setup, I do not intend to write in detail about how I set it up. In fact, after PVE is set up, all that remains is to create virtual machines according to your own needs to achieve your goals. The process of creating a virtual machine itself is very simple, so there is not much to talk about.
Here is a list of the VMs I created on this host:
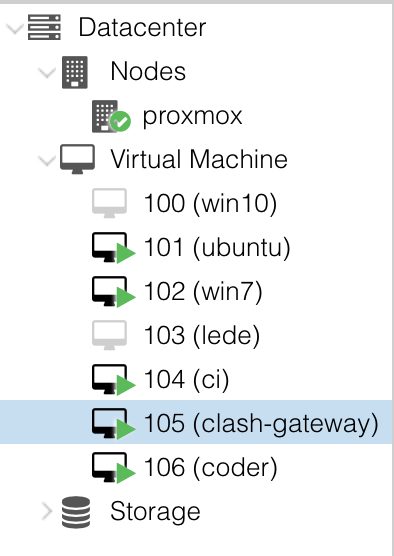
- Ubuntu: mainly used to run GitLab, and only runs the GitLab service. Database-related ones, such as Postgresql and Redis, still run on the NAS.
- Windows 7: Mainly used to run Google's "Backup and Sync" program, to sync my personal photo album to Google Photos. And sometimes I need to use the IE browser to open certain bank web pages.
- CI: Mainly used to run CI tasks.
- Clash-gateway: Mainly runs clash, serving as a bypass router gateway, so that all devices can bypass the firewall painlessly.
- Coder: Runs a remote version of VSCode, so that I can write code remotely.
The other two VMs that are not started: one Windows 10 is mainly a backup, in case some Windows software cannot run on Windows 7. Because the Windows 7 system uses a trimmed-down version of Windows Thin Client, some features may not be included. And LEDE serves as a backup for clash; whenever I get dissatisfied with clash, I'll switch back to LEDE.
And the Synology NAS runs the following services:
- Moments package: Used to manage phone photos and enable automatic photo backup
- Active Backup for Business package: Used to back up the data of VPS and the VMs inside PVE
- Photo Station package: Used to manage photos from mirrorless cameras
- Radarr package: Used to manage movies, as well as automatically monitor and download movies
- Sonarr package: Used to manage TV series, as well as automatically monitor and download TV series
- Plex package: Used to remotely watch multimedia files on the NAS
- Video Station package: Used to remotely watch multimedia files on the NAS
- QBittorrent: Used to download BT and PT
I also used the Docker package to run some containers. So with this setup, the Synology NAS is dedicated to storage, backup, and multimedia file management, while the Yunxuan mini PC is responsible for running GitLab, VSCode, a bypass router, and a Windows virtual machine. All my needs can be met between these two servers.
With this configuration, the following usage scenarios can be achieved:
- One day I had a sudden idea that I wanted to develop a web service
- Log in to the remote VSCode, create a project, and start writing code
- After finishing writing the code, commit it to GitLab
- The code commit triggers a CI task for continuous testing and packaging/release
- In the CI stage, the web service is packaged into an image via Docker, then pushed to GitLab's Registry
- In the CI stage, the deployment process is triggered, deploying the web service to a VM on PVE to serve as a testing environment
- Once the project development is finally complete, deploy the image to my own VPS
As for watching multimedia files, the following can be achieved:
- At home, use the TV to open Kodi and connect to the movies and TV shows on the NAS, directly watching the downloaded movies and TV shows
- Whether at home or out and about, you can use DS Video or Plex to watch resources on the NAS
- If you want to follow a TV series, add the series on Sonarr and configure monitoring to enable automatic downloading. The same applies to movies
Whether it's painless circumvention of internet restrictions for all my devices, multimedia needs, code hosting, service deployment, or continuous integration of projects, this configuration can satisfy them all.
Of course, there are many ways to implement this kind of solution, and all of this can even be done directly on a single NAS machine. This is, in my opinion, the solution that suits me best.
Summary
For around 1,600 yuan, I put together this tiny little machine, and I personally think it was money well spent. At the very least, it meets all my needs.
Since getting into NAS and Homelab, I've spent quite a bit of money on it, but the returns have far outweighed the costs. Of course, some people think NAS and Homelab are just fake needs. After all, there are plenty of cloud services these days, along with a bunch of free code hosting and CI services. But that feeling of having complete control over all your own data is really great. At least you don't have to worry about when some service might shut down or change its offerings. You also don't have to worry about unscrupulous vendors selling your private data. Homelab is inherently for people who enjoy tinkering, and I'm happy doing it—that's enough for me 😆.