

The Magic of the Tag
According to the standard definition, the tag is actually used to indicate the relationship between the current page and external resources: The HTML External Resource Link element () specifies relationships between the current document and an external resource. — MDN. One of the simplest examples is our most familiar reference to a stylesheet.
According to the standard definition,
<link> the tag is actually used to indicate the relationship between the current page and external resources:The HTML External Resource Link element (<link>) specifies relationships between the current document and an external resource. —— MDN
The simplest example is the stylesheet reference we are most familiar with:
<link href="style.css" rel="stylesheet" />Add this tag to the page's HTML, and when the page is opened, the browser will load it for us
style.css this file. The href (HREF = Hypertext REFerence) attribute specifies the URI address of the referenced resource, while rel (REL = RELationship) indicates the relationship between that resource and the document.The Link tag also has other very useful attributes. For example, you may not know that when using link to reference stylesheets, you can dynamically load different stylesheets based on media queries:
<link href="mobile.css" rel="stylesheet" media="screen and (max-width: 600px)" />Of course, this article is not specifically about how to load stylesheets. Besides loading stylesheets, the link tag is very helpful for loading web resources. If used properly, it can greatly improve your page load time and reduce the time to first interaction. Below are several methods for using the link tag to speed up web resource loading.
Preload
The resources that today's web pages depend on are not all declared in the main document in the form of HTML tags; many resources are deeply hidden inside CSS and JS files, such as font resources and asynchronous JS resources. These resources are usually necessary for rendering the page, but they cannot be discovered by the browser in advance, which delays the loading time of these resources, causing the page load time to become longer and possibly also making the blank screen time longer. The emergence of Preload was to solve this problem.
Preload, as the name suggests, is used to load a certain resource in advance. When the browser parses the HTML, if it encounters a preload tag, it will download this resource with a specific priority. But preload only helps you download in advance; it will not help you execute these resources. And when your page actually initiates a request for this resource, if preload has already finished downloading at that time, the browser will directly take the content from the preload download result instead of downloading the file again. In this way, from the result, the resource loading time will become much shorter (because it has already been downloaded for you in advance). In addition to helping you download resources in advance, Preload also has a very important characteristic:it will not block the page's onload event。
Let's give a very simple example:
<!DOCTYPE html>
<html>
<head>
  <title>Preload demo</title>
+ <link rel="preload" as="image" type="image/jpeg" href="https://avatars2.githubusercontent.com/u/6716522" >
</head>
<body>
  <p>Preload demo:</p>
  <script>
  (function() {
    window.addEventListener('load', function() {
      var image = document.createElement('img');
      image.src = 'https://avatars2.githubusercontent.com/u/6716522';
      document.body.appendChild(image);
    });
  })();
  </script>
</body>
</html>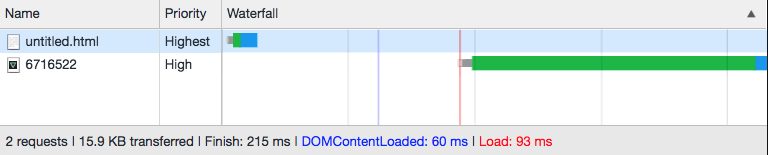
Request waterfall chart without preload
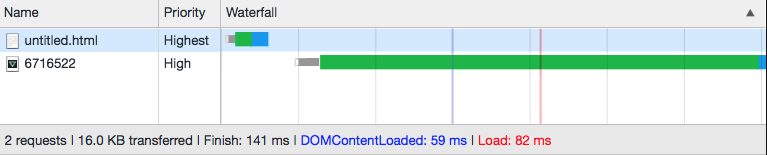
Request waterfall chart with preload
From the resource loading waterfall chart above, it can be seen that after using preload, the loading timing of the image is advanced by a lot instantly, and the loading of the resource does not affect the DOMContentLoaded event and the Load event in the slightest.
How to use Preload
Now that you understand what preload does, let's look at how to use preload. Similar to referencing CSS, preload is also declared using
<link> tag, except that the rel attribute is not stylesheet but preload. In addition, you also need to declare an as attribute to specify the type of the current resource. This attribute enables the browser to:- Set more precise resource loading priorities
- Set the correct Content-Security-Policy rules for the resource
- Set the correct Accept request header for the resource request
Combining these two attributes, a minimal preload tag can look like this:
<link rel="preload" as="script" href="http://example.com/test.js" />Preload can load a great many resource types, including:
audio: audio filesdocument: documents embedded in an iframeembed: embedded in<embed>resourcesfetch: resources loaded using XHR or fetch, such as an ArrayBuffer or a JSON filefont: font resourcesimage: image resourcesobject: embedded in<embed>resourcesscript: script resourcesstyle: style resourcestrack: WebVTT filesworker: web worker filesvideo: video resources
Set a MIME type
The preload tag can also set a type attribute, which can be used to tell the browser the MIME type of the current resource. If the browser does not support resources of that MIME type, it will ignore this resource and will not load it.
For example, if you want to preload an MP4 file, you can declare it like this:
<link rel="preload" href="sintel-short.mp4" as="video" type="video/mp4">On browsers that support the MP4 format, this resource will be loaded normally, while on browsers that do not support MP4, the resource will be ignored. This allows for more precise control over resource loading and avoids wasting bandwidth.
Preloading Cross-Origin Resources
Preload can also preload cross-origin resources; you just need to set the correct crossorigin attribute. For example, if you want to use preload to preload a cross-origin API or image resource, you only need to add the crossorigin attribute to the link tag:
<link rel="preload" href="http://exmaple.com/api/list" as="fetch" crossorigin />At this point, when the browser requests the API, it will automatically include the corresponding cross-origin request headers, such as the Origin header.
In addition, there is a special type of resource: even if it is same-origin, loading it with preload still requires setting the crossorigin attribute—namely, font resources.
<link rel="preload" href="fonts/icon.woff2" as="font" type="font/woff2" crossorigin>If you want to understand the reason behind this, you canconsult the W3C documentation。
Other Interesting Attributes
Since Preload itself is based on the link tag, it also has attributes such as the media attribute and the onload attribute mentioned at the beginning of the article.
The media attribute allows you to flexibly declare media queries, so that these resources are loaded only when the browser meets the conditions. This lets you control resource loading more precisely and avoid waste.
The onload attribute, meanwhile, can achieve some unexpected effects.
Some Clever Uses of Preload
From the above, we can see that preload has the following special characteristics:
- Resources are only downloaded, not executed
- Preloaded resources can be reused
- Resource loading does not block the page onload event
- The tag itself has an onload event
It can achieve:
Delaying the execution of resources
From the first point, we can see the revolutionary significance of preload: it decouples the loading and execution of resources! This means that after a resource has finished loading,we can delay the execution of the resource and execute it only when we need to.
Imagine a scenario where at some point your page needs to execute a third-party script, for example when the user clicks a button. But the logic of this script executes immediately; it does not expose something like a
runNow() method that lets you manually control when it executes, and you do not have control over its contents. This means you cannot load it in the HTML file with a regular <script> tag to load it, because with this method of loading, as soon as the script finishes loading, the script's logic executes immediately, whereas we want the timing of the script's execution to be manually controllable. So before Preload appeared, all you could do was manually create a <script> tag to load it. But loading takes time, so there is a gap between the user clicking the button and the script finishing execution. During this period, the page cannot respond normally to the user's actions, and the user may be at a loss.With preload, however, the problem becomes much simpler. In a case like this, we can use
<link rel="preload"> in the HTML file to load this third-party script, and then when the user clicks the button, manually create <script> tag to load and execute it. Since preload was used for preloading, it can be considered that manually creating <script> the load time is negligible, so the page can respond more quickly to the user's button click, and the user will not be confused by it. Elegant Asynchronous Resource Loading
The characteristics of Preload mean that it can be used to implement asynchronous loading of resources. Using the onload event, we can write asynchronous script loading like this:
<link rel="preload" as="script" href="async_script.js"
onload="var script = document.createElement('script');
        script.src = this.href;
        document.body.appendChild(script);">
Once the resource has finished preloading, a real script tag is immediately created to load and execute it, and because preloaded resources can be reused, the load time is negligible. Moreover, when preload loads a resource, it does not affect the loading of other resources on the page, nor does it affect
window.onload timing, so it is very suitable for this scenario. In contrast, the script tag's built-in async and defer attributes, although they are also used for asynchronous loading, they affect window.onload timing. Preload has an unparalleled advantage here.In addition to asynchronously loading scripts, it can also be used to asynchronously load style files. As we all know,
<link rel="stylesheet"> loading a CSS file will block the parsing of the HTML content after the tag, and the page remains non-interactive until the style file has finished downloading. Before preload appeared, if you wanted to asynchronously load a CSS file, you could only use a script to manually request the CSS file and then dynamically create a <style> tag. But after preload appeared, everything became very simple. To asynchronously load a CSS file, you only need to write one line of code:<link href="style.css" rel="preload" onload="this.rel = 'stylesheet'" />When
style.css preloading is complete, it takes effect immediately, and the entire process does not affect the loading of other resources on the page, nor does it affect the continued parsing of the HTML!Using this asynchronous loading method is more suitable for resources that the page does not strongly depend on, such as page analytics SDKs, page monitoring SDKs, comment SDKs, and so on. This is because this type of resource is of no help to the rendering of the page's critical content. Therefore, these resources can be loaded asynchronously so that they do not affect the parsing of the rest of the page. This helps the page's critical content display faster, thereby reducing the page's blank screen time and time to interactive.
Prefetch
Similar to preload, prefetch is also used to preload resources. However, it is very different from preload.
In fact, prefetch came into being much earlier than preload. However, it was created to accelerate resources that the page may use in the future. In other words, prefetch is used to serve subsequent page visits, not the current page visit. Conversely, preload is used to serve the current page visit.
How to Use Prefetch
The usage of prefetch is very similar to that of preload; you only need to change the rel attribute to
prefetch and that's it:<link rel="prefetch" href="/image.jpg" >Differences Between Prefetch and Preload
As mentioned at the beginning, the most fundamental difference between prefetch and preload is that they serve different targets. The resources preloaded by preload are all for the current page. If a preloaded resource is still unused a few seconds after the current page finishes loading, Chrome will output a warning in the console, reminding you that the preloaded resource has not actually been used. Prefetch, on the other hand, is for subsequent page visits.
In other words, preload speeds up the loading of the current page, while prefetch is used to speed up the second page visit. The two can coexist and can be regarded as complementary.
In terms of how they are declared in tags, prefetch differs from preload: prefetch has no as attribute and no crossorigin attribute. Prefetch is not subject to CORS cross-origin restrictions, so you can use it to preload resources from other domains without worrying about being restricted by CORS policies.
In addition, prefetch has no onload event either, so you cannot determine exactly when a resource has finished downloading. Moreover, in the Firefox browser, prefetch resources only start downloading when the browser is idle.
DNS prefetch
When we visit a web page, we usually access it using a domain name. Behind the scenes, the browser quietly performs DNS resolution on the domain name to obtain the server IP, and only then can it establish a connection with the server. DNS resolution can sometimes take a certain amount of time; when there is no local DNS cache, it has to recursively query upward level by level. It can be said that DNS resolution affects page load performance to some extent.
DNS prefetch, on the other hand, allows the browser to resolve the IP addresses of the corresponding domain names in advance, so that when the page accesses resources from these domain names, the browser no longer needs to spend time resolving DNS. This can speed up page access.


The image above shows request waterfall charts with and without DNS prefetch. As you can see, in the second chart, because DNS prefetch is used, the timing of DNS resolution is moved earlier.
How to use DNS prefetch
Change the rel attribute of the link tag to
dns-prefetch , and then pass the domain name to be resolved to href.<link rel="dns-prefetch" href="//example.com">When resolving DNS, only the domain name is needed, so href does not need to include the detailed path.
When to use DNS prefetch
DNS prefetch is suitable for resolving the DNS of third-party site resources in advance. If DNS prefetch is not used, then when the page loads third-party site resources, because the domain name is different from that of the original site, if there is no DNS cache at that time, DNS resolution will be performed first before a connection is created. If DNS prefetch is used, the timing of DNS resolution can be moved earlier, so that DNS resolution is no longer needed when the third-party site resources are actually loaded.
For resources on the same site, DNS prefetch is not needed, because a DNS cache will already exist when these resources are loaded.
DNS prefetch is suitable for resolving the DNS of third-party site resources in advance. If DNS prefetch is not used, then when the page loads resources from a third-party site, since the domain name is different from the original site, if there is no DNS cache at that time, a DNS resolution will be performed first before a connection is created. If DNS prefetch is used, the timing of DNS resolution can be moved earlier, so that when the third-party site resources are actually loaded, DNS resolution is no longer needed. For resources on the same site, DNS prefetch is not needed, because a DNS cache will already exist when these resources are loaded. Preconnect Preconnect is similar to DNS prefetch, except that it does more than DNS prefetch: it can not only resolve DNS in advance, but also create a TCP connection in advance, and perform TLS negotiation if necessary. The figure below is a simple illustration: Compared with the DNS prefetch figure above, you can see that after using preconnect, the timing of DNS, TCP, and SSL resolution for the font file is moved earlier, and the overall page load time is shortened as a result.
Preconnect is similar to DNS prefetch, except that it does more than DNS prefetch: it can not only resolve DNS in advance, but also create a TCP connection in advance, and perform TLS negotiation if necessary. The figure below is a simple illustration:

Compared with the DNS prefetch figure above, you can see that after using preconnect, the timing of DNS, TCP, and SSL resolution for the font file is moved earlier, and the overall page load time is shortened as a result.
How to use Preconnect
Similar to DNS prefetch, you only need to set the rel attribute to
preconnect and that's it:<link rel="preconnect" href="//example.com">When to use Preconnect
The scenarios where DNS prefetch applies also apply to preconnect. In theory, preconnect should be preferred, because preconnect does more and therefore has more room for improvement. However, preconnect appeared much later than DNS prefetch, so there are compatibility issues. Therefore, as a best practice, you can declare both together.
Prerender
Prerender is mainly used to render a page in advance. It not only loads this page, but also downloads all the resources this page depends on and executes their logic. This looks equivalent to creating a hidden tab to load a page, and when the user actually visits this page, the browser then displays the content of this hidden tab.
How to use Prerender
Set the rel attribute to
prerender and that's it:<link rel="prerender" href="https://www.google.com" >When to Use Prerender
In fact, you should use prerender with caution. You should only set prerender if you are sure the user will definitely visit the prerendered page. Otherwise, abusing prerender will waste the user's bandwidth and traffic.
In addition, since prerender executes the page's JS logic and downloads all of the page's resource dependencies, which very likely include analytics functionality, using prerender may cause analytics to be inaccurate. Therefore, before using prerender, you should make sure your page logic will not be affected by this feature.
Summary
Preload, prefetch, DNS prefetch, and preconnect are currently among the more commonly used means of improving web page loading performance. Among them, preload is the most powerful; if used properly, it can reduce the time a page remains blank and speed up page loading. Prerender, however, has relatively few use cases because its side effects are significant. Developers should use it with caution.
These optimization techniques are all implemented by declaring a simple <link> tag, which shows just how powerful the <link> tag is. If your page is not yet using the optimization techniques mentioned above, you should take a look! Making users open your web pages faster is a skill every developer must master.