

Synology NAS: Backup Features
The primary role of a NAS is backup. For me, the data I need to back up includes personal photos, some work files, and some of my own private files, as well as backups of important files from my phone and computer. Time Machine Backup For the macOS system, the simplest way to back up is to use Time Machine. Time Machine is a system-level backup that performs incremental backups of your entire macOS system drive. Time Machine is generally paired with an external hard drive for system backups, but DSM can also enable Time Machine
The primary role of a NAS is backup. For me, the data I need to back up includes personal photos, some work files, and some of my own private files, as well as backups of important files from my phone and computer.
Time Machine Backup
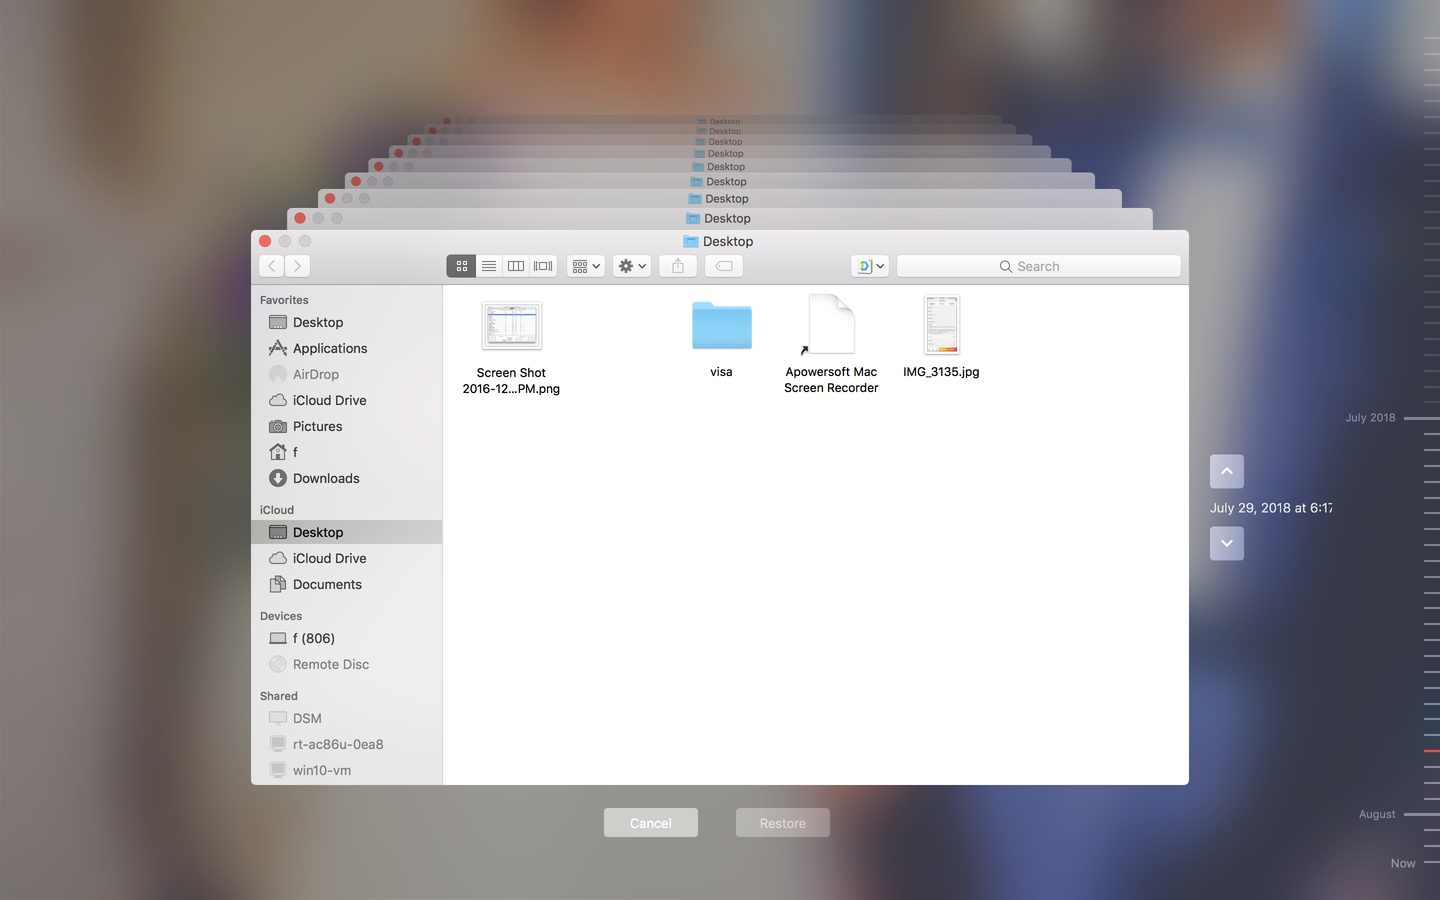
For the macOS system, the simplest way to back up is to use Time Machine. Time Machine is a system-level backup that performs incremental backups of your entire macOS system drive. Time Machine is generally used with an external hard drive to back up the system, but DSM can also enable support for Time Machine backups.
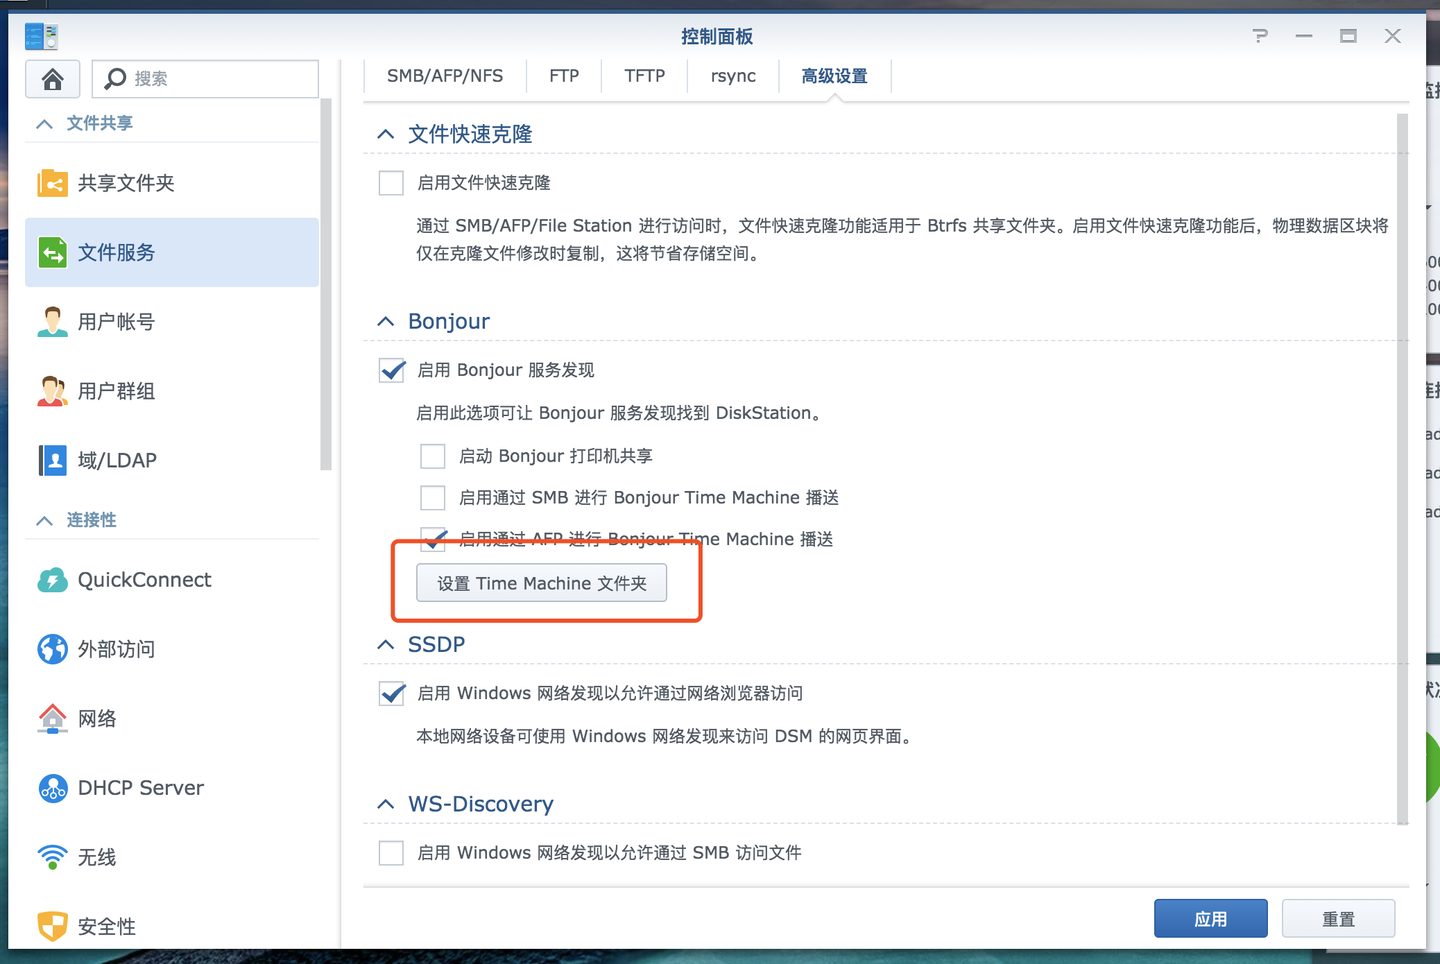
Enter the DSM management console, and you can enable the Time Machine backup feature in the system settings.
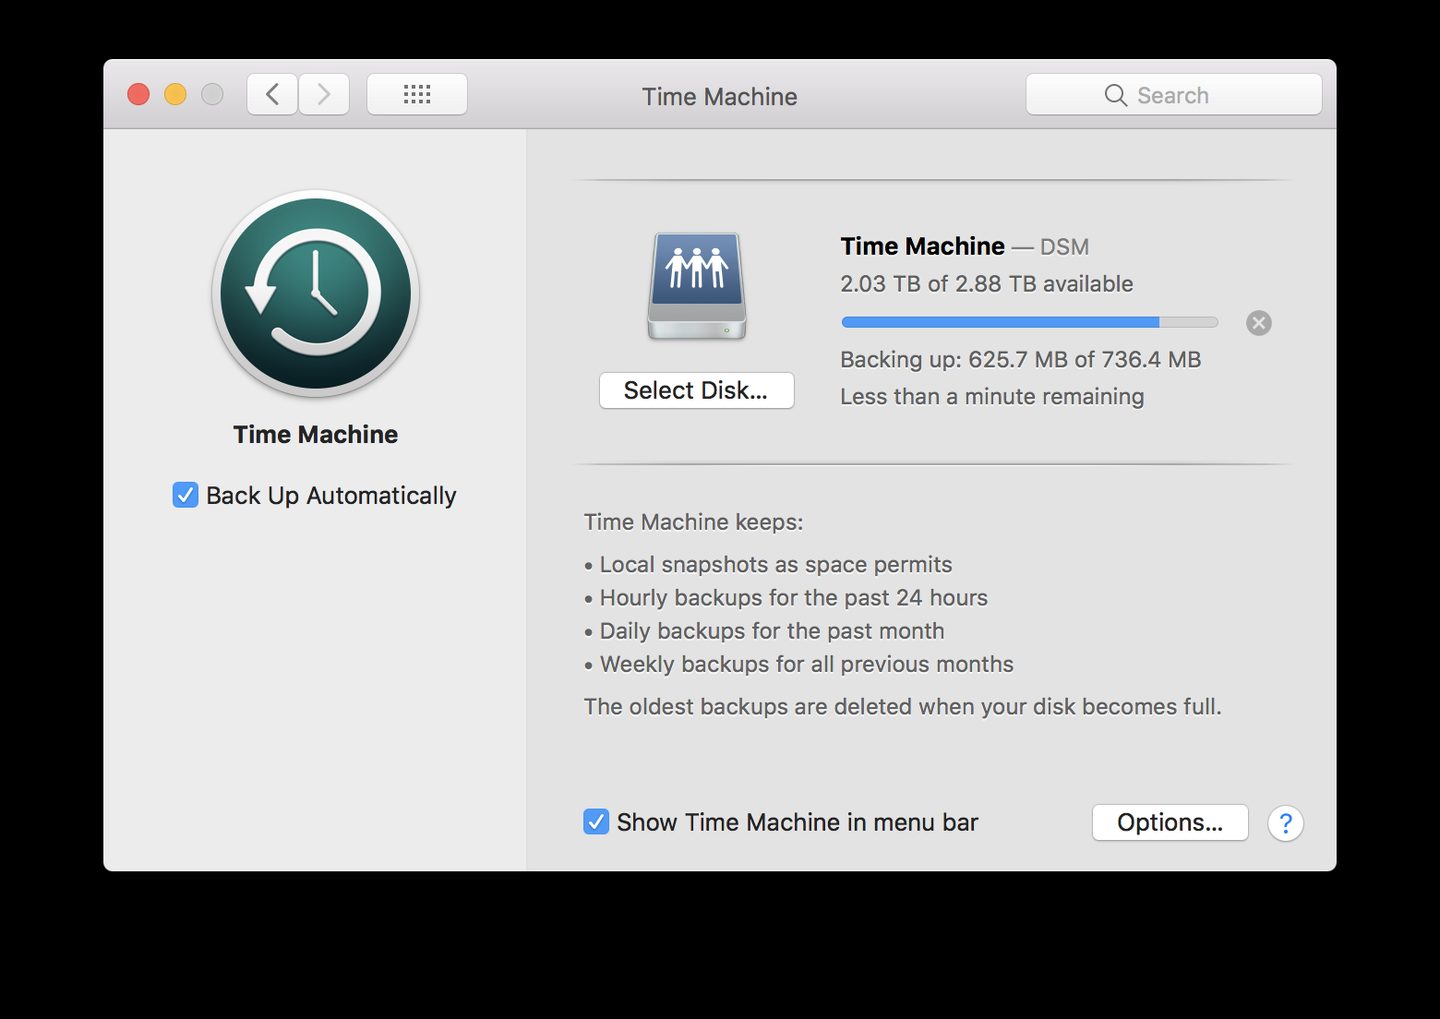
Open Time Machine on macOS and then select the folder you previously set up on the DSM.
When using Time Machine for system backups, the first backup is usually very slow because it is a full backup at that point. After the first backup is complete, subsequent backups are intelligent incremental backups, which are relatively much faster. In addition, after automatic backup is enabled on macOS, the whole process is almost imperceptible. You can use your computer normally, and the system will automatically back it up for you at regular intervals, so you no longer need to worry about losing files on your computer—even if you delete them by mistake, you can get them back.
Another point is that Time Machine is a full-disk backup, which means that even if your hard drive is formatted, you can fully restore it to its original state through the Time Machine backup. Of course, I haven't tried this myself, so whether it works well is another matter.
Server Backup
Time Machine is a feature unique to macOS, so you can only use it to back up macOS systems. So what about Linux or Windows systems? Don't worry, Synology has thought of this too.
Synology provides a package called Active Backup for Server to help you back up Windows and Linux systems:
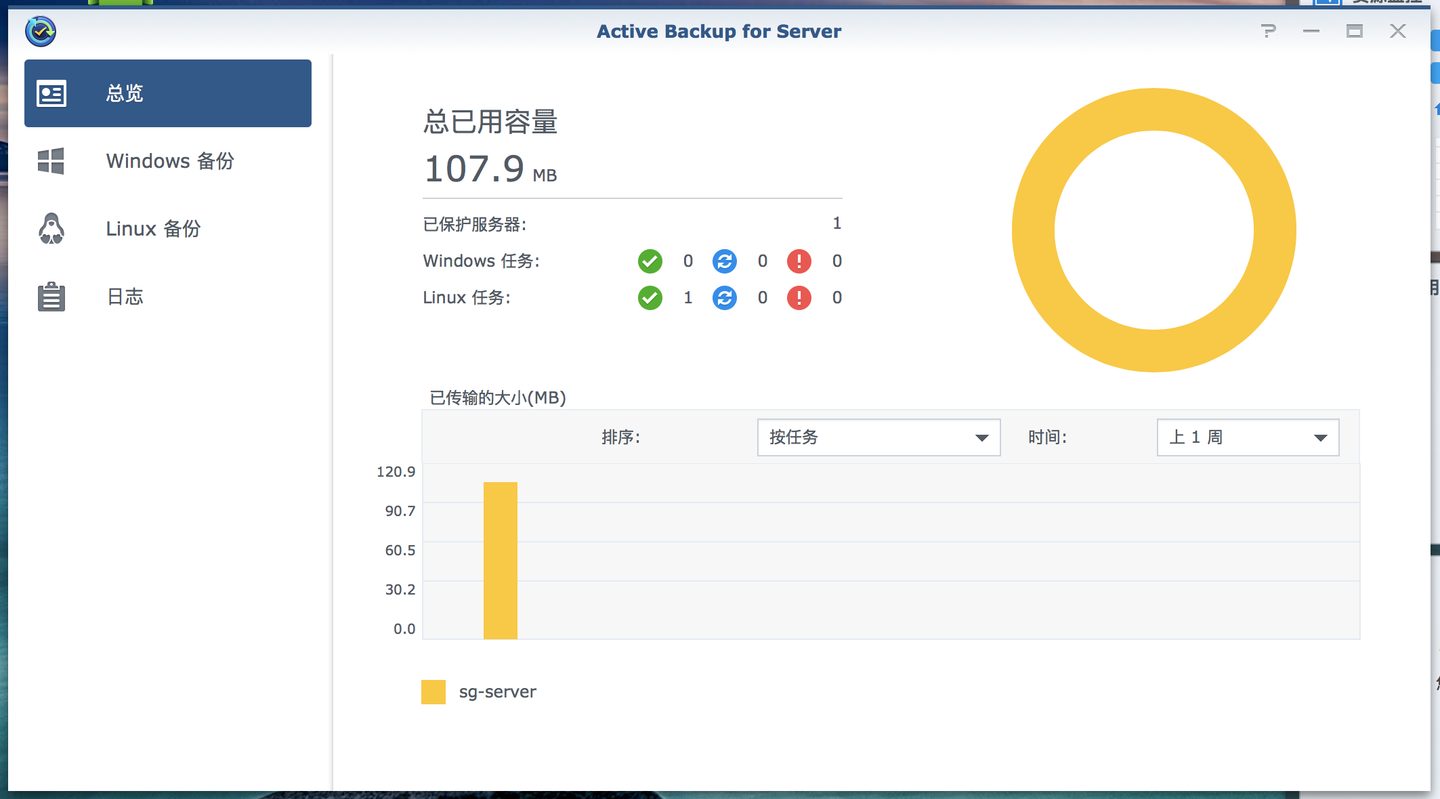
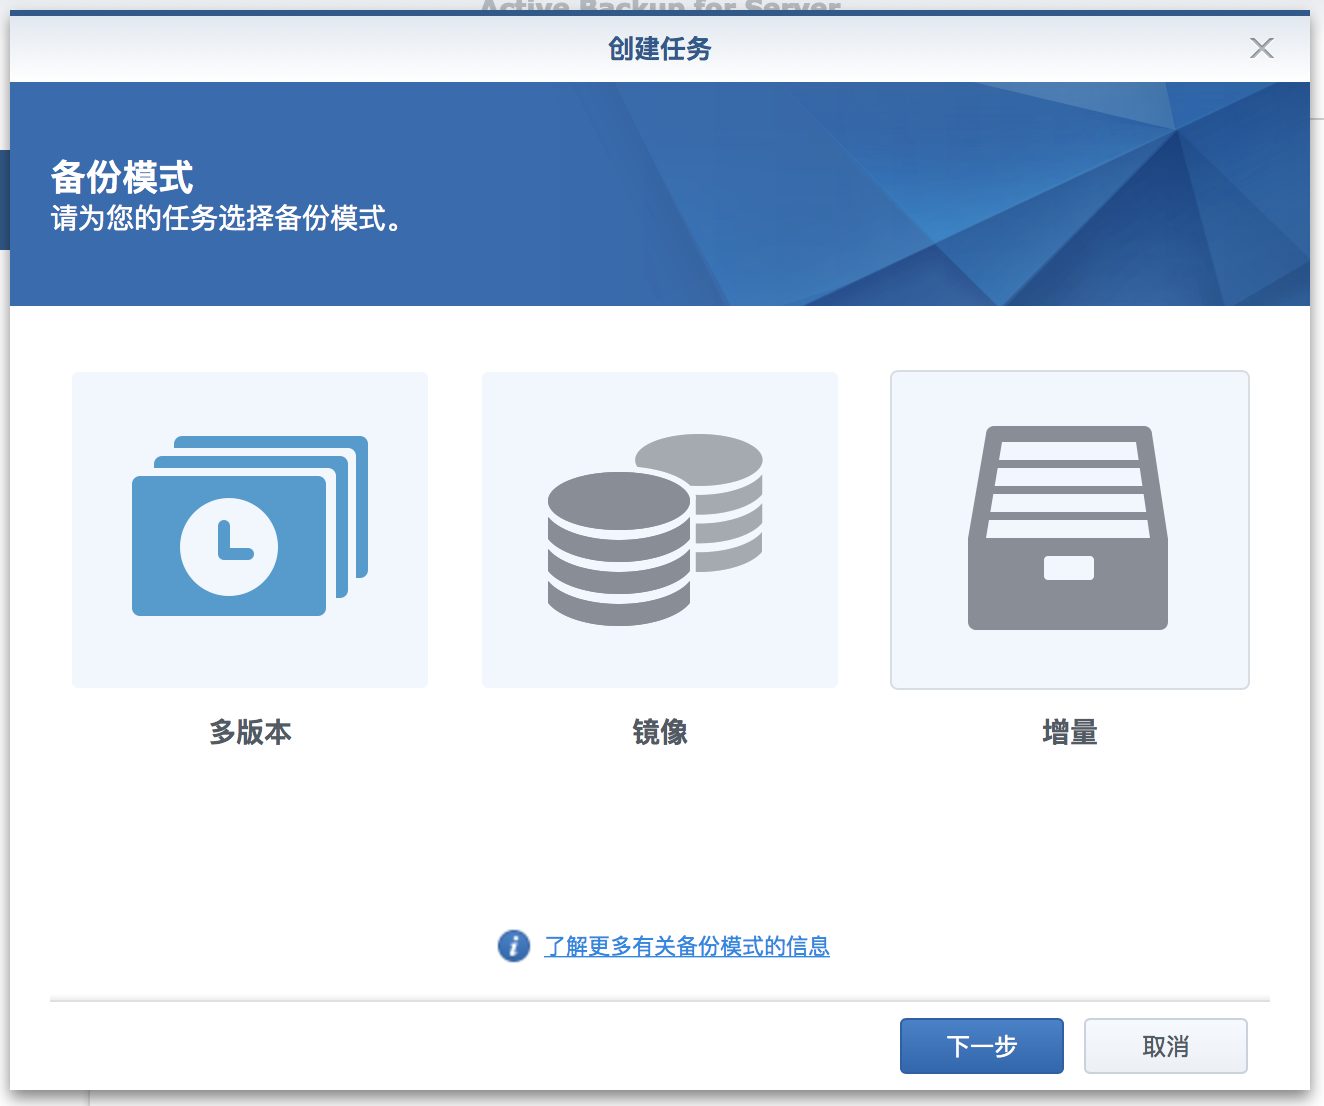
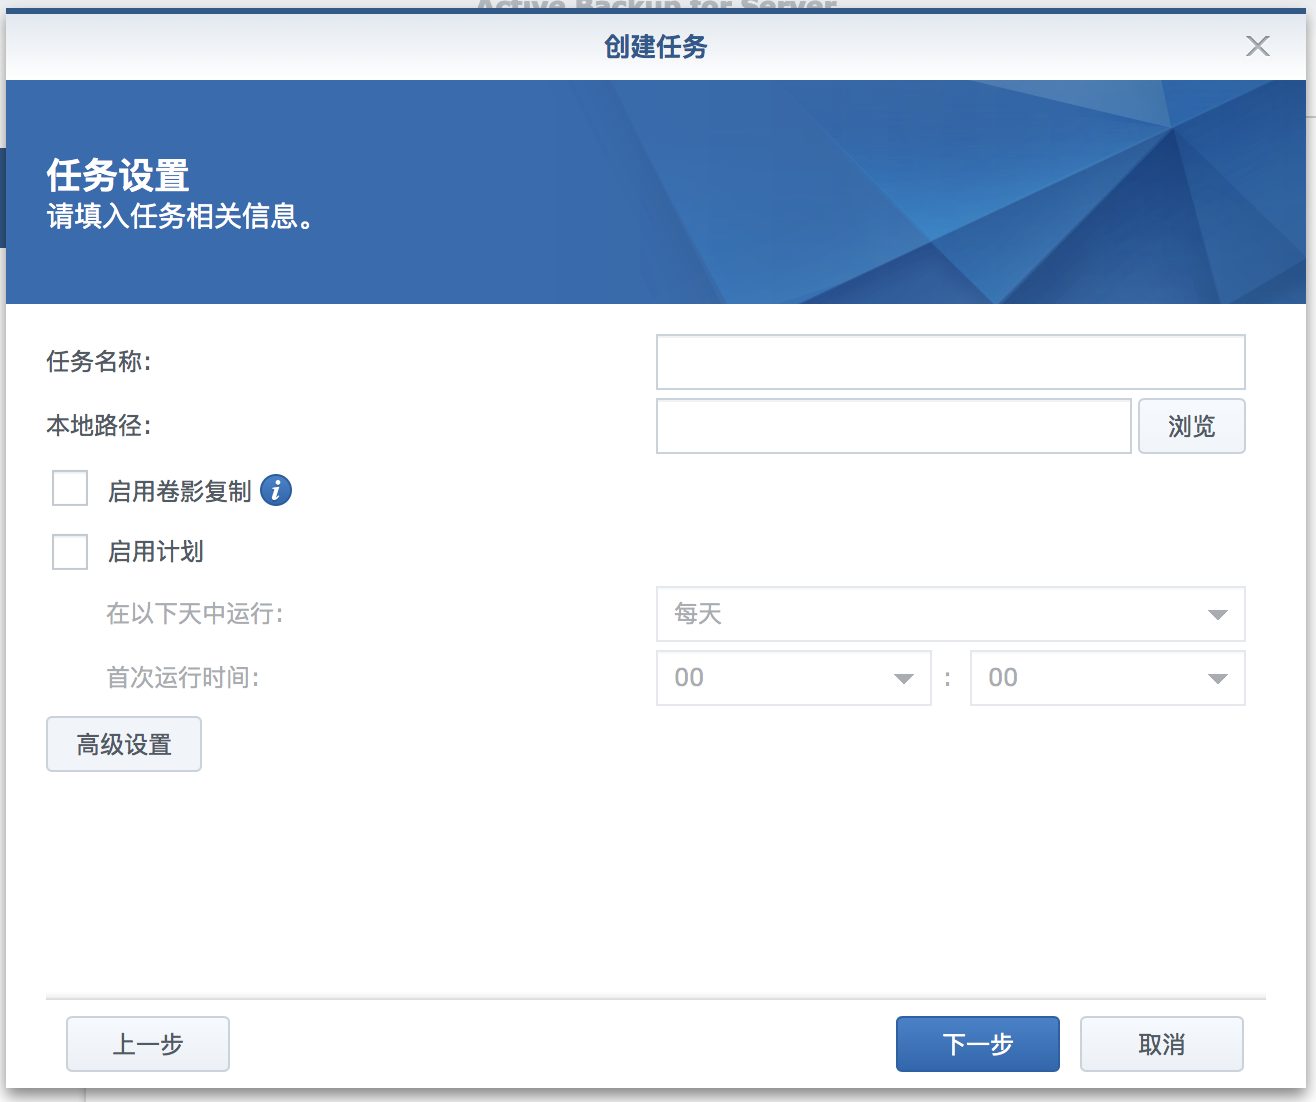
It's also quite simple to use. You don't need to install any software on the Windows or Linux system to perform backups (in fact, on Linux, Synology performs backups via rsync, while on Windows it appears to be SMB). On the tab on the left, select the type you want to back up, then click Create to enter the backup wizard. Each backup can be set to multi-version, mirror, or incremental backup, which is a very practical feature. If the data you want to back up is very important, choosing multi-version is a very safe option. And if your data isn't that important, you can choose incremental backup. That way, as long as there are changes in the source system's backup directory, it will be synced to the NAS incrementally, without needing to re-back up the entire directory.
In addition, you can also add a schedule to the backup task, that is, enable scheduled backups. This is also quite important and practical for the backup feature. Once enabled, as long as your source system can be accessed, DSM will automatically back up at the set times.
Phone Photo Album Backup
Besides computers, there is another important device that needs to be backed up, and that is the mobile phone, which is closely tied to our daily lives. The data on a phone that usually needs to be backed up is the photo album and videos. Of course, besides that, some people may have other files that need to be backed up, such as documents and app data. But for me, these latter two needs are almost nonexistent, so I won't say much about them here.
DSM has two sets of software to help you manage your photos: one is DS Photo, and the other is Moments. DS Photo is more geared toward helping professional photographers manage their own photographic work; you can view photo metadata and perform simple edits in DS Photo. Moments, on the other hand, can be understood as Synology's answer to Google Photos. Its features are very similar to Google Photos. Besides backing up photos, both can also automatically help you categorize photos, with categories such as by face, by scene, by location, and so on. You can also set custom tags to manage your photos. Of course, in terms of features and accuracy, Google Photos still comes out ahead.
Since we are talking about backing up mobile phone photo albums, let's first take a look at how to automatically back up photos on a phone through DS Photo and Moments.
After logging into Moments, the software will guide you to enable the automatic backup feature. You can enable it at this point, or you can skip it first and enable this feature later through the settings menu after entering the app.
Once backup is enabled, it will immediately back up your phone. From then on, whenever you take new photos, the Moments software will quietly upload them automatically in the background, without you needing to manually open the software yourself. Of course, due to the limitations of the iOS system, I have found that Moments automatic backup has a certain delay, meaning that photos taken on the same day will not be uploaded immediately after being taken, even under Wi-Fi network conditions. The timing of this upload is a bit hard to figure out, but what is certain is that it does back up automatically, just with a certain delay. Apart from the iCloud backup built into the iOS system, other apps all have this problem. The Android system should not have this problem.
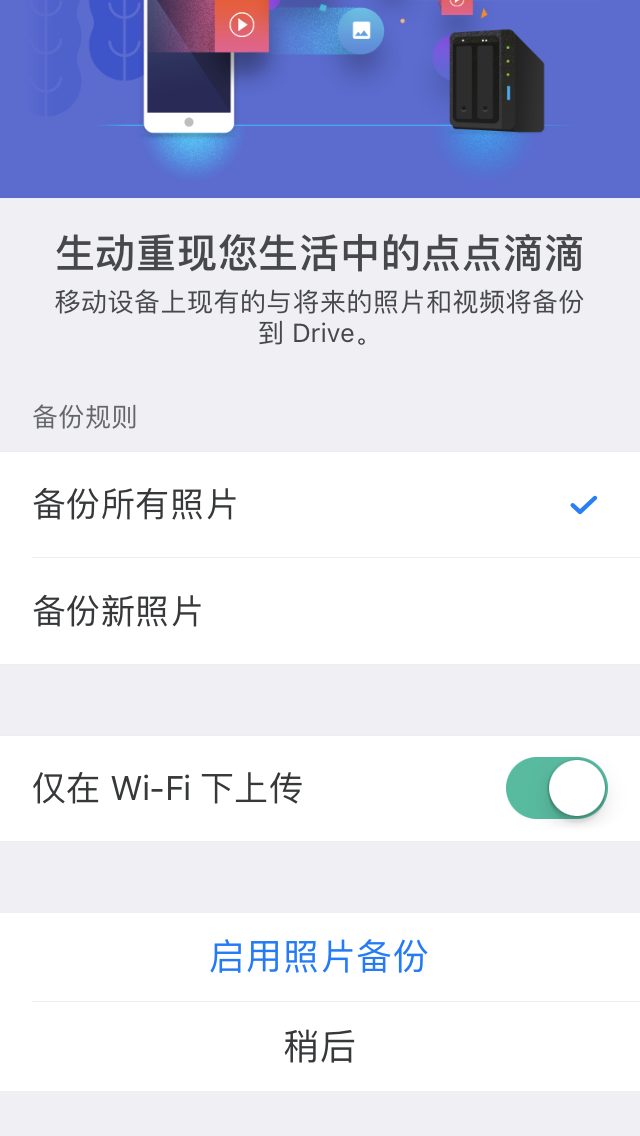
Opening the Moments app for the first time will guide you through enabling backup
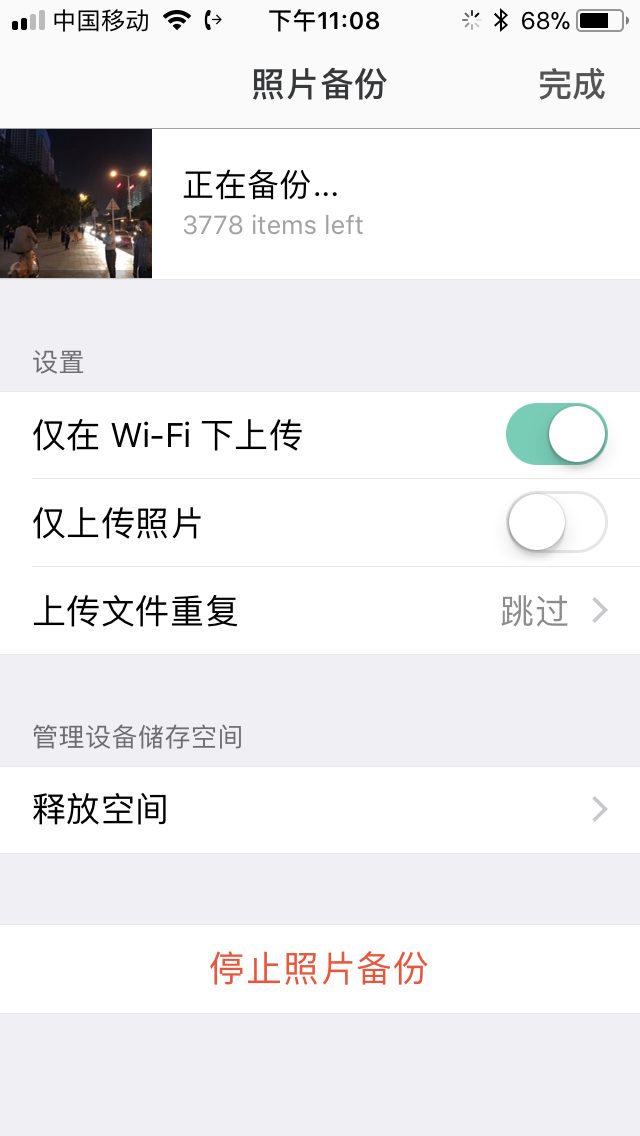
During backup
After backing up your photos on your phone, you can see all the backed-up images in the app and on the web. The web UI is somewhat similar to Google Photos, with a timeline on the right and photos displayed in a waterfall layout. This display method is also the mainstream way image websites present content today. Clicking on a photo lets you view it in full size and browse some basic metadata, but there is no photo editing feature.
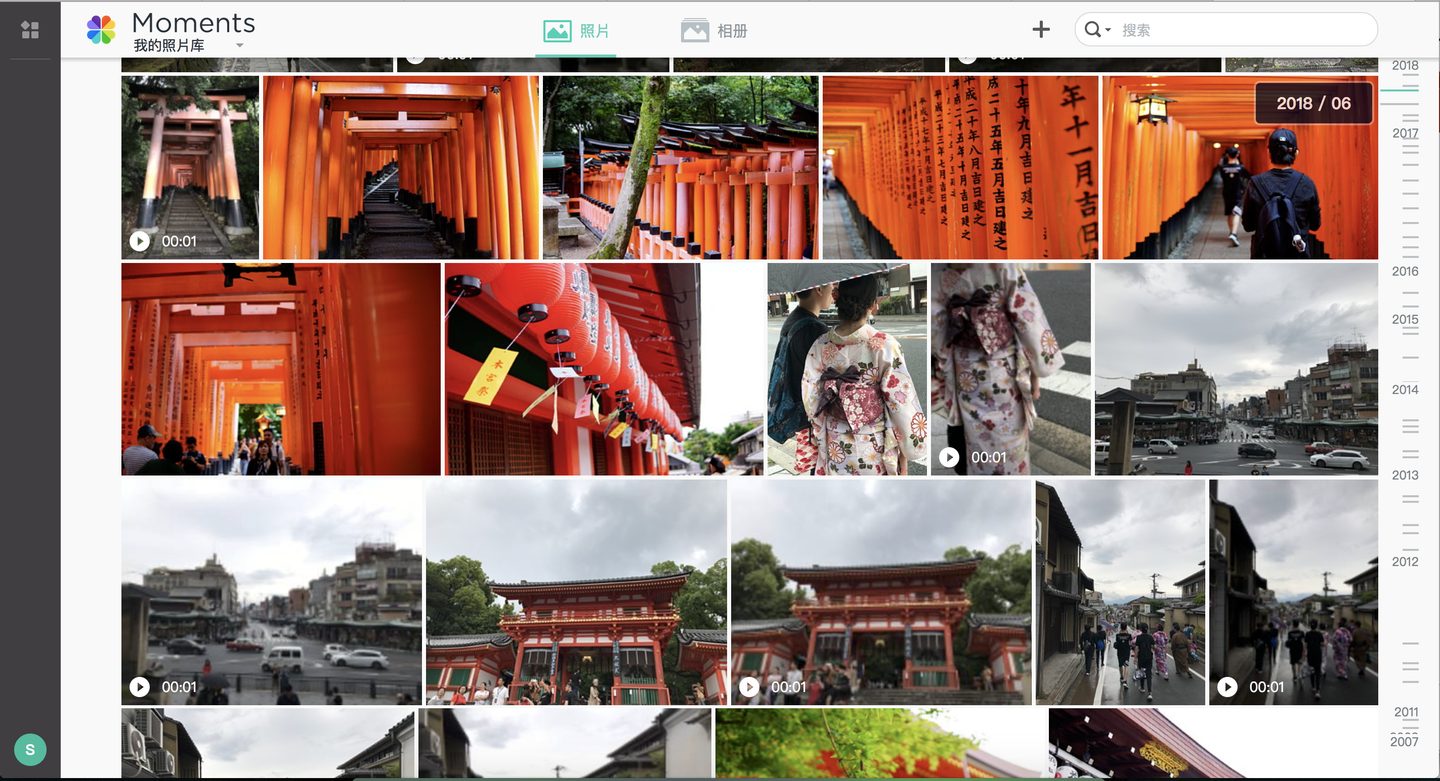

Switch the tab at the top of the page to Albums, and you will see the albums that Moments has automatically categorized and analyzed for you. You can see that it automatically recognizes faces, themes, and locations for you. The accuracy of Moments' automatic recognition is only so-so, but it is at a usable level, so for me Moments still has some use. In addition, the tag feature also lets you manually manage your photos and categorize them by tags.
The backup process for DS Photo is similar to that of Moments. After logging in to DS Photo, you can enable the photo backup feature in the settings menu. The settings options are almost identical to those in Moments, and once configured, automatic backup will begin.
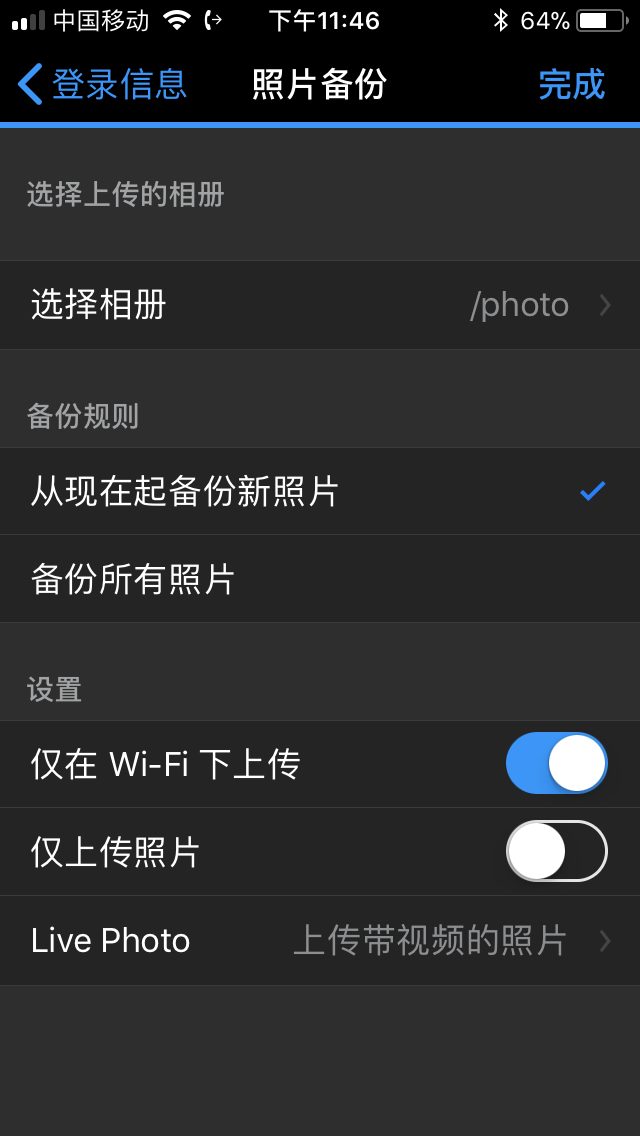
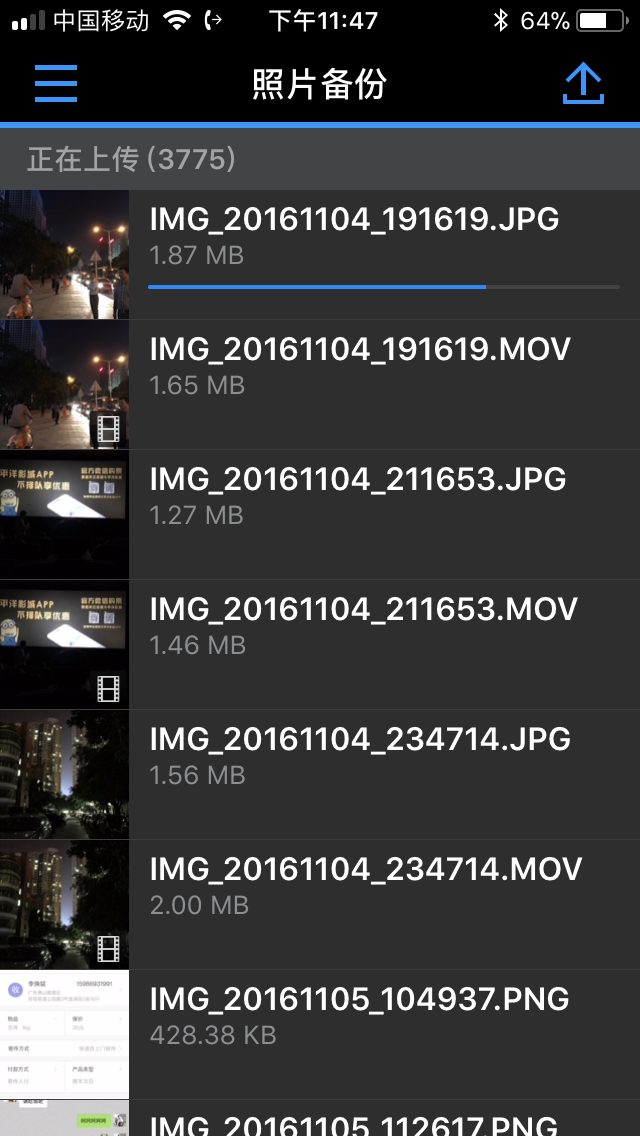
Similarly, after the images have been uploaded, you can also browse the photos in the app and on the web. Whereas Moments organizes photos by faces, scenes, locations, and tags, DS Photo organizes photos by folders. I put the photos I took with my mirrorless camera onto DS Photo, and this is how they are displayed:
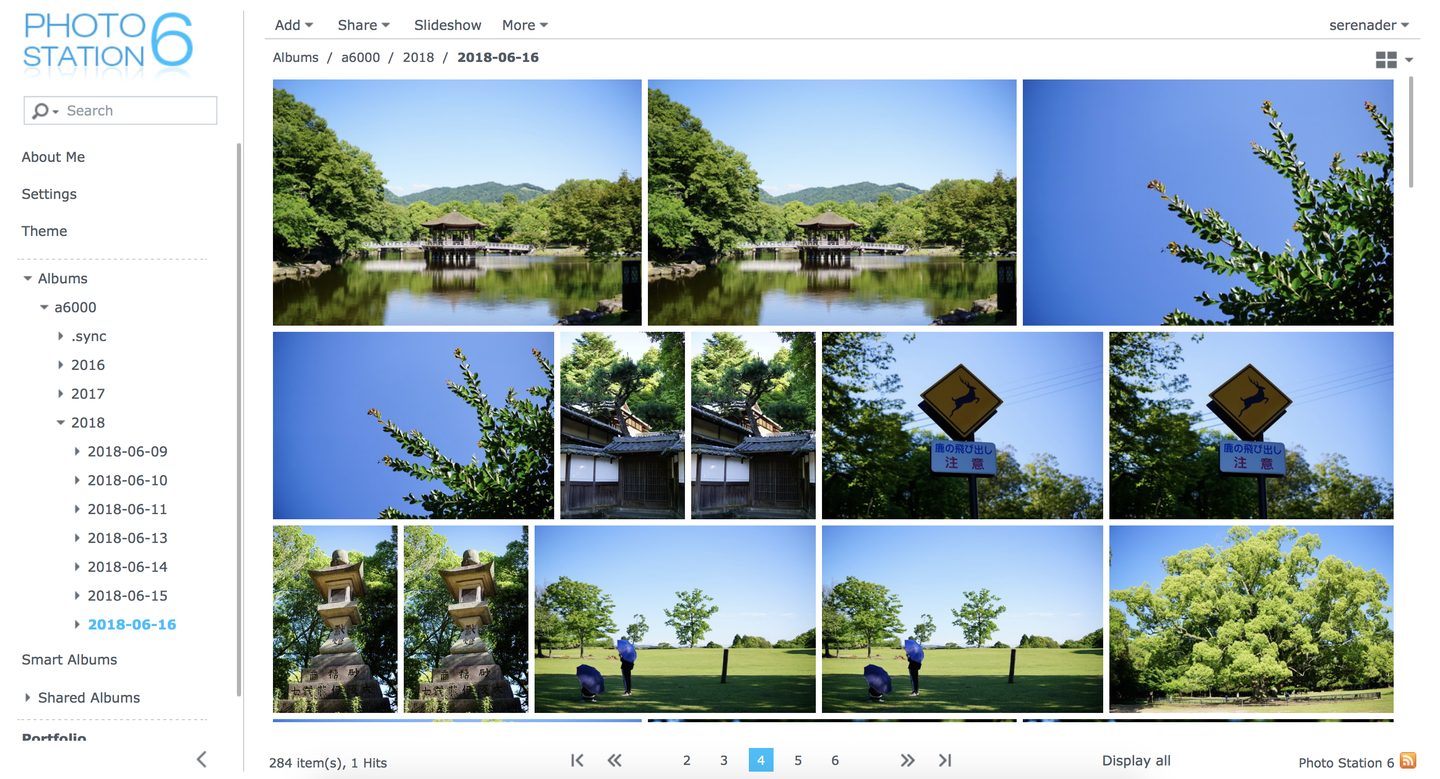
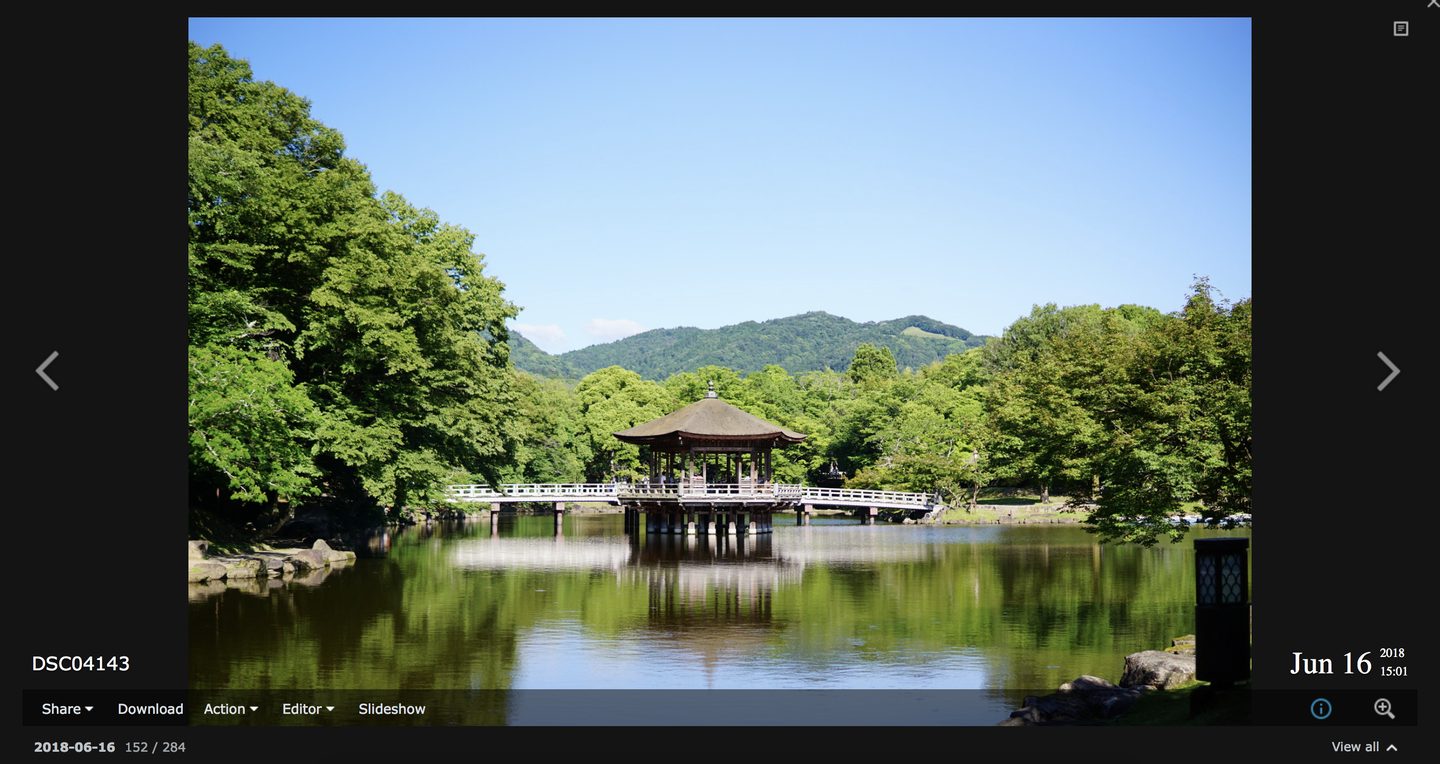
Click on an image to enter image preview mode. Compared with Moments, the image preview feature of the DS Photo web version is much more powerful. Not only can you view a large image (yes, the Moments web version cannot display large images..), you can also edit (although I have never been able to edit in my setup..) and share.
As mentioned earlier, many of Moments' features are actually benchmarked against Google Photos, but compared to Google Photos, the features of Moments or DS Photo are still not quite as complete. The most powerful photo management tool is still Google Photos, and it allows unlimited uploads of high-quality images. The ideal solution is to use Google Photos as the ultimate fallback for photo management. After all, Google requires special means to access. However, DSM does not have a relatively direct way to back up photos to Google Photos, and if you install the Google Photos client on your phone to back up, you will run into another problem: to back up to Google Photos, your phone needs to be able to connect to Google. This is quite troublesome in China, so it is not a good solution. Fortunately, the DSM system supports virtual machines, so you can use a virtual machine to run Windows and thereby achieve the roundabout goal of backing up photos to Google Photos. The specific method will be covered in the virtual machine chapter later.
Cloud Sync Backup
The backups mentioned earlier all involve backing up data from various devices to the NAS. But a NAS is just an ordinary machine; it also uses hard drives to store data, and hard drives can fail. If a hard drive fails, then all the data stored on it is gone, and the loss would be very severe. Fortunately, the data stored on the NAS can be further backed up, that is, backed up to the cloud.
Cloud Sync, as the name suggests, is a package for backing up data to the cloud, or backing up data from the cloud to the NAS. Paired with cloud drives like Baidu Cloud, it can enable off-site backup.
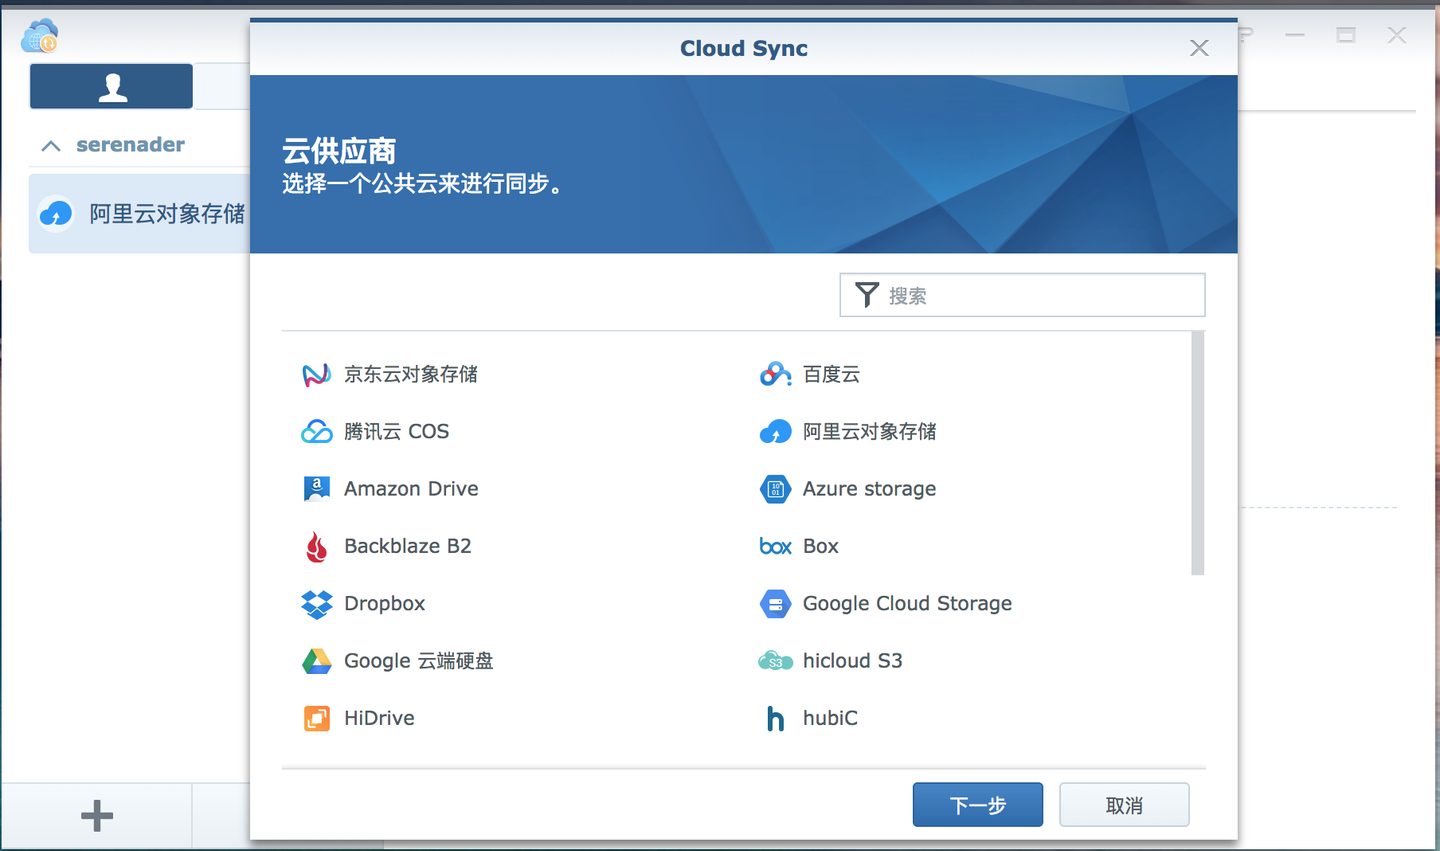
After opening the Cloud Sync package, click Add Sync and you will see the list of cloud providers below. The vast majority of cloud storage services or cloud services on the market can be found in this list. For example, the ones we commonly use, such as Baidu Cloud, Alibaba Cloud OSS, One Drive, Google Drive, and so on. If you do not use a public cloud and choose to set up your own storage service, then Cloud Sync also supports WebDav, as well as custom S3 object storage.
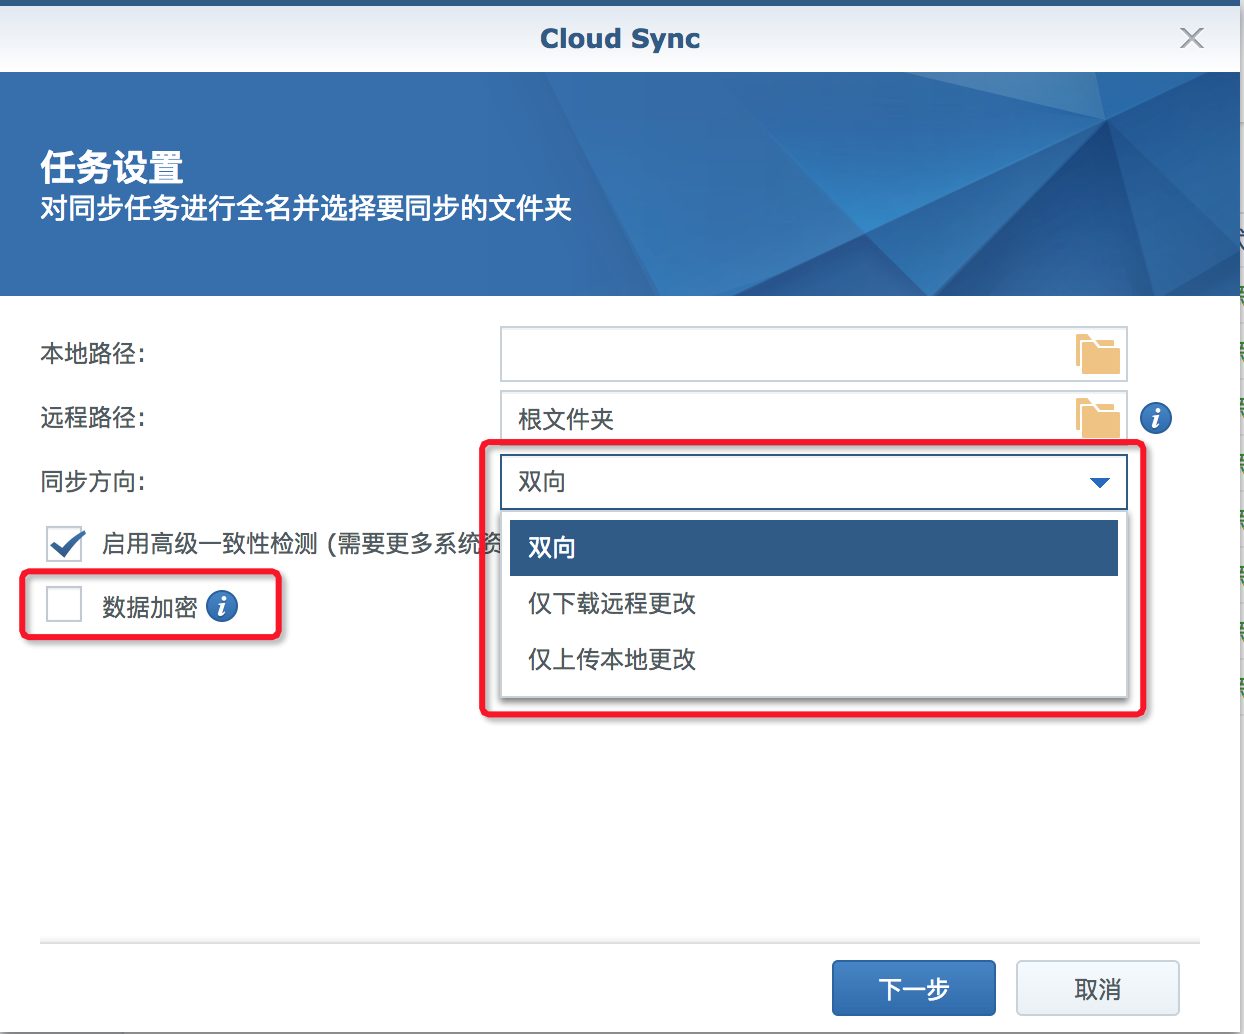
When creating a sync task, you can choose the sync direction. You can choose "Bidirectional," which means that whether changes are made on the local NAS or on the remote cloud storage, they will be synced to both sides, and in the end the files on both sides will be consistent. "Download remote changes only" means that if files are added or deleted on the remote cloud storage, they will be synced to the local side, while local additions and deletions will not be synced to the cloud storage. "Upload local changes only" is the opposite.
At the same time, when creating a task, you can check data encryption, which means that data is encrypted first before being uploaded to the cloud storage, and then stored on the cloud storage. If you want to read the contents of files on the cloud storage, you need to decrypt them through Synology's dedicated decryption software; otherwise, you cannot read the actual contents. At the same time, the source files stored on the NAS remain unencrypted, so locally you can still view your files without decryption, while the files on the cloud storage need to be decrypted separately.
After the task is created, you can also specify an execution schedule for the task, for example, setting it to automatically upload files to the cloud storage every night.
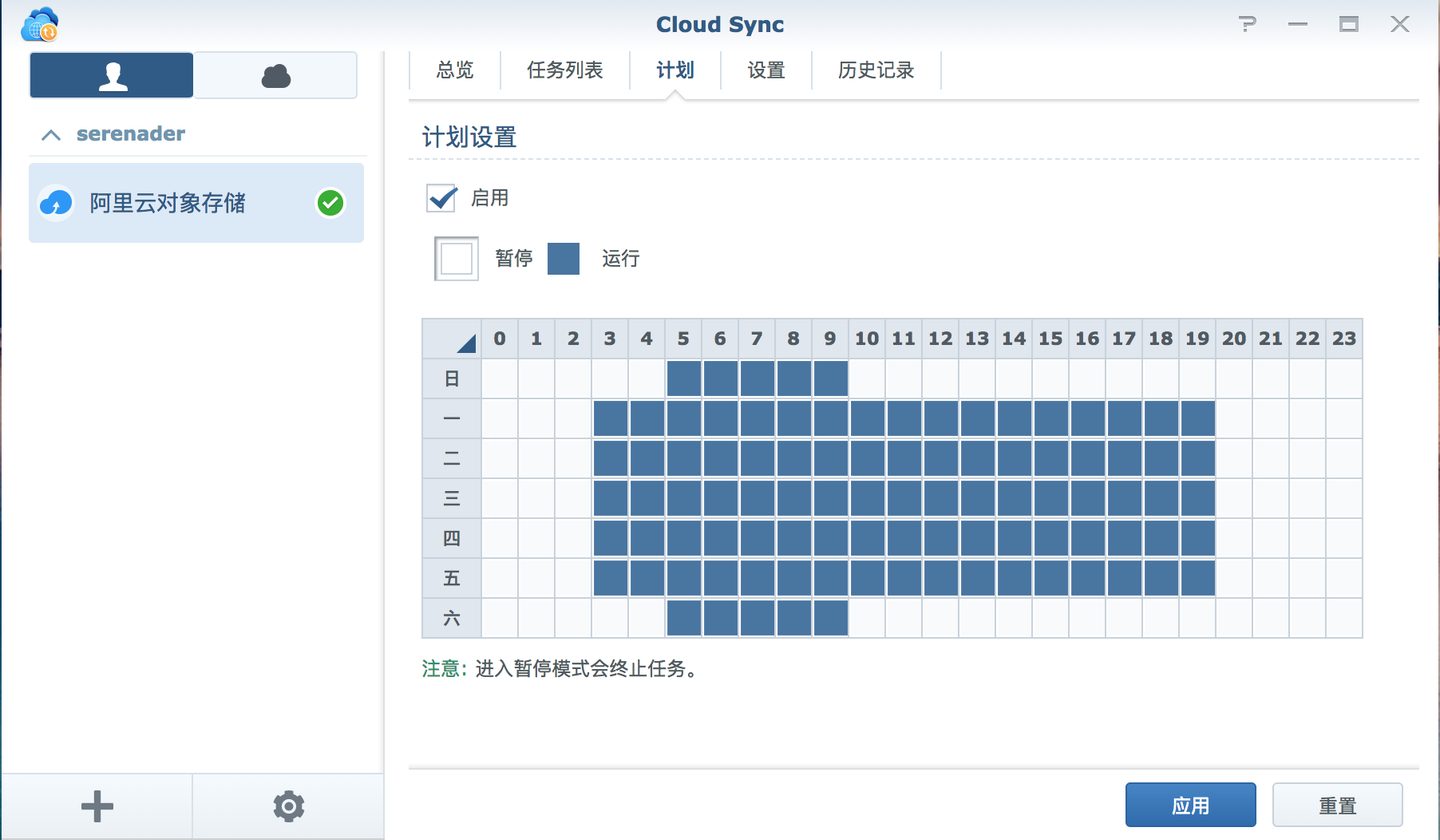
A relatively common use case is to regularly back up private data on the NAS, such as photos, to the cloud storage on a schedule, and automatically encrypt it. The advantage of this is that the private data is not only stored in the NAS, but also has an encrypted cold backup stored on a remote server. If your NAS hard drive is accidentally damaged, you can still download your data back from the cloud storage. And even if the data stored on the cloud storage is leaked, the other party cannot do anything if they do not know your key. It is simply a perfect backup solution.
Of course, in addition to backing up data, you can also use Cloud Sync to sync data on cloud drives. For example, there's a scenario where you occasionally toss some resources onto Baidu Cloud Drive (usually various resources shared by others), and then want these files to be automatically downloaded to your NAS. For Cloud Sync, this kind of need is a piece of cake. As long as you set up the sync folder and enable a schedule, the NAS will obediently and silently download the files for you.
Summary
Actually, in addition to the backup software mentioned above, DSM also provides other backup software, which can be found in the Package Center. What I listed above are just some packages that I commonly use and that have given me a pretty good experience.
For something like backup, the most critical thing is actually the stability of the service. If a backup service requires you to tinker with it every other day, then that service can be said to be quite useless. Because the user's main demand is for it to run stably over the long term, and for it to be imperceptible to the user.
Based on my own experience, among the packages above, aside from macOS's Time Machine backup, the others are all quite stable. Time Machine backup behaves very strangely; after running for a while, it sometimes becomes unable to back up. Usually when this happens, the only solution is to delete the entire Time Machine backup directory on the NAS and then perform the backup again. The downside of this is that you lose your previous backup records. However, when Time Machine cannot back up, you can still use Time Machine to access previously backed-up files, so even if the worst-case scenario happens, you still have a remedy: use Time Machine to access the previous backup files, download the files that need to be backed up again, and finally delete all the original backups and perform a complete backup again.
One explanation for this situation is that Time Machine itself is only designed to back up to an external drive, not over the network. So it's possible that this is caused by a compatibility issue with Time Machine itself. Regardless, those using this service should be aware of this point: you cannot rely on this service one hundred percent.
Another point I want to mention is that, for now, backup for iOS devices is still quite limited. You can only back up photos and videos; you cannot back up other files, such as music files stored in NetEase Cloud Music, as well as app data for phone software. Of course, this is due to the limitations of iOS itself, not because Synology DSM doesn't develop such a feature. Backing up app data on iOS still requires using iCloud. It can be said that the most reliable backup method for iOS devices is still iCloud. This is a rather regrettable point for NAS. If NAS could fully back up all the data on an entire phone, its practicality would be greatly increased.
But regardless, DSM's backup features are still quite useful for me. At least they save me from worrying about data loss, and with multiple backups, I don't need to worry about backup data corruption. Considering this point, spending so much money on such a service is still worth it. What do you think?